Guide to the web platform
Watch step-by-step guides and learn how to use VKube services efficiently.
📺 Visit VKube YouTube Channel
- Guide to the web platform
How to purchase a service on VKube
Signup/login VKube
Visit https://vkube.vcloud.systems (opens new window) to sign up as a first-time user. Accounts are IP-based, which means that new users will only need to set up a password and save the back-up seed phase displayed during registration.


Available services
As shown in the figure below, click on "Purchase", you can see all available services and place an order. Click order button to go to purchase configuration.

Create your order
As shown in the figure below, you can choose your configuration in this page. Click Create Order button to create an order, or click Add to Cart button to add an order to shopping cart.

As shown in the figure below, users can check shopping list in shopping cart icon in the upper right corner.

Complete the payment
Click on "My Orders" to complete the payment of your service and start deploying your container. Click on Pay button it will appear a payment dialogue, you can click the "Pay" button to complete the payment.

Payment dialogue
Review the order details and select the token you want to pay with (VSYS or USDV). And you also can use the third party payment.

Review your purchased services
Click on "My Services" on the left sidebar to view the services you have purchased. If you need to Refund or Renew the Service, please click on the corresponding buttons. Clicking on Token button can copy the token.

How to use VKube services
VKube Dashboard
There are two tokens. Both of them can be used to add service in "Container" page. The first one, under the "My Services" page, click on Token button to copy the service token. The second one, under the "Access Token" page, copy the access token. If you don't know how to copy token, please go back to the previous two step. After copying the token successfully, then go to the "Container" page to click on Import button and paste the token. Finally, click on Confirm button and you will see the service detail. As shown in the figure below.
Please note that each service token corresponds to a container, and it is stored in the local cache. The service token will be erased once you empty the browser cache.
Adding or deleting service token won’t affect your service info or status.

Containers

As you can see, there are three areas in above picture.
First Area:
On the left, "Service ID" is used to search the service. "Container Status" is used as a condition to select matched services. On the right, Refresh is to refresh the web page. Manage has two function.ImageHub is used to record the private ImageHub credentials information. Synchronize is used to synchronize the pods from the remote server.
Import Service: To import a service into the Containers page, you can follow one of two methods:Manual Import with Token: Go to the My Services page, copy the service token of the service you wish to import, and then paste it into the import field on the Containers page. Click "Confirm" to complete the import. Bulk Import: Alternatively, on the My Services page, select the services you want to import and click "Import Services" to import them in bulk. These methods allow you to easily import your services into the Containers page for further use.
ImageHub: Click theImageHubbutton and click the "Save Account", it will appears a pop-up window as the follow picture. Select the different image libraries by the selection box and then fill in your account credentials. It can help you to avoid input the credentials every time you deploy services.

Synchronize: When you use another computer or different browsers to sign up the same account, you can't see the containers data via "Containers" aside. At this time, you can click theSynchronizebutton and then you can see the same data.
Second Area:
This area is a table header. Each column represents a different meaning. "Service ID" refers to the number of the service created. "Label" is the description you label the service when after deploying it. "Container Status" refers to the status of the pod. "Service Status" refers to the status of the service. Under "Actions", you can find the Deploy, Alias, Contact, Policy, Delete buttons:
Deploy: If the container has not been deployed yet, theDeploybutton will be displayed. It will disappear once the container has been deployed.Alias: It you want to update the service access port and alias the service name, you can use this button. Then in the same region, your services can access this service by aliasName:aliasPort.Contact: For a certain service, after binding an email, when any abnormal situations occur with the service, relevant notifications will be sent. Notification message includes the service expired or Restart operation, etc. The binding of an email address can also be done on the user level. If you bind two emails at the same time, the difference between them are as follows. Suppose you have purchased three services, and one of them is bound to email A, while the user level is bound to email B, For the service bound to email A, related notifications will be sent to email A, and for the other two services, notifications will be sent to email B. As shown in the figure below, by clicking on the user's avatar, you can add and bind an email in the Account section.
Policy: The network policy acts as a whitelist , specifying which services can access your service within the same region. You can define rules that allow only particular services or those associated with specific accounts to make requests to your service. After clicking thePolicybutton, the next step is clicking the "Add Rules" button and then fill in the service ID which can access your service in the same region.Delete: Delete the service token in the Local Storage. This will not impact the operation of the remote container. You can import it again by usingImportbutton in area one.
Third Area:
You can click on the arrow on the left side of each row to view the corresponding details. As the follow picture shows:

Service Name: Service name of the Container defined by the container creator.Created Time: Time of order creationExpired Time: Time at which the service expired time. If the expired time is displayed, then the container can’t be used any longer.Service Duration: Total duration of the service.Address: VSYS wallet address used to purchase the service.Recipient: VSYS wallet address of the merchant providing the service (VKube by V Systems)Service Option: Parameters of the container. This information is embedded inside a collapsing menu, accessible by clicking on the arrow icon besides the Service Options.Status: Current service status, including "Pending", "Running", "CrashLoopBackOff" and so on.
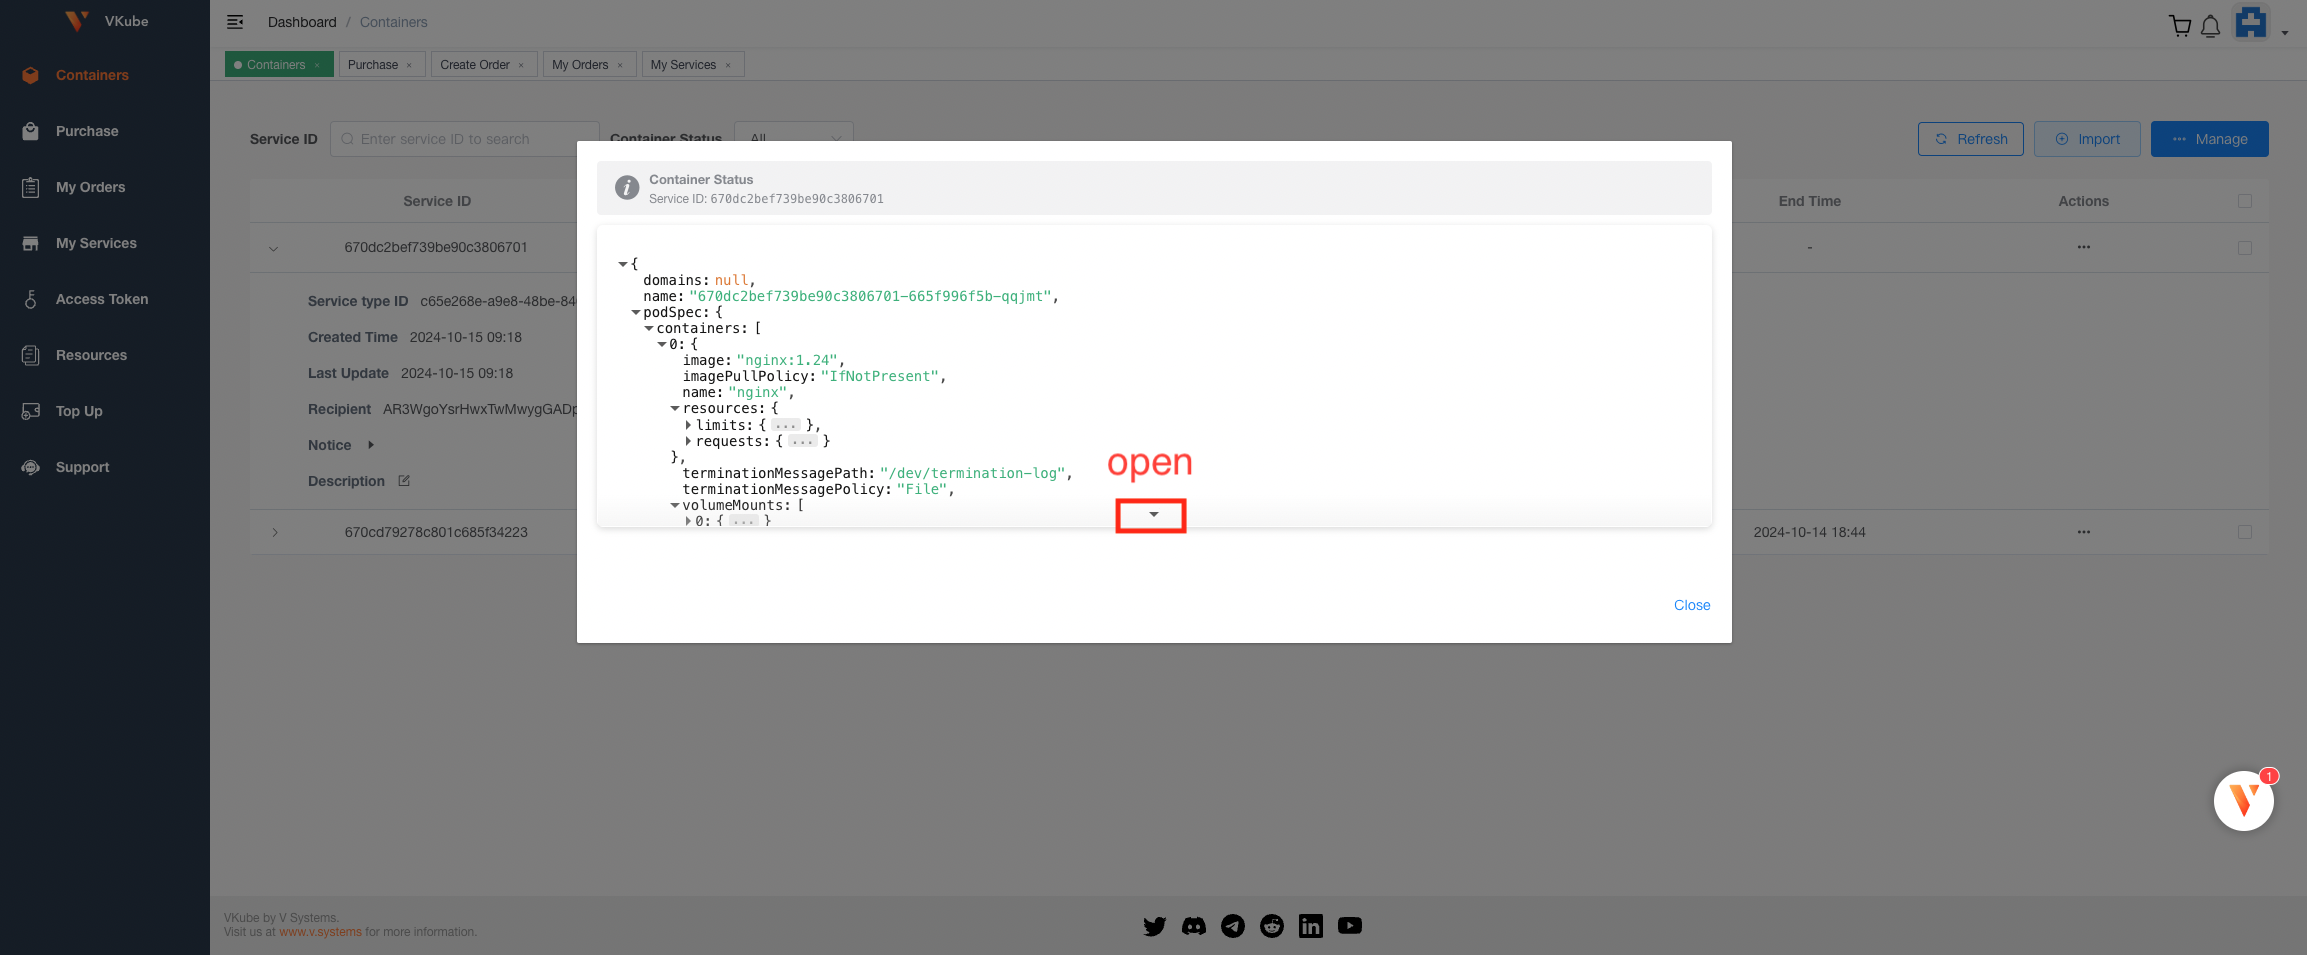
Container status dialog
Display the status and information of all containers, including the past and current container status, configuration info, and current status
You can view the container Service ID in the dialog box. You can slide up, down, left, and right in the lower area to view the status information in json format

Deploy a container
After placing an order, the container status will be "Pending" and the Deploy button will appear.
Start deploying your container,as shown in the figure below:

- First, choose your image which is from Dockerhub or Github
- Second, enter the image information. Currently, the supported images can be from dockerhub and GitHub. It supports public and private images.
Public images: For DockerHub, the recommended format is name:tag (e.g. nginx:latest). For Github, the recommended format is account name/image name:tag(e.g. john/redis:7.2.1).
Private images: For Dockerhub, the recommended format is account name/private repository:tag. For Github, the recommended format is account name/image name:tag. You also need to fill in the account and password. It is recommended to use a PAT(Personal Access Token) as the password. Before deployment, the corresponding image will be queried at the repository address, so you must ensure that the image with the corresponding tag is readable in the image repository. As shown in the figure below, the system will check image is existed or not.

3.Third, click the Deploy button to deploy. Containers names must adhere to certain rules; they can include letters (a-z, A-Z), numbers (0-9), and hyphens (-), but can not start or end with a hyphen. The system will review each input before submitting the deployment request. Don't worry,the system will validate your input, as shown in the figure above.
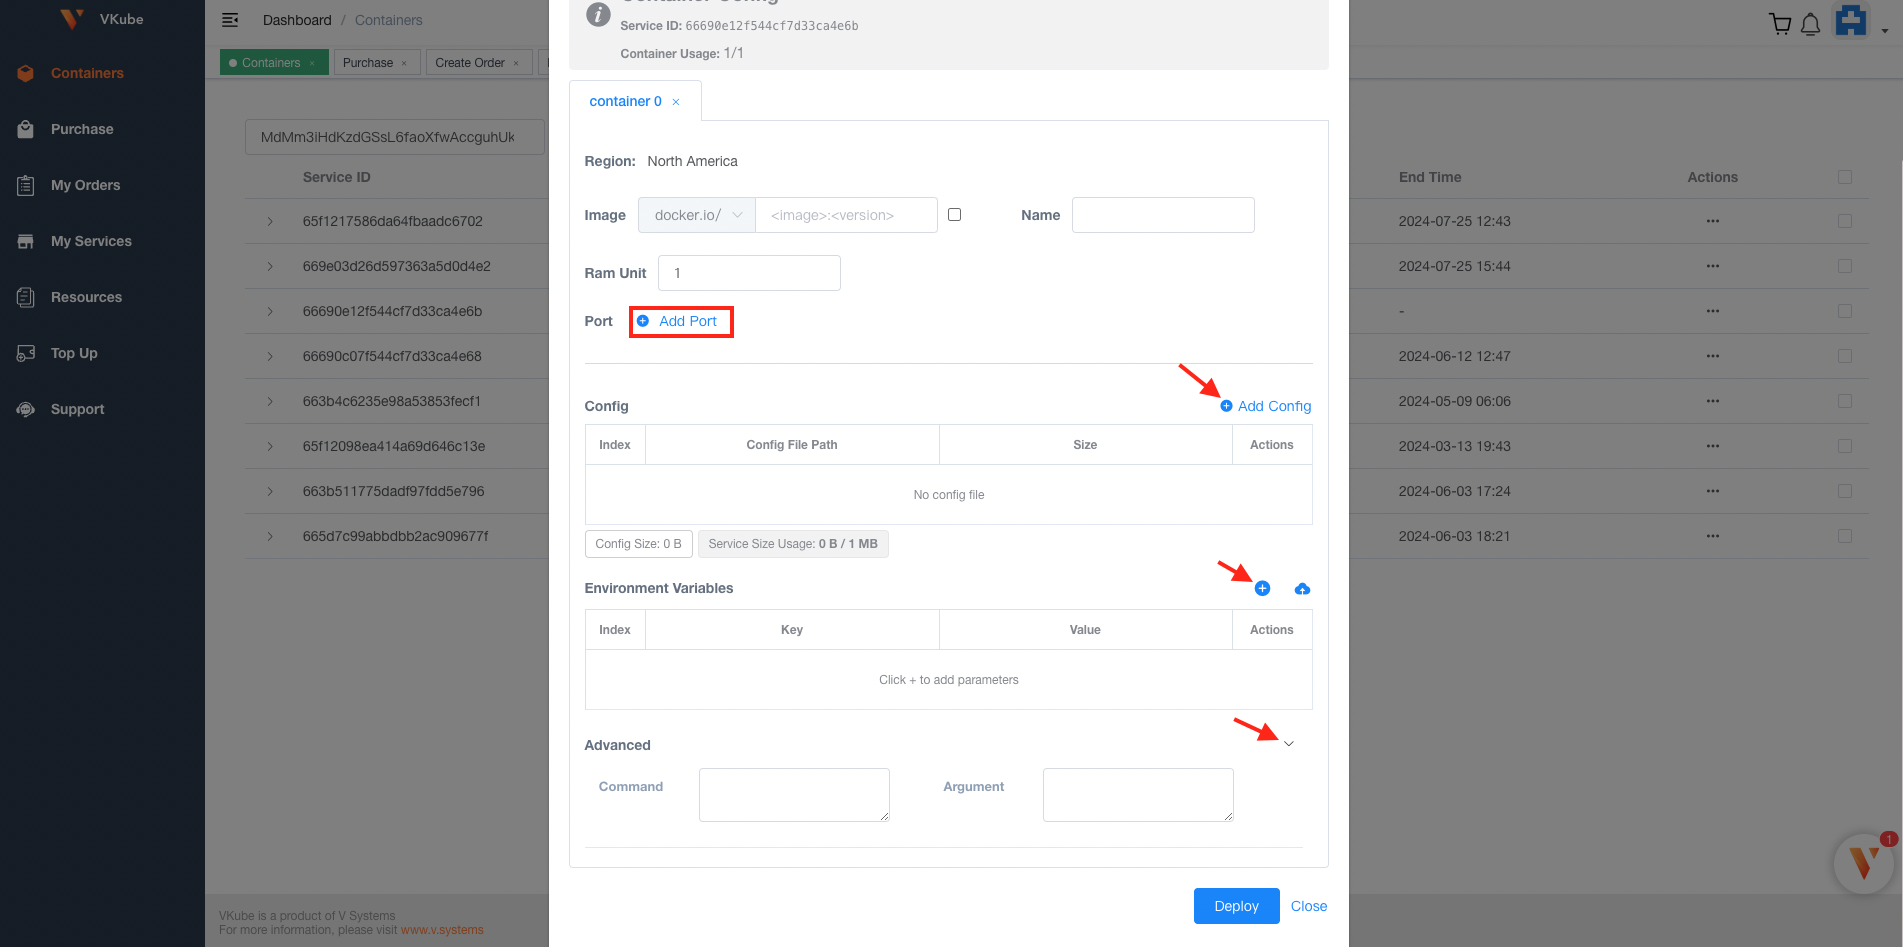
Options:
- Add
Portresource:- If you finish the configuration, port mapping between the host and the user’s container will be completed, allowing the user’s service to be accessed on the Internet via HostIP:hostPort.
- Click the “+Port” button to add container port and host port (which must be mapped one-to-one). The text below, 1 host port available, indicates the number of host ports that can still be added. The number of ports is determined by the Number Of Port setting in the Service Option. Users can use ports equal to or fewer than the specified Number Of Port. The system will check the availability of host port resources in the region, and if the entered port is occupied, users can input a new host port.
- Add
Configuration fileresource- The container service reads external configuration files, avoiding the need to rebuild the image when configuration changes are required, if the configuration file was included in the image.
- Click the
Add Configbutton. In the configuration file edit popup, you need to fill in the configuration file name (including the absolute file path) under Config Path and the content under Config Content. Clicking the Confirm button will save the configuration file content to the path specified in the user’s container.
- Add
Environment Variableresource- The
VKUBEenvironment variable works the same as Linux environment variables, allowing you to set environment variables for the container at runtime. - Click the Environment Variables button to add environment variables for the container deployment: name and value.
- The
AdvanceCommand: The concept is the same as the Command in Docker containers, allowing you to set commands to be executed when the container starts.Argument: The concept is the same as Arguments in Docker containers, allowing you to set parameters to be executed when the container starts.
Once the container is successfully deployed, you will be able to perform the following functions: Restart, Stop, Config, Redeploy, Domain, Contact, Delete
Deploy an application from the App Catalog
To simplify the deployment process and support non-expert users, V-Cloud provides an App Catalog that includes preconfigured templates for popular applications.
You can browse these app images and their corresponding deployment configurations directly on the App Catalog page.

Click on any application card to view detailed information, including supported image tags, storage requirements, and environment variables.

App Deployment
Click Deploy on the desired app in the App Catalog to open the app details page.
Choose a deployment mode:
- Automatic Deployment: Purchase a new service and deploy the app automatically.
- Manual Deployment: Deploy the app to an existing container service.
For Automatic Deployment, complete the service configuration and payment process. After payment, the service will be created and deployed automatically.
Go to the My Services page to view the newly purchased service, which is already running with the selected application.
For Manual Deployment, follow the on-screen steps to select a target container service and complete the deployment.
Deploy from the Container Panel
Alternatively, you can also deploy directly from the Deploy Panel within a container:
- Open the App Catalog tab.
- Choose the desired app configuration.
- Apply the selected configuration to your current container by clicking Use this configuration.
- Then click Deploy to start the deployment.
Once deployed, open the container details to view the configuration and confirm the app has been successfully deployed.
💡 Tip:
If a selected image requires persistent storage, please ensure the target pod supports persistent volumes before deployment.
You can watch the full video demonstration of the App Catalog feature on YouTube:
Operating the container
As shown in the figure below, after the deployment is completed, the allowed operations on the container: Restart, Stop, Config, Redeploy, Domain, Contact, Delete. The Notice action area is some error message when the container is abnormal.

Restart
Click the Restart button, the all containers belong this service will stop first, and then start again. After a restart, the previous container’s logs and other data will be deleted. If you want to prevent data from being deleted after a restart, you should use the Persistence feature to persist data at a user-specified path.
Stop
Click the Stop button, the all containers belong this service will be stopped. If you want to start again, you should click the Start button. It should be noted that after the Stop operation, billing does not stop. For example, if you purchase a 2-hour service, it is successfully deployed at 8:00, and expires at 10:00. If you perform the Stop operation at 9:00, and then restart at 9:30, the expiration time will not be extended to 10:30, but remains at 10:00. It means that the "End Time" in the follow picture is unchanged. As shown in the figure below, the "End Time" is unchanged.

Label and Description
To better manage the deployed services, you can add appropriate labels to identify them or include relevant descriptions in the Details panel. Adding labels allows for easy categorization and filtering of services, while descriptions provide additional context to help users understand the purpose or configuration of each service. This enhances the organization and accessibility of your deployed services.
Config
Click the Config operation to modify the content of the container’s configuration files and environment variables.
- Users can select a specific configuration file from a container that they want to modify or view. Configuration files can be edited manually or by uploading a file. Note that the upload operation reads the file to the front end, and the configuration will only take effect after clicking the Confirm button.
- For manual configuration of environment variables, click
+to add a configuration and-to remove one. You can also choose to upload a file, as shown in the image below:


Redeploy
Alternatively, you can choose to redeploy a service. During this process, you have the option to copy or clone the container configuration from another service by using its token. This makes it easier to deploy the service with the same container settings, streamlining the setup process.
Bind Domains
The domain service feature in VKUBE requires users to configure their domain (e.g., A Record) to point to the nodeIP, which is the IP address of the machine hosting the user’s service. After completing this step, you can use VKUBE's domain service feature to proxy your service. Once the setup is completed, you can access your deployed services on VKUBE via your domain on the Internet. The domain binding feature supports two modes: Basic and Advance.
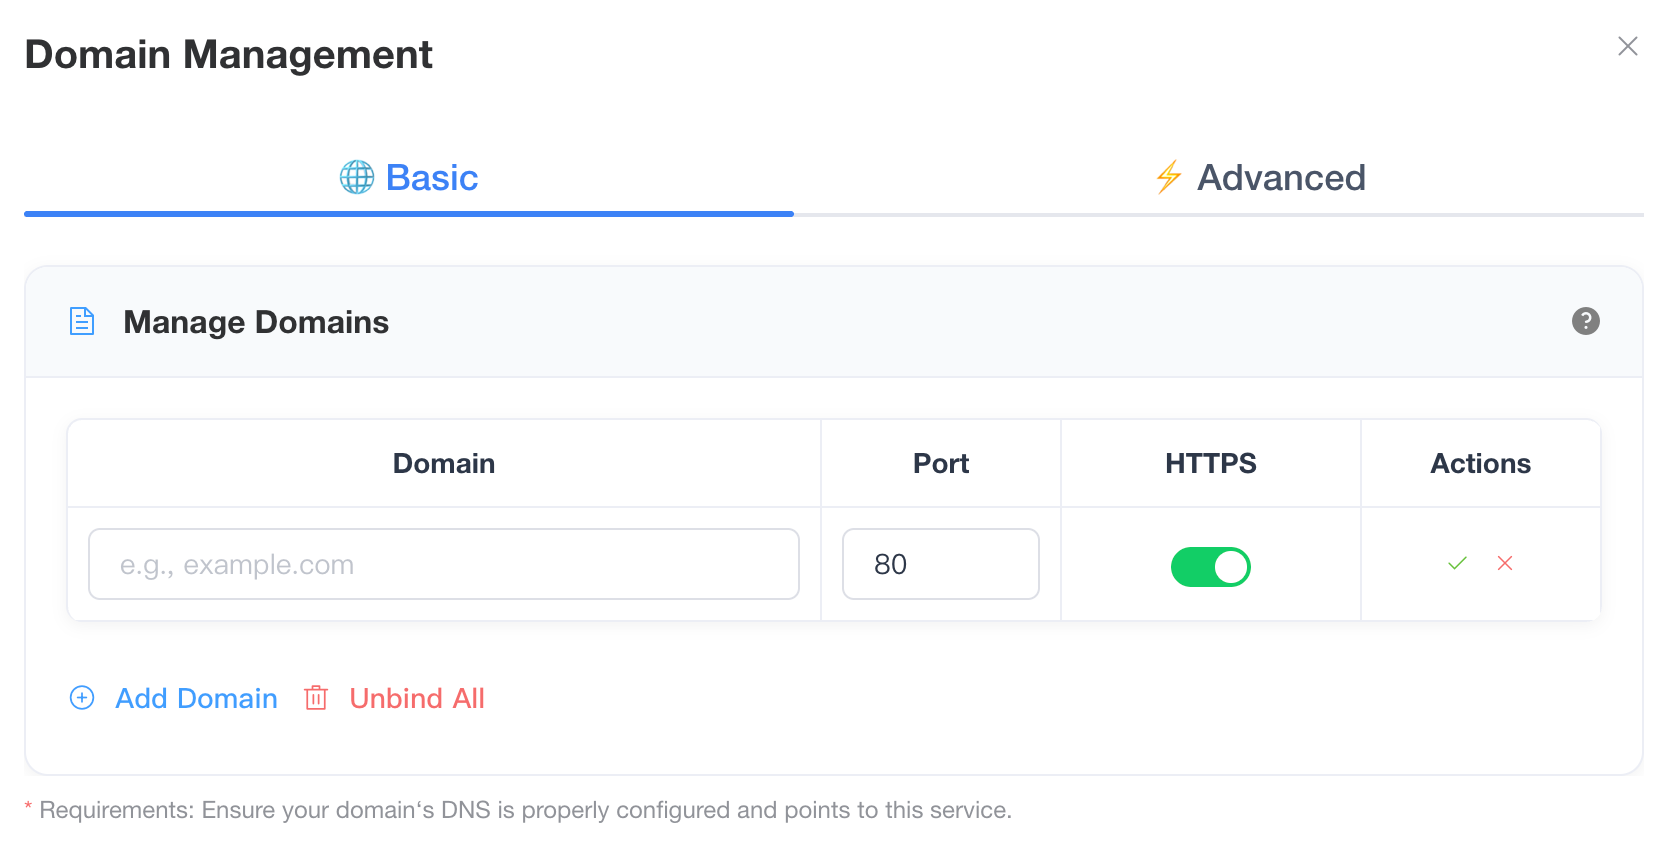
Basic Mode
Supported operations for container domain binding:
- Add (supports binding multiple domains): Create a proxy relationship between the user service and the domain, allowing the domain to access the service deployed on
VKUBEover the Internet. For the same service, as long as multiple domain mappings are configured (e.g., A Record), multiple domains can be bound. - 'Unbind All': Unbind all domains from
VKUBEat once. Note that this only removes the proxy relationship between the user service and the domain inVKUBEand does not affect the user's DNS mapping configuration. - Unbind a single domain
Parameter Explanation:
Domain: The domain to be bound toVKUBE, e.g., www.example.comContainer Port: The port number that the user’s container listens on, e.g., 80HTTPS: Whether to use the free certificate generated byLetsencryptprovided byVKUBE. If selected, the system will automatically apply for and bind the certificate.
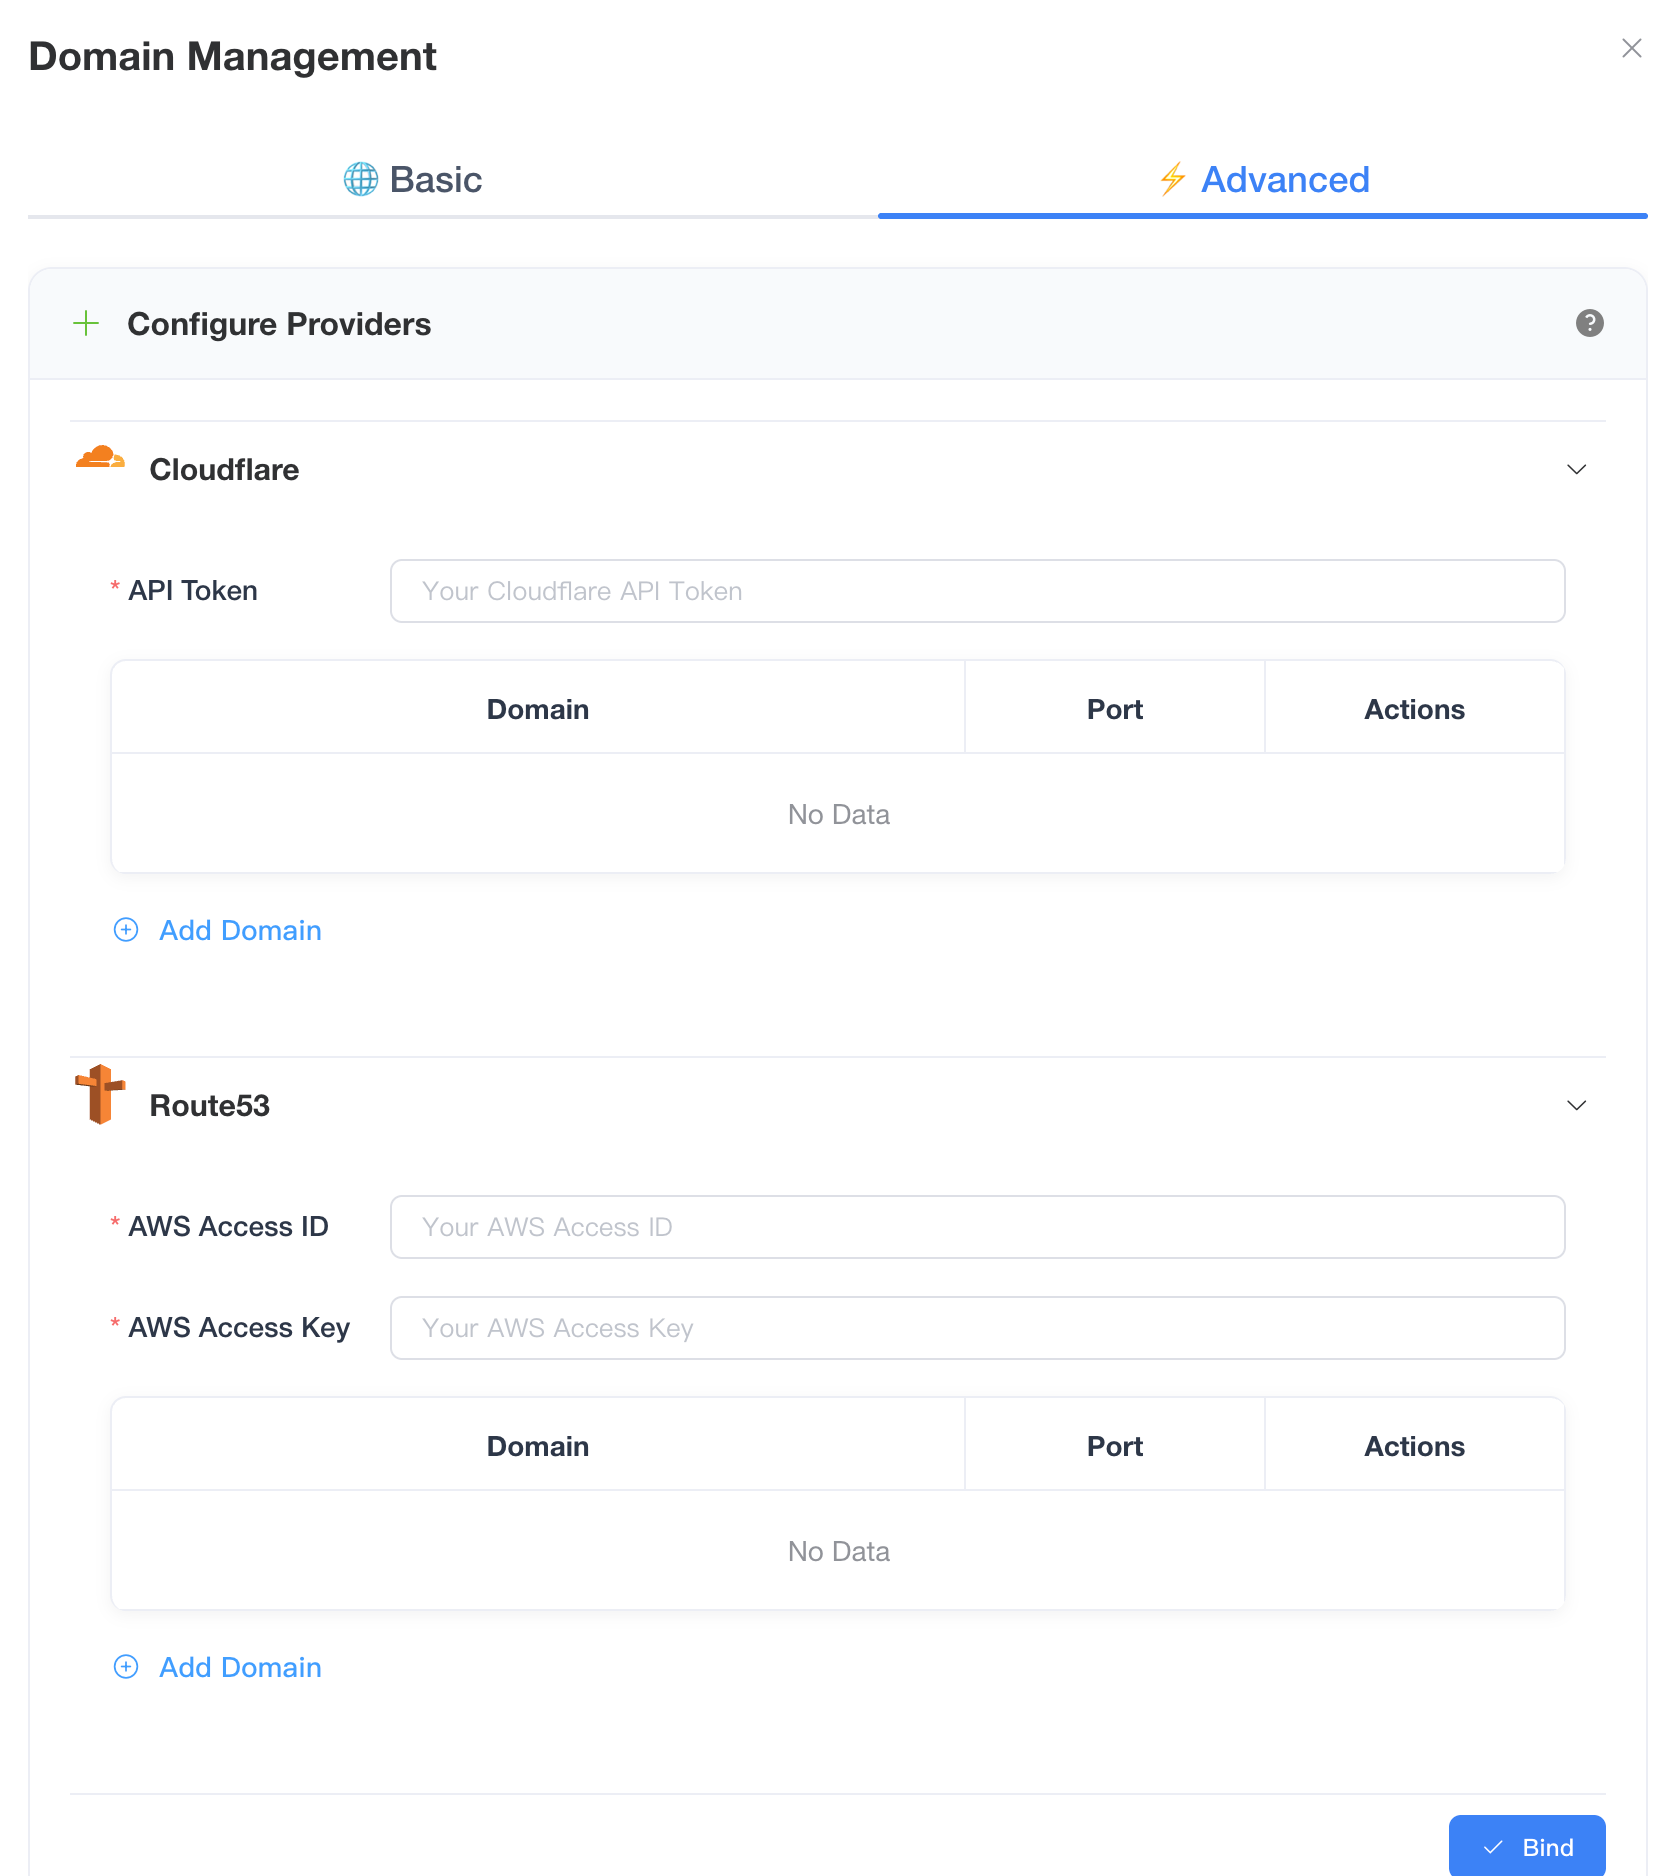
Advance Mode
Currently supported domain management platforms for container domain binding include AWS Route53 and Cloudflare. Users need to provide the corresponding credentials for the domain management platform they use, so that the VKUBE service can verify domain ownership and complete the certificate generation process. In this mode, wildcard domains are allowed. For domains managed under Cloudflare, Proxy DNS mode is supported.
Supported operations:
- Add (supports binding multiple domains): Create a proxy relationship between the user service and the domain, allowing the domain to access the service deployed on
VKUBEover the Internet. For the same service, as long as multiple domain mappings are configured (e.g., A Record), multiple domains can be bound. - Delete: Remove the proxy relationship between the user service and the domain.
Delete Provider: Remove all information related to this domain management provider inVKUBE, including credentials and the mapping relationships between domains and container ports.
Alias
The VKUNE Alias feature allows users to assign an alias to their services. In the same region, different services can communicate with each other using this alias.
Parameter Explanation:
Alias: Users can enter a custom or meaningful string as the service alias.Alias Port: The port number associated with the alias, e.g., 80.Container Port: The port number the user’s service listens on.Protocol: The network protocol used by the service, either TCP or UDP.
Example:
| Alias | mongo-url |
|---|---|
| Alias Port | 27017 |
| container Port | 27017 |
| Protocol | TCP |
Once the setup is completed, services within the same region on VKUBE can access the service using mongo-url:27017.
Note: If the user has deployed a web service, using the alias to access it in a browser (e.g., mongo-url:27017) will not work.
To better demonstrate the alias feature, we will use the deployment of a MongoDB image as an example.
Contact
The VKUBE Contact feature binds an email address to the user’s service. When there is an issue with the service, related notifications will be sent. Currently, it synchronizes with VKUBE’s Notice system. Any new information in Notice will be sent to the configured email if set.
Parameter Explanation:
Your Email address: Users can enter their email address to serve as the contact for the service.Verification code: The system will send a verification code to this email. The user needs to enter the code and click the Verify Code button to bind the email.
Delete
Clicking the Delete button will remove the selected service from the current page. This action does not affect the server in any way; it only removes the visual information of the service from the user’s browser. To restore it, go to My Services, copy the token, and then go to the My Containers page to Import it again.
Policy
The VKUBE Policy feature provides a whitelist mechanism to control access permissions between different services. Once created, all requests to the service will be restricted except those from services specified in the whitelist. For example, if you create an empty whitelist, no services will be able to access the user’s service.
Operation Procedure:
1.Click the Policy button, then click Add Rules. Under Add Rules, there are three options:
Single Service: Enter the User Service ID to allow this service ID to access the service with the applied Policy.Services of Owner: Enter the Address to allow a group of services owned by this Address to access the service with the applied Policy.Specific Service of Owner: Enter both the User Service ID and Address to allow a specific service ID and Address to access the service with the applied Policy.
2.After configuring, click Confirm. In the main configuration window, you’ll see the newly added information. If you’d like to add more rules, click Add Rules again. Once everything is correct, click the Create Policy button to complete the creation of the Policy.
3.You can also create a Policy without adding any rules, which will block all services from accessing the user’s service.
Watch more Tutorials below
To better demonstrate the policy feature, we will use the deployment of a MongoDB image as an example.
Notice
The VKUBE Notice feature allows users to view service status notifications, such as Out Of Memory events or service expiration reminders. If the user has linked an email, the system will automatically send these notifications to the email. As shown in the image below:

Containers List
To view information and status of the containers within a service's deployed pod, you can either click on the pod's icon to open the container list and check its details, or click on "View Containers List" to see all the containers associated with the service. Both options provide an easy way to monitor the containers and their status after deployment.
Single Container Operation
Clicking the downward-facing triangle on the right side of Containers will bring up a popup window displaying the list of containers that the service is actually deployed on. For each container, there are three actions: Log, Monitor, and Upgrade, as shown in the figure below.

Log
Click the Log button to view the log of the container. You should fill in start time and end time and then click on Search button to see the logs. You can click on Reset button if you want to clear the logs.

Tail Lines: Default is 10, representing the number of log lines displayed to the user.Follow: Default is unchecked. If selected, it will continuously follow log changes, disregarding the line limitLog time range: Default is empty, allowing the user to select a time range for the logs to be displayed.Reset: Clicking the Reset button will clear the log content.
Monitor
Monitor button allows you to view information such as the memory and CPU usage of the current container. As shown in the figure below.

Upgrade
Clicking the Upgrade button allows you to update the image.
Please note:
Upgradingwill restart your service, so proceed with caution.Upgradingthe image involves a version update of the same image. For example, if you’re running an Nginx image, the update must also be an Nginx image, just a different version.- For private images, you still need to provide your account and password. Please refer to the deployment steps above.

Tool Injection

In the Action section, click on Tool Injection to enter the settings page. VKUBE will provide the functionality for tool injection, allowing users to choose from three tools:
sshd:sshd(Secure Shell Daemon) is the SSH server process provided by OpenSSH, allowing remote users to securely connect to Linux servers via the SSH protocol.ttyd:ttydis a tool that maps command-line terminals (TTY) to web pages via WebSocket, enabling users to access server terminals through their browsers.rsync:rsync(Remote Sync) is an efficient remote synchronization tool used for local and remote file synchronization, supporting incremental copying and compressed transfer.
VKUBE will configure based on the user's selection:
Choosing
sshd:VKUBEwill help users download and run sshd in a specified container. sshd can only be authenticated and encrypted using public key/private key, with the public key written into the container's environment variables. After this, the user container will startsshd, allowing users to log in to the specified container viaSSH.Choosing
ttyd:VKUBEwill help users download and runttydin a specified container.ttydwill start a web-based program that allows users to connect to the corresponding container through a web page. Users need to provide a username and password, with the password requirements being: at least one uppercase letter, one lowercase letter, one number, and one special character.Choosing
rsync: requiressshdto be enabled.VKUBEwill help users download and use rsync in a specified container.
VKUBE carries out the download and execution according to the script's operation and the user's selected configuration.
Note: VKUBE will do its best to help users download and run sshd, but current tests indicate that newer versions of Ubuntu, Alpine, and Debian-based images are suitable. Other Linux distributions may not succeed. Additionally, downloading ttyd is not possible in Debian.
 Click on the image above to enter the settings page, where users can choose to enable different tools.
 Taking the above configuration as an example, this example enables the ssh, ttyd, and rsync tools. At this point, you need to select and fill in the parameters:
- Target Container: The container where the tool will be started.
- SSH Public Key: The public key used for SSH communication, which will be passed into the container through environment variables
VKUBE_SSH_PUB_KEY. - TTYD Username: The ttyd requires users to have an account and password, so users are forced to enter a username. If it does not exist, a user and password will be created in the container. If the user already exists, the password will be updated. It will be passed into the container through environment variables
VKUBE_TTYD_USER. - TTYD Password: The ttyd requires users to have an account and password, and the password must meet the requirements of at least one uppercase letter, one lowercase letter, one number, one special character, and a minimum of 8 characters. It will be passed into the container through environment variables
VKUBE_TTYD_PASSWORD.
After the configuration is successful, the user's service will restart and enable the following tools. You will need to wait for a while for the service to restart, and you can see the information about the enabled tools as follows:

In the Access Info section, you can see the access methods and restrictions as follows:

- SSH Command:
ssh -i $YOUR-PRIVATE-KEY -o ProxyCommand="openssl s_client -quiet -servername %h -connect ssh-67e9f03c2de346d39fe0a35f.europe.vkube.vcloud.systems:443" root@ssh-67e9f03c2de346d39fe0a35f.europe.vkube.vcloud.systems - Explanation: Users will replace their own
$YOUR-PRIVATE-KEYfile path, and according to this command, they can access it. - Rsync Command:
rsync -avz -e "ssh -i $YOUR-PRIVATE-KEY -o ProxyCommand='openssl s_client -quiet -servername %h -connect ssh-67e9f03c2de346d39fe0a35f.europe.vkube.vcloud.systems:443'" /local/path/ root@ssh-67e9f03c2de346d39fe0a35f.europe.vkube.vcloud.systems:/remote/path/ - Explanation: Users will replace their own
$YOUR-PRIVATE-KEYfile path, change/local/path/to the local file path, and replace/remote/path/with the file path on the container. According to this command, they can complete the file transfer from the local to the remote container. Other usage can refer to the rsync usage method. - TTYD URL:
https://ttyd.europe.vkube.vcloud.systems/67e9f03c2de346d39fe0a35f - Explanation: Clicking the button will redirect to the page to access this link, where a username and password need to be filled in for login.
Tool Compatibility Matrix
| Ubuntu-based image | Alpine-based image | Debian-based image | Other | |
|---|---|---|---|---|
| sshd | Yes | Yes | Yes | Unknown |
| rsync | Yes | Yes | Yes | Unknown |
| ttyd | Yes | Yes | No | Unknown |
If you want to disable the current tool injection usage or change the configured container or parameters, you need to first disable the current tool injection, then reconfigure and start it, as shown in the image below:

Subdomain Access
The subdomain access feature allows you to access services deployed on the platform through custom subdomains. With simple configuration, you can specify different access paths for different container ports, making services easier and safer to access and manage. These subdomains are automatically allocated, so you don't need to provide additional domains, and all communication is conducted via HTTPS.
When deploying your service, you can configure the Path Routing field to enable HTTPS access to your service through a domain name.
In Path Routing, select Add Routing to add new routes. New routes contain three fields that need to be configured, including "Container Port", "Path", and "Rewrite".

"Container Port" is the port number inside the container to which the routing rule forwards traffic. Container Port can be duplicated. Multiple routing rules can match the same port.
"Path" refers to the URL path, which forwards access to that path to the container. At the API level, users access the service through this path. When forwarding to the container, if the "rewrite" option is not configured, the access path will not be changed. Path configuration follows these rules:
- Path uses prefix matching during forwarding. That is, when accessing any path, as long as any prefix matches a configured Path, forwarding will occur.
- Path follows longest prefix matching during forwarding. When multiple configured Paths satisfy forwarding conditions, longer Paths have higher priority.
- Path cannot be duplicated. Multiple rules cannot use the same Path, even for different containers.
"Rewrite" is an option for whether to remove the first-level routing. When checked, it will discard the first level when accessing the Path before forwarding to the container. For example, when Path is configured as "/api/v1" and a user accesses "/api/v1/detail", the service will receive access to "/v1/detail".
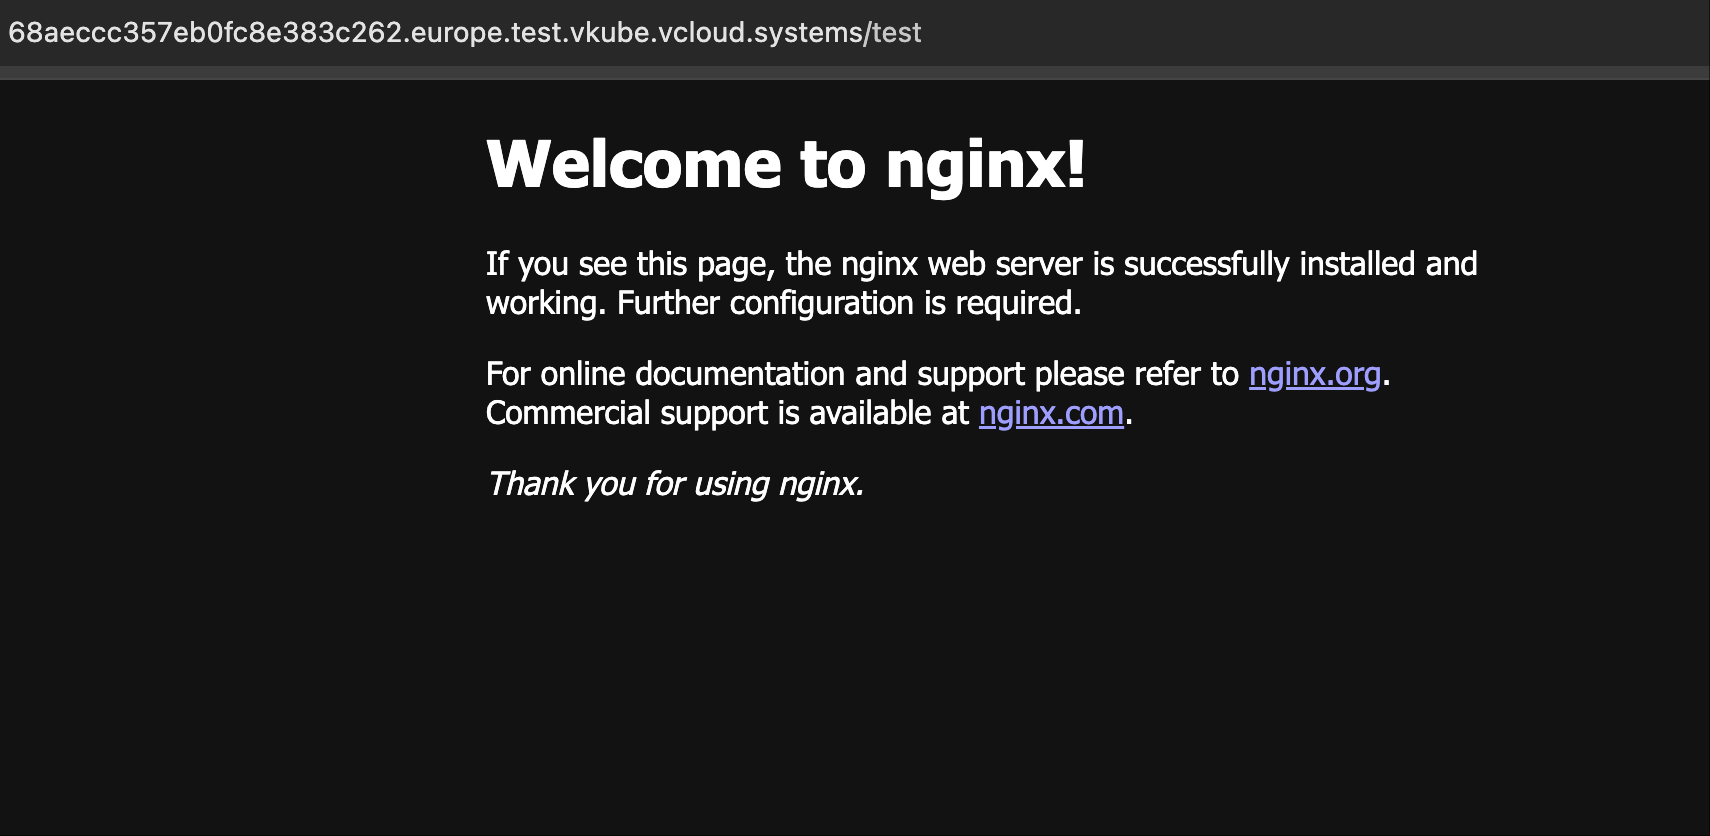
After configuration and successful deployment, entering the "view containers" interface will display the subdomain for this service.

The configured routing rules are displayed in the "Path Routing" table. By accessing the combination of domain and path provided by the subdomain, you can access your service via HTTPS.

Expired Services
After a service expires, its deployment information is still retained. You can download the deployment information to back it up locally, or you can clone the expired service when deploying a new service.
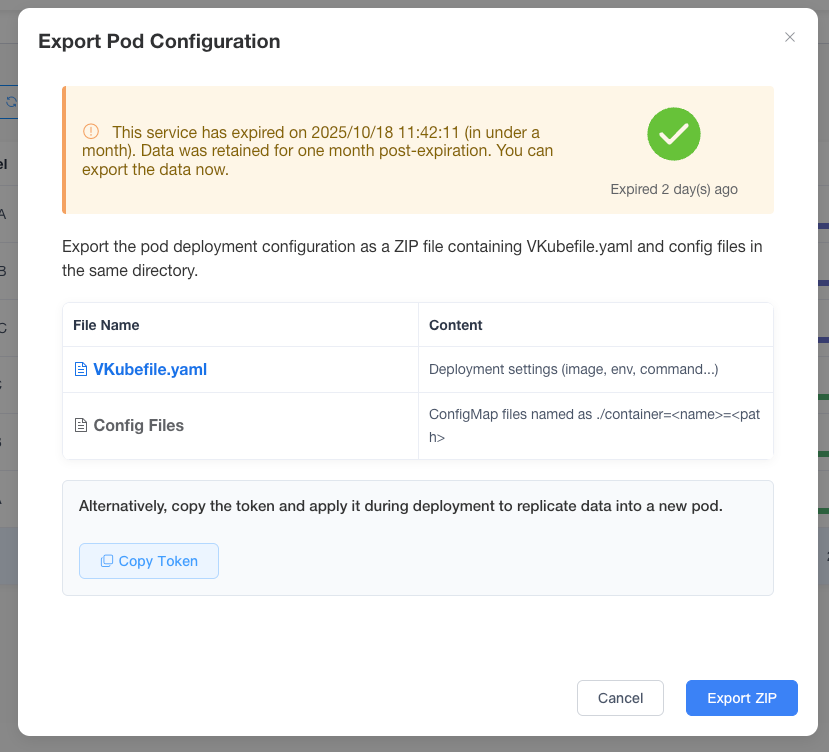
After a service expires, you can select Export Deployment Data from the Actions menu to open the "Export Pod Configuration" page.

On this page, you can copy the token or directly export the service's configuration information. The exported content includes the service's configuration file in .yaml format, which is used for redeployment, as well as Config Files, which contain the ConfigMap used by the service and related paths.
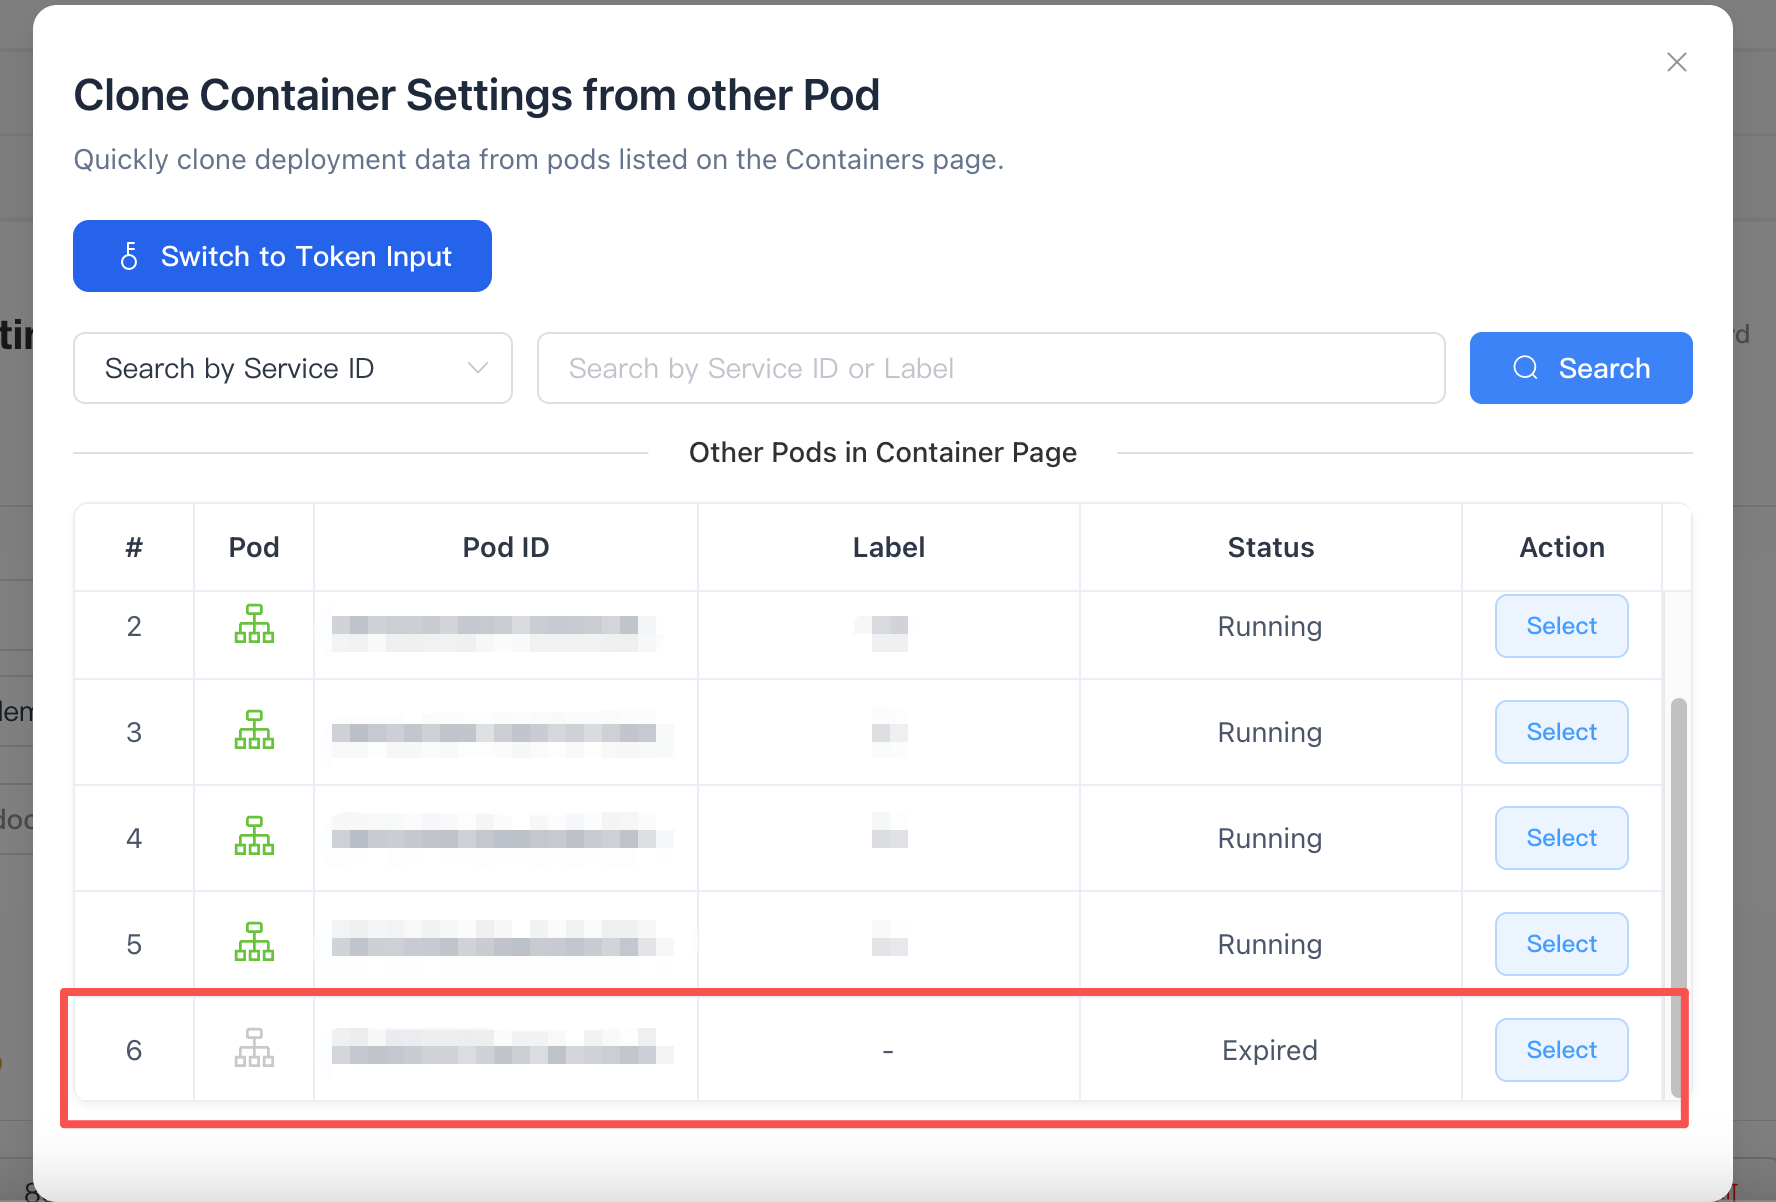
When deploying a new service, clicking Clone allows you to use an expired service for cloning, thus enabling quick deployment. You can also enter the Clone Service by Token interface and paste the expired service's token to clone it.
Rollback
The Rollback feature allows you to record a service's configuration information and quickly deploy the previously recorded configuration information later.
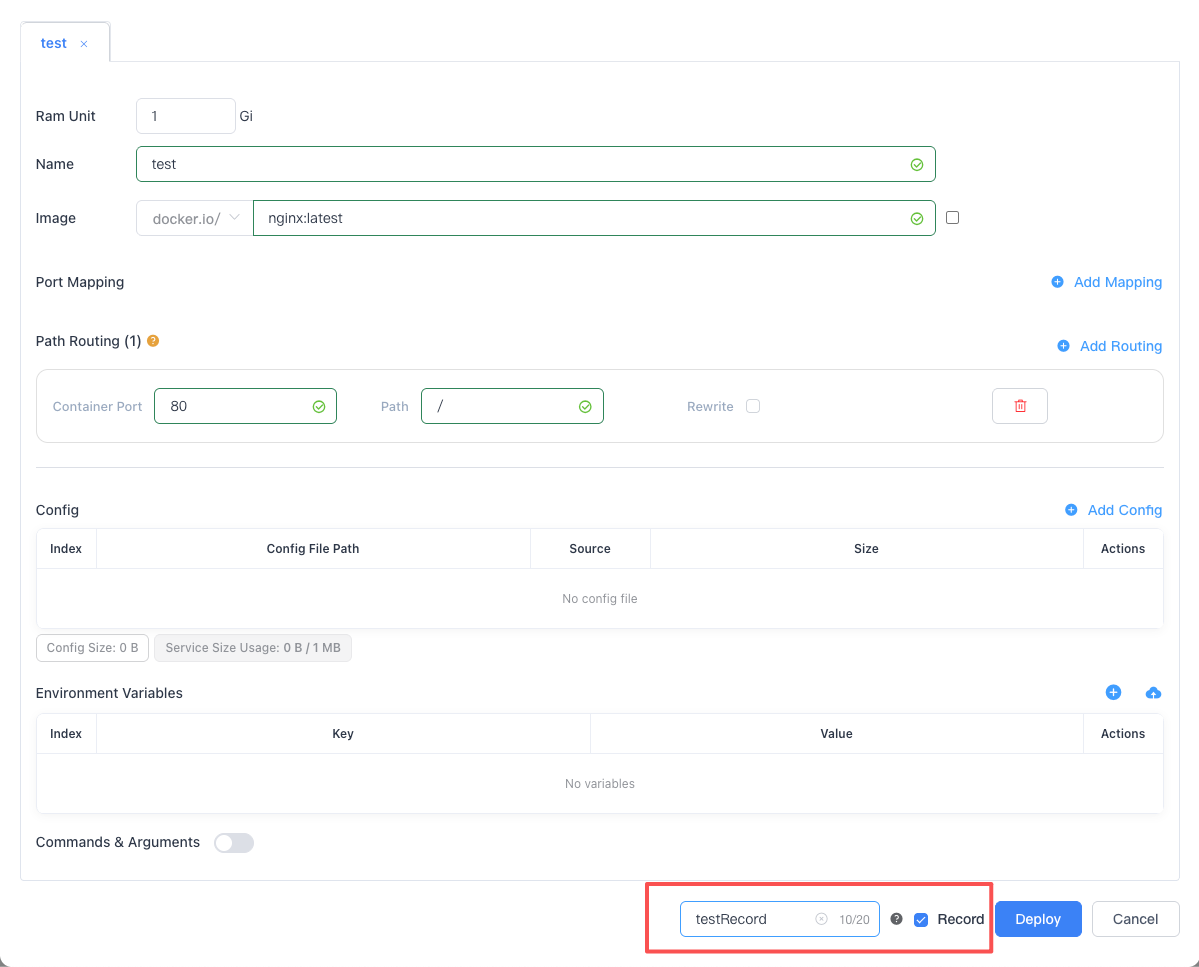
There are two ways to record the configuration. First, during deployment, you can check the Record option box. After checking, a text box for the tag appears, where you can enter a tag to distinguish different records. After checking the Record option box and clicking Deploy, the deployment configuration used for this deployment will be recorded.
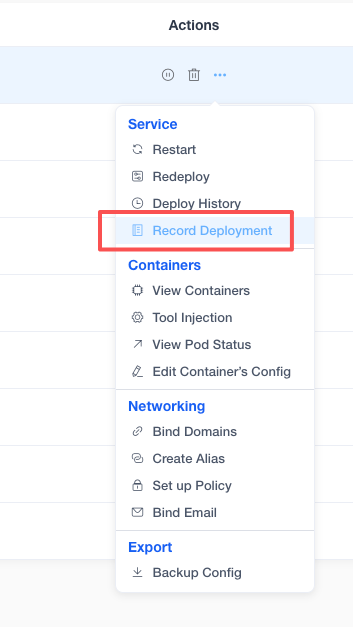
For a service that is already running, you can select Record Deployment in the Actions menu to record that service's configuration information.
After recording the deployment information, when performing a Redeploy, you can click Record in the upper right corner to open the already recorded configuration information.
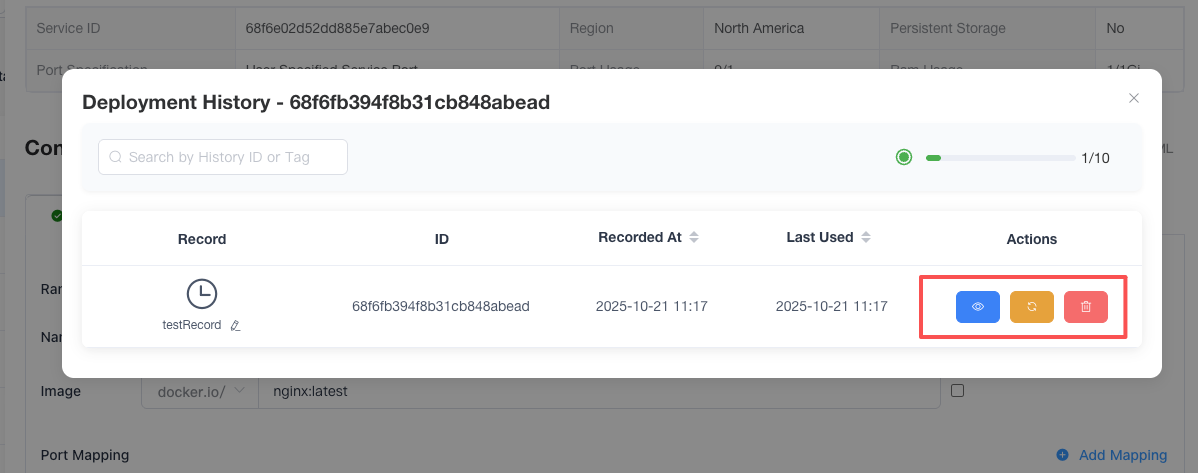
In the Record window, you can manage the records. Click Preview in Actions to view a preview of the configuration information, click Apply to apply that configuration information, or click Remove to delete it.