Example
This document will outline some usage examples for VKUBE:
- Simple Deployment Usage
- How to use private images from
GHCRorDocker HubonVKUBE - The possibility of multiple services making network requests within VKUBE:
- Deploy two containers within a single user service, using the localhost network.
- Deploy two user services in any region, using the hostIP:port network.
- Deploy two user services in any region, using the domain feature.
- Deploy two user services in the same region, using the Alias feature.
- For additional control over network requests, use the Network Policy feature.
- Using multiple configuration files in
VKUBE.
Simple Deployment Usage
After purchasing the required resources based on your needs, proceed with payment to obtain the Access Token (also referred to as Secret in VKUBE). Use the Access Token to import in the containers for deployment. For specifics, please refer to the documentation.
For example, to deploy an Nginx service requiring 2GB of memory with at least one network access point, and to run this service in Europe for a minimum of six months, you would select the Europe region in the service options. You would choose 2 Resource Units (equivalent to 2Gi of memory), 2 Host Port mappings, and select a service duration of 180 days before proceeding to order and payment. For specific details on Service Options, please refer to the documentation.
To deploy an Nginx service, prepare the Nginx image in advance, whether using the public Nginx (opens new window) image on Docker hub (opens new window) or a customized version you’ve modified.
In the deployment dialog box:
Image: nginx:latestName: myNginx(Any custom name you prefer)Ram Unit: 2(The maximum limit is set to the 2 Resource Units selected during the purchase.)Port:Container Port: 80(The reason for entering 80 is because it’s the port Nginx listens on.)Host Port: 12235(Any port number you prefer.VKUBEwill then review whether this port is permitted for use.)
After completing the above entries, you can proceed with deployment. VKUBE will start a container using the nginx:latest image, map its 80 port to the specified Host Port, and restrict its memory usage to 2Gi. You can then access it at http://HostIP:12235/.
How to use private images from GHCR or Docker Hub on VKUBE
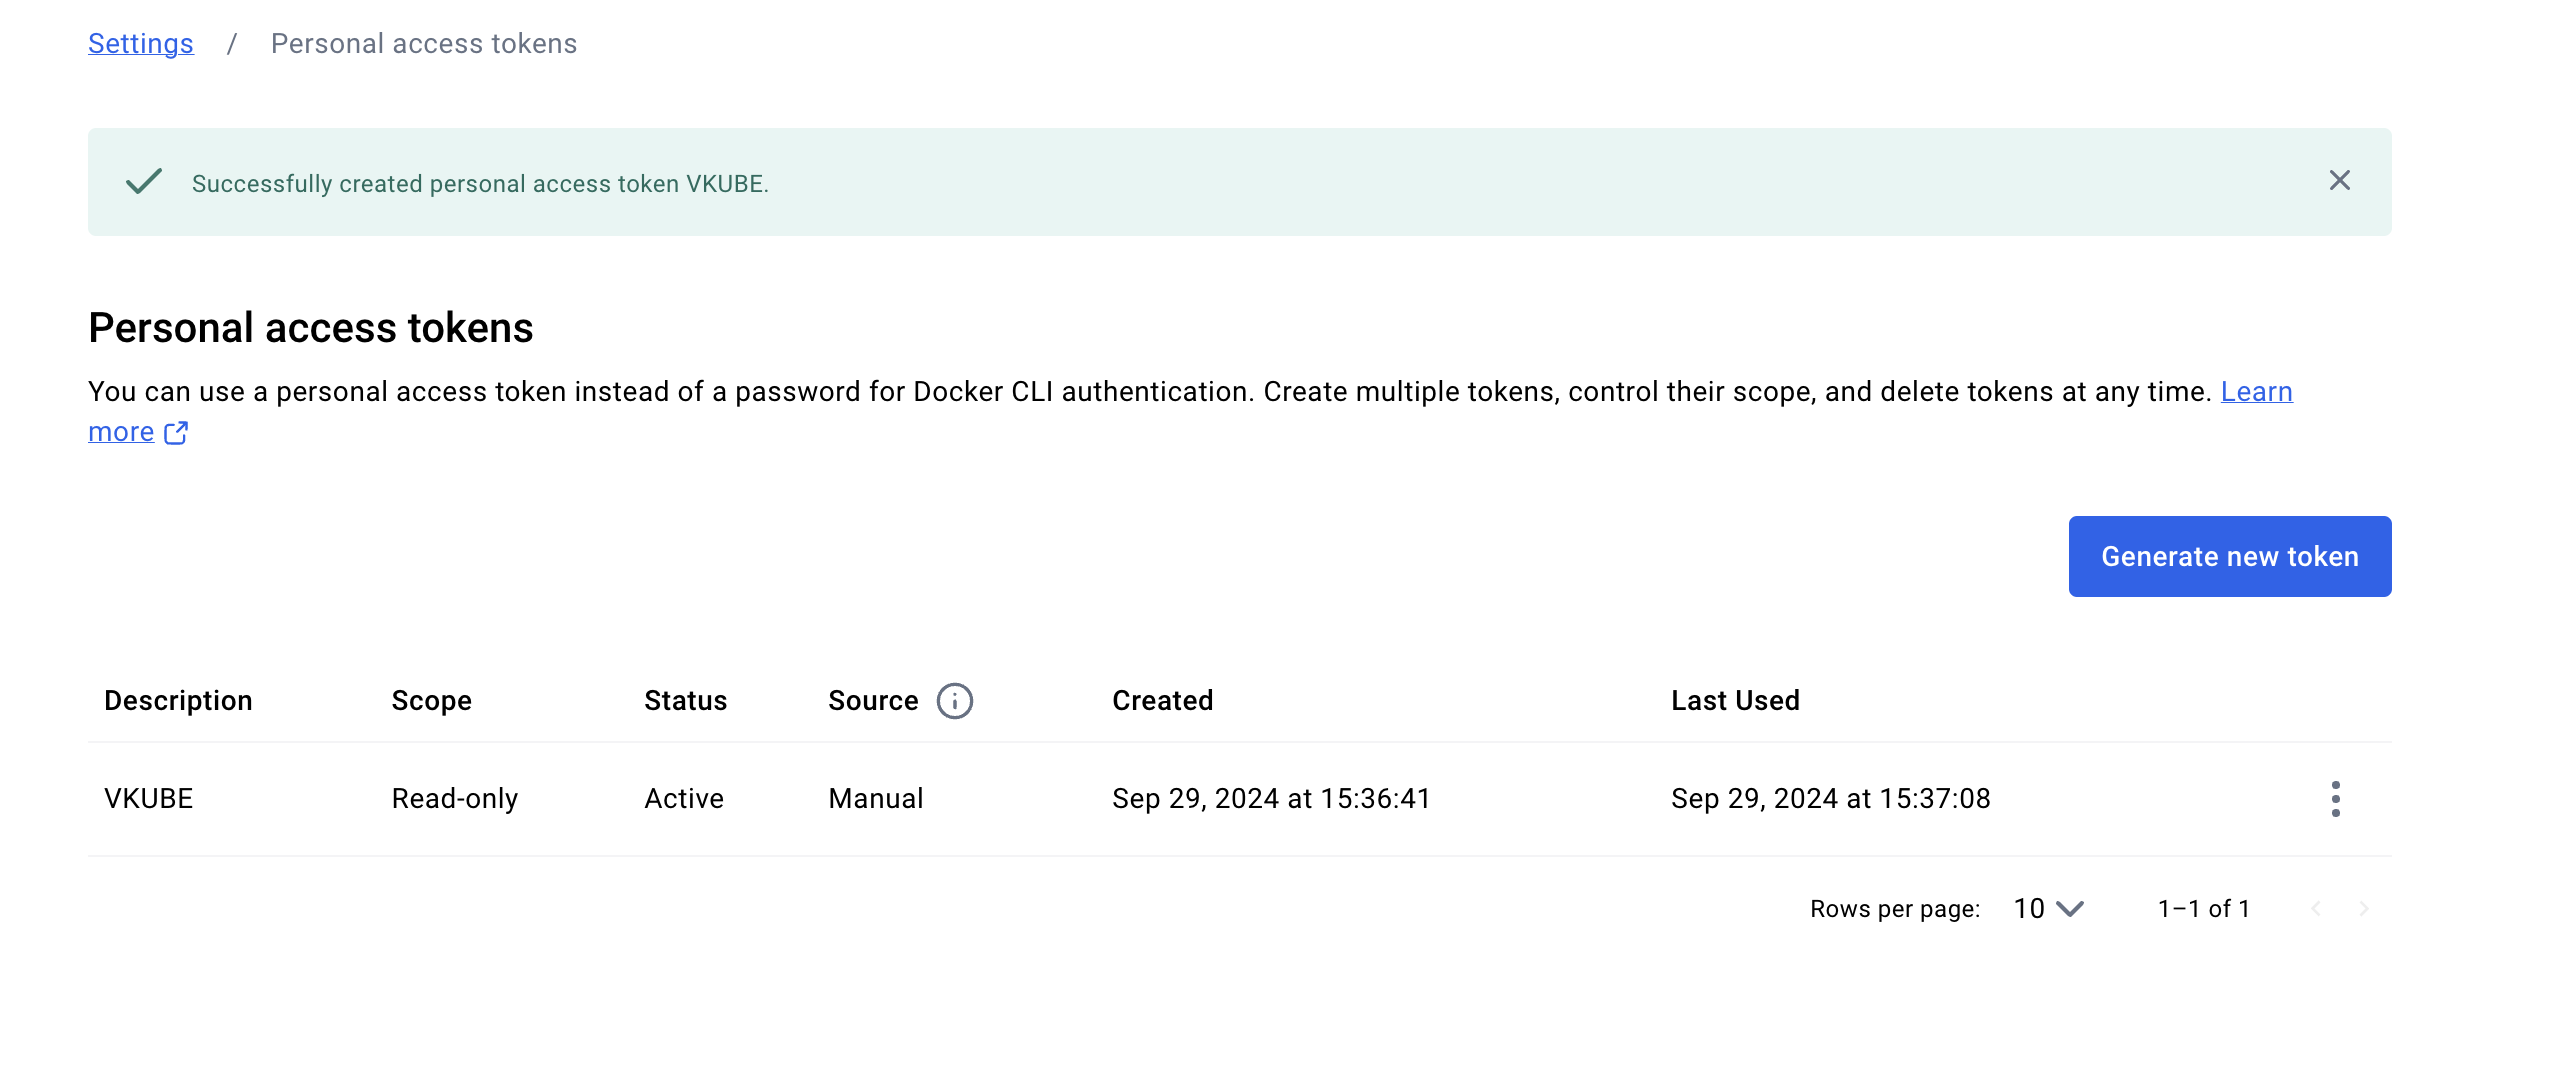
Currently, the VKUBE system supports importing images from Docker Hub and GitHub Container Registry (ghcr). Simply prefix the image name with ghcr.io/ or docker.io/. Private images are also supported; just enter your username and the corresponding Access Token. It’s recommended to use Access Tokens for authorization with read-only permissions to maximize account security. For Docker Hub, refer to: Personal Access Tokens (opens new window).
For information on using ghcr, refer to: Introduction to GitHub Packages (opens new window).
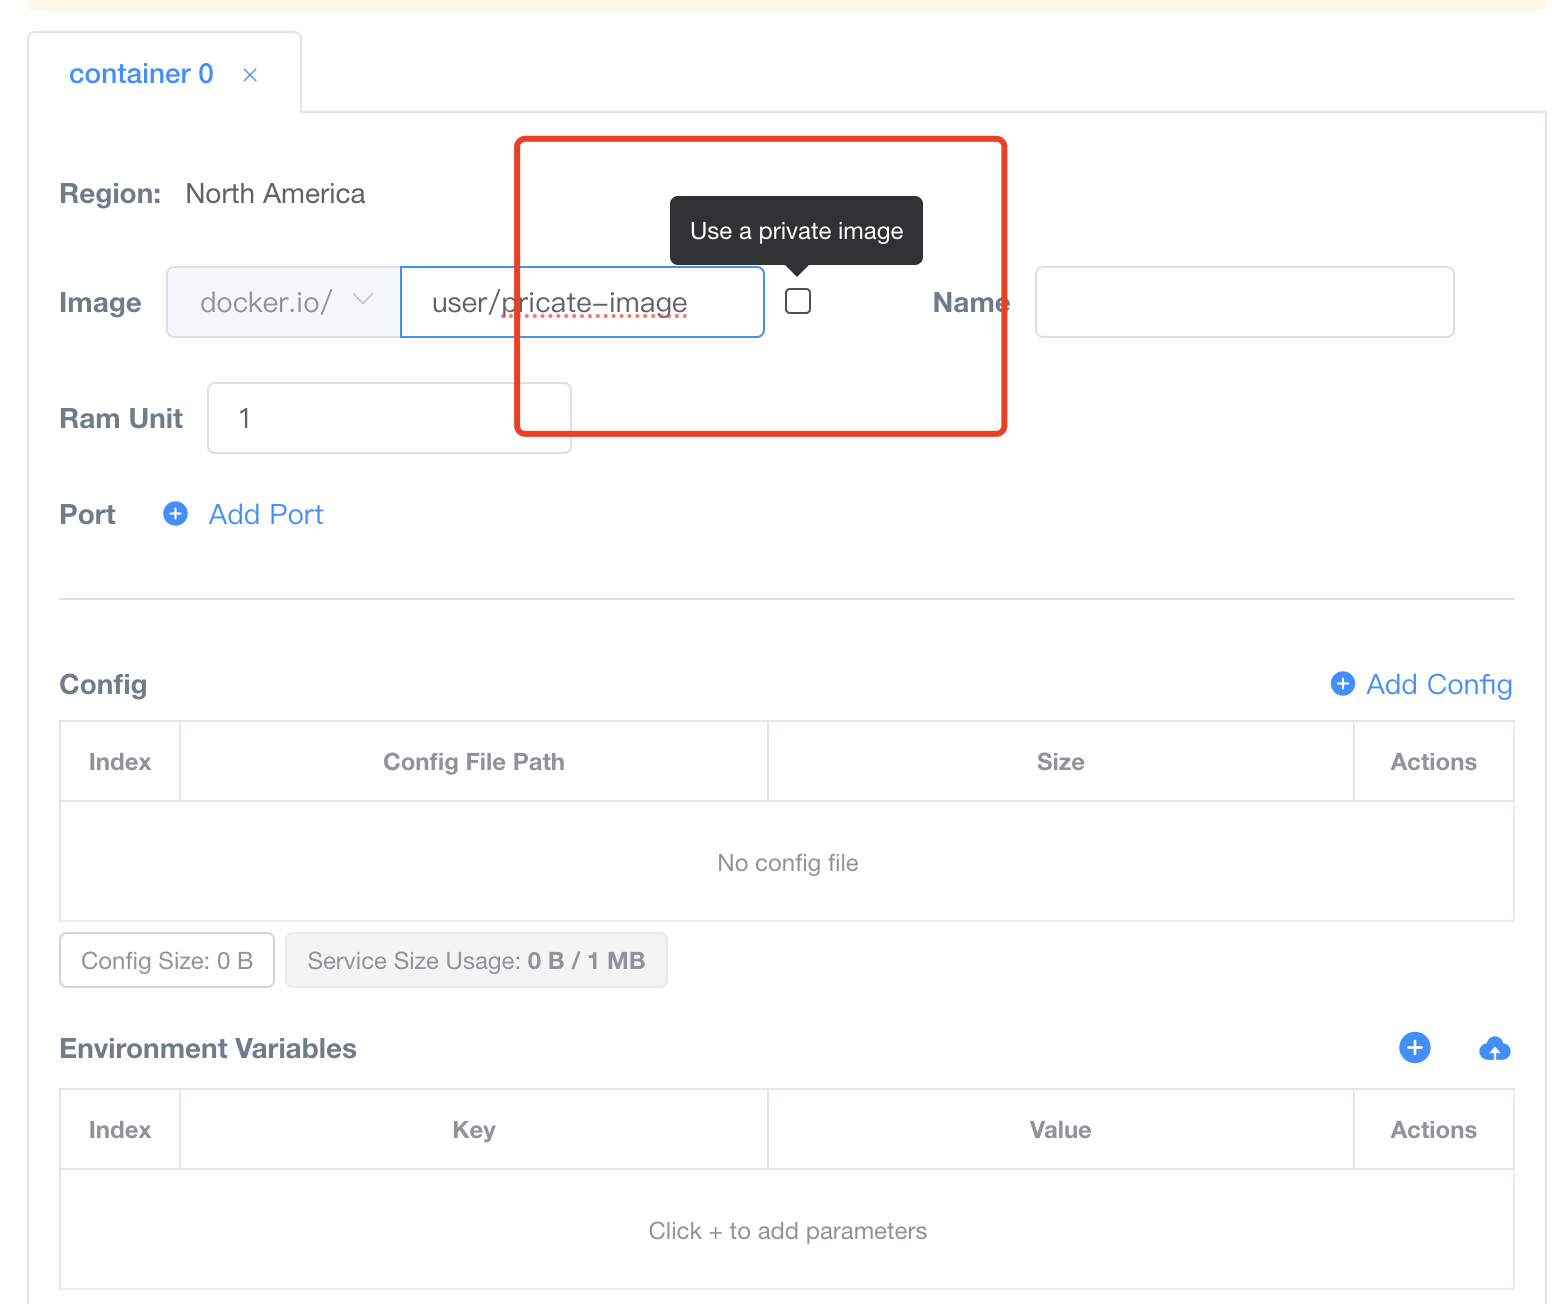
In the VKUBE deployment dialog box, you can select either docker.io or ghcr.io in the image name input box. There is a checkbox at the end; selecting it indicates that you will use a private image. Then, simply enter your username and the corresponding token.
The possibility of multiple services making network requests within VKUBE
If multiple services need to make network requests between each other, what methods can be implemented in VKUBE? Assume there is a scenario where a MongoDB service is deployed as a DB service, and another service is deployed as an API service, with the API service needing to connect to the MongoDB service. How can this be achieved in VKUBE?
Deploy two containers within a single user service, using the localhost network
In VKUBE, you can choose to deploy both containers within the same pod, utilizing the localhost network for communication. It’s important to note that when purchasing services, you need to buy more than one resource unit, as the service requires two containers, and each container requires at least one resource unit. Therefore, you should purchase at least two resource units for the service. For other options, refer to the Simple Deployment Usage section.
The target based on the expected requirements is:
- Start two containers within one service (indicating a minimum of 2 resource units).
- Specify the memory size required for each container (if the service scenario requires more memory resources, consider purchasing more than 2 resource units).
- For external exposure, choose to use hostPort mapping.
- For communication between the DB service and the App service, choose to use the localhost network.
- For passing parameters, choose between configuration files or environment variables. Here, select environment variables.
Deploy MongoDB according to the target specifications:
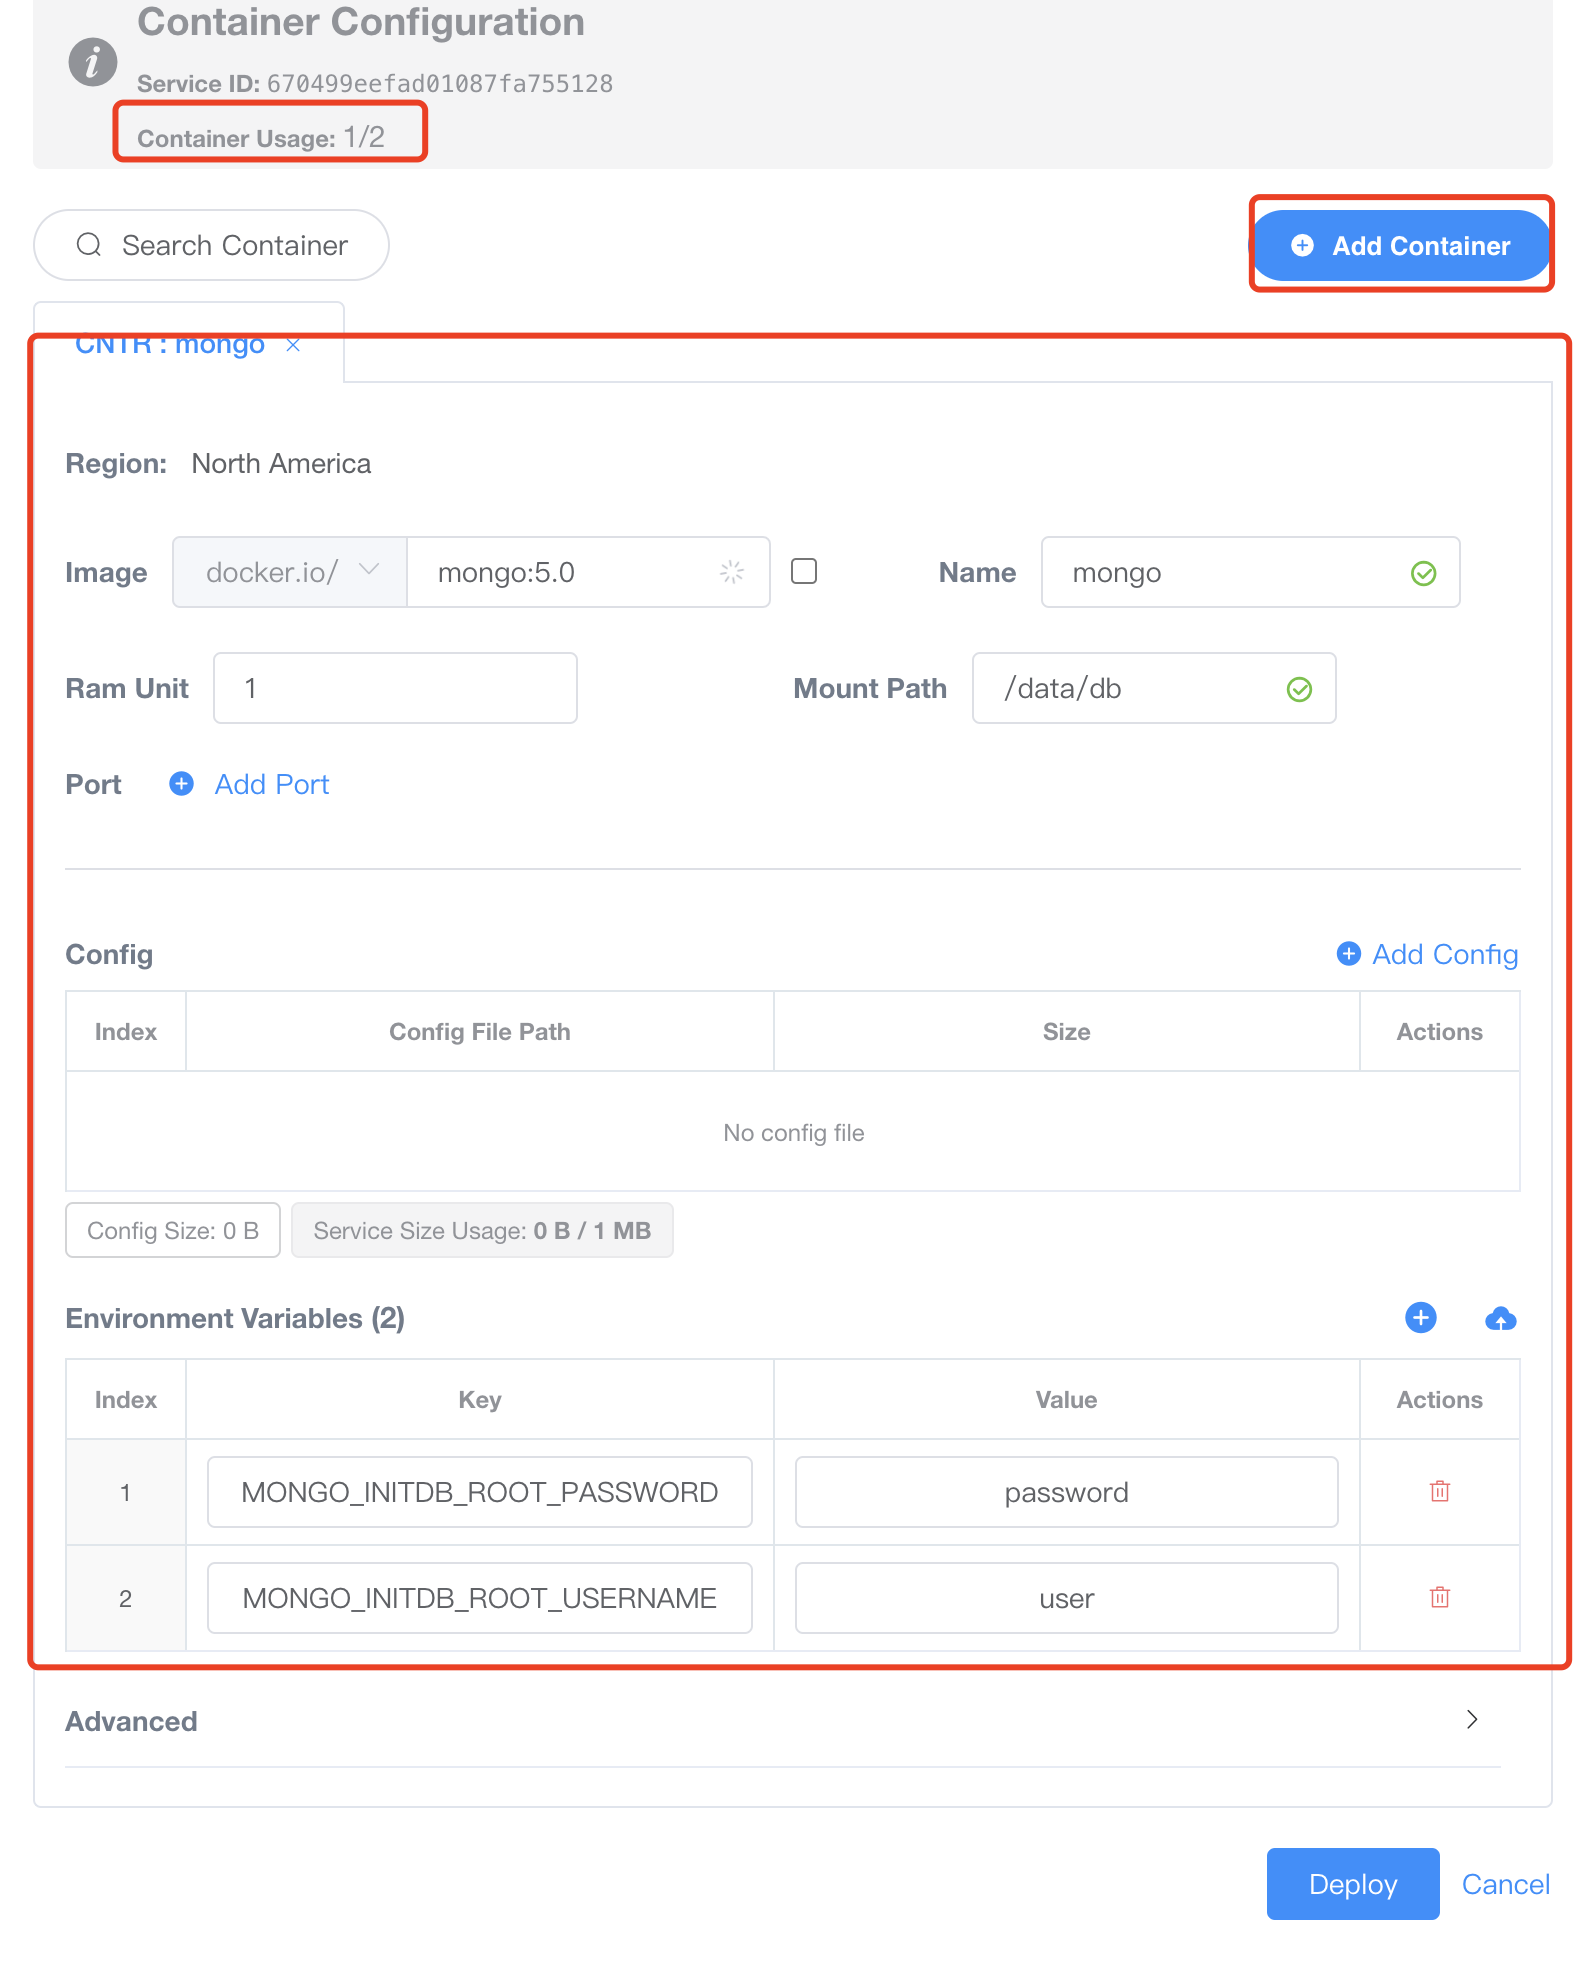
Image: Use themongo:5.0image as the DB service.Name: mongoRam Unit: Allocate 1Gi of memory (up to a total of 2Gi, as 2 resource units were purchased).Mount Path: Enter/data/dbas the data storage path for persistence (since MongoDB’s default data storage path is/data/db).Port: None. There’s no need to expose a port externally, as the DB service in this setup uses localhost for communication and does not require external access.Config: None. In this setup, configuration files are not used for parameter input.Environment Variables:Enter the necessary environment variables:MONGO_INITDB_ROOT_USERNAMEandMONGO_INITDB_ROOT_PASSWORDto initialize MongoDB’s root user and password. Set these values to user and password.Add Container: In the same service, add another container by clicking the Add Container button located at the top right corner of the deployment popup.
Deploy the web app according to the target specifications:
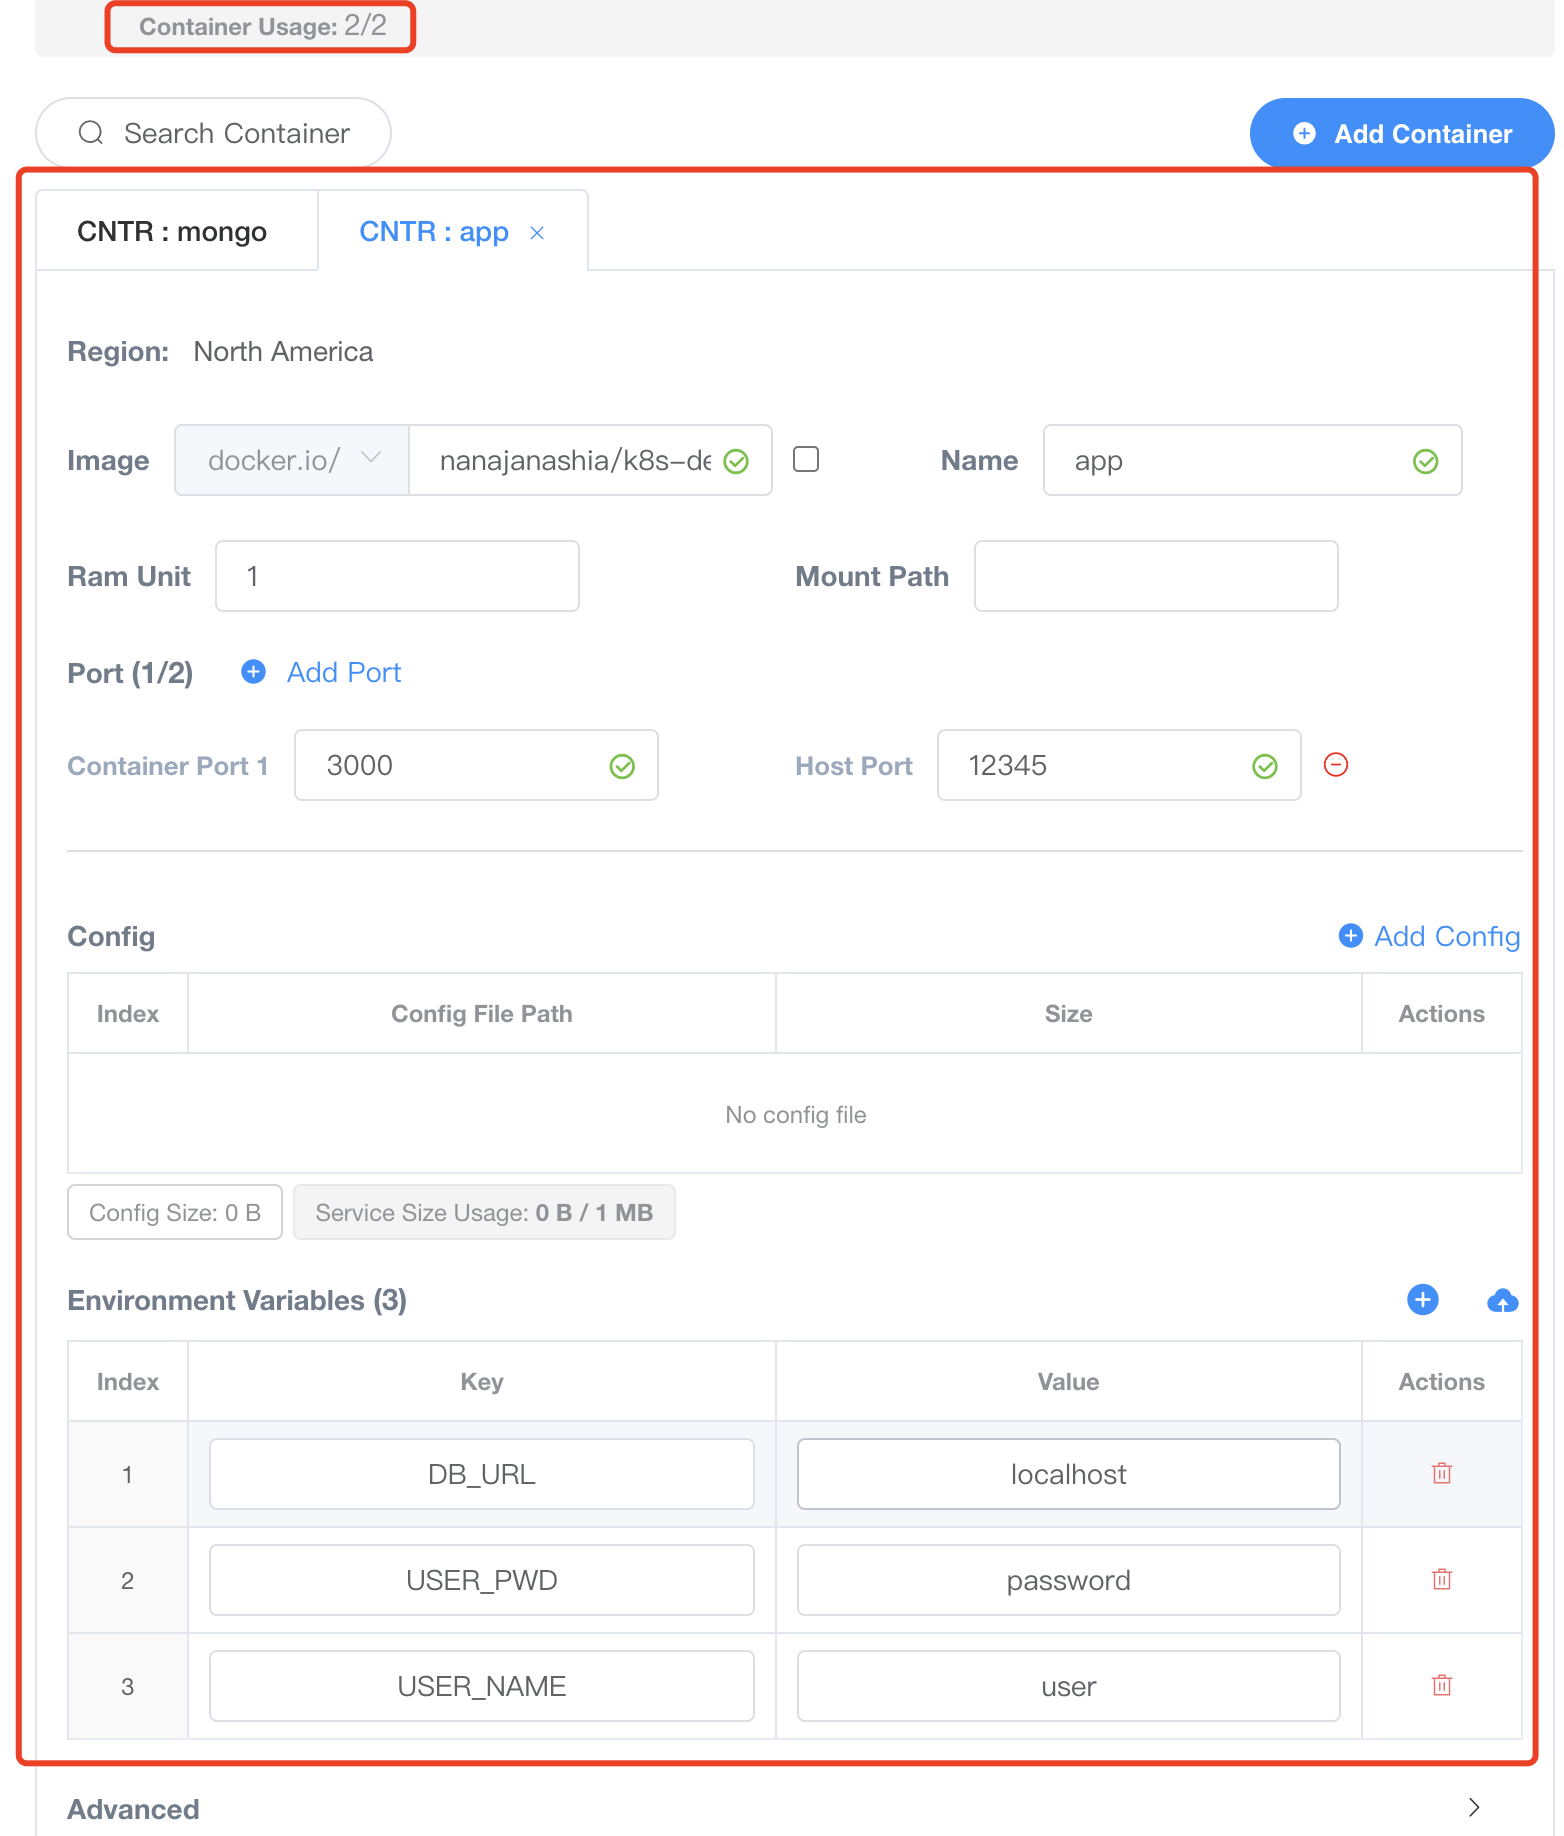
Image: Use the nanajanashia/k8s-demo-app:v1.0 image as the web application service.Name: appRam Unit: Allocate 1Gi of memory (the remaining amount available, as 2 resource units were purchased and 1Gi has already been allocated to MongoDB).Mount Path: None. As a web app service, no data storage path needs to be mounted.Port:Container Port:3000. Expose port 3000, as this application listens on that port.Host Port:12345. Choose 12345 as the mapped port. Once deployment is successful, you can access the service on the public network via HostIP:12345.
Config: None. In this setup, configuration files are not used for parameter input.Environment Variables: Fill in the necessary environment variables according to your application. For this web app, the required parameters are:USER_NAME:user. This is the MongoDB username.USER_PWD:password. This is the MongoDB password.DB_URL:localhost. This is the MongoDB address. Since the services are within the same internal network and not exposed to the public, localhost is used.
Click Deploy to complete the deployment.
Using two containers within a single service, with localhost for networking, allows for quick and efficient communication between services, offering the fastest network communication. However, this method lacks flexibility—restarting the web app will also restart the DB service.Therefore, can deploy the DB service and the web app service as two separate services. When using two separate services, their communication can be achieved through:
- Communicating via hostIP:port allows for connectivity across any region, as it uses the standard IP and port combination for communication.
- Communicating via domain allows users to use
VKUBEto proxy their domain to services hosted onVKUBE(limited to HTTP protocol). This can be implemented in any region, but users must own their domain. - Communicating via Alias acts like an internal domain within VKUBE, which is used solely for internal networking. This method can only be utilized within the same region, but it does not require users to own a domain.
Deploy two user services in any region, using the hostIP:port network
In VKUBE, we can deploy two services in separate pods and communicate using host:port.
The target achieved based on the expected requirements is:
- You can deploy two services with one container each (indicating that each requires at least 1 resource unit).
- Specify the memory requirements for each service’s container (if more memory resources are needed, consider purchasing more than 1 resource unit).
- The external exposure method is chosen to use hostPort for mapping.
- The communication method between the DB service and the App service is chosen to use hostPort networking, and the DB access interface will also be exposed externally.
- Parameters can be passed using either configuration files or environment variables; here, we choose to use environment variables.
Deploy MongoDB according to the target specifications:
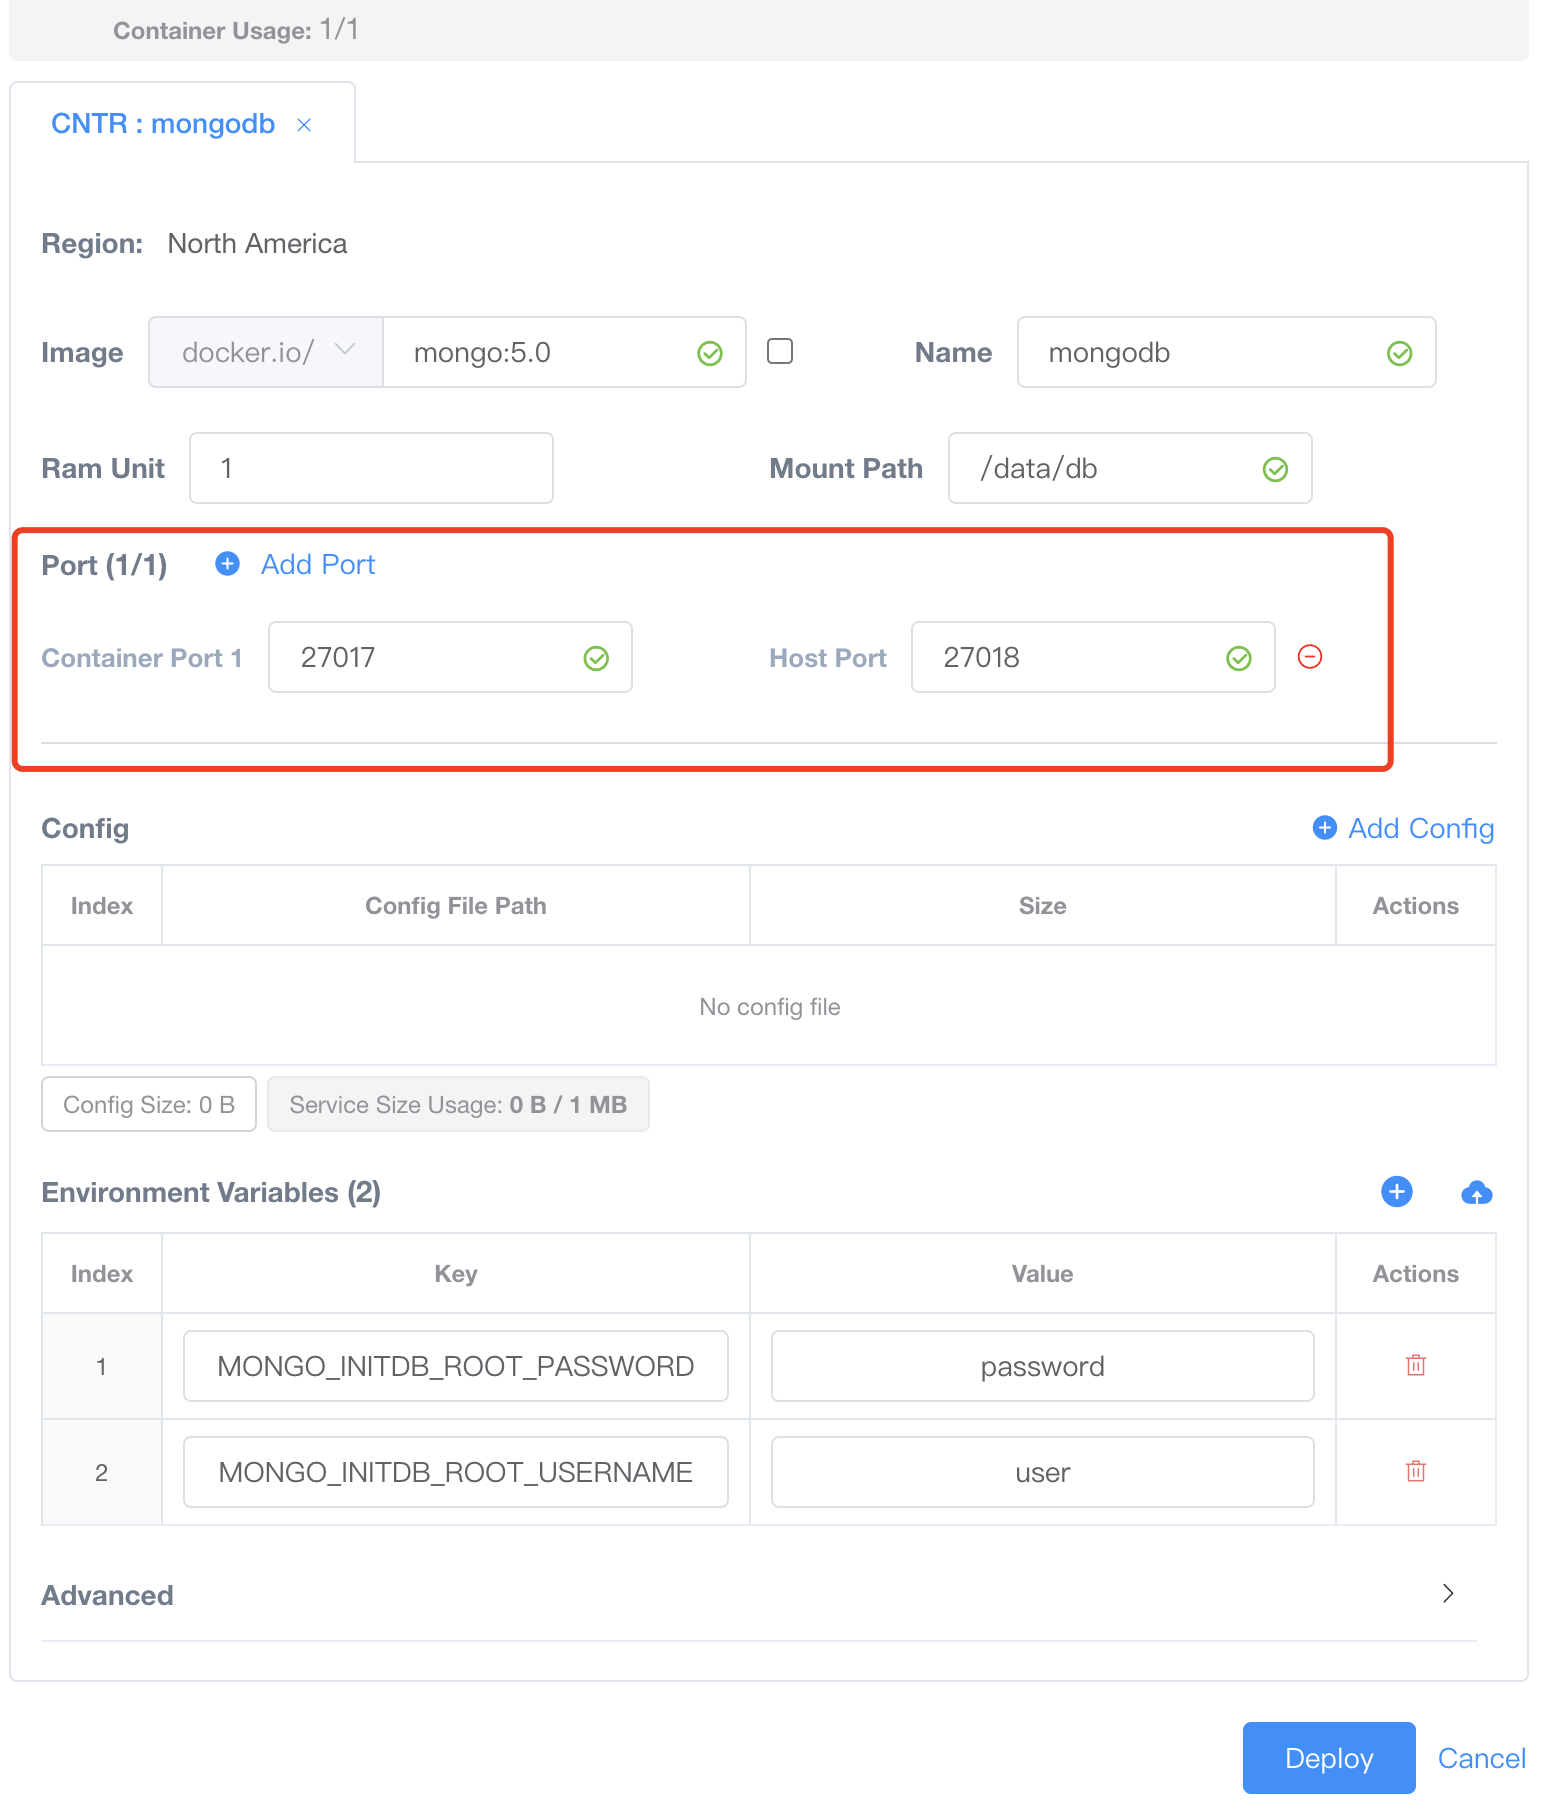
Image: Use themongo:5.0image as the DB service.Name: mongoRam Unit: Only 1Gi of memory can be allocated (the total available is 1Gi, as 1 resource unit was purchased).Mount Path: Enter/data/dbas the data storage path for persistence (since MongoDB’s default data storage path is/data/db).Port:Container Port:27017. This program listens on port 27017.Host Port:27017. Port 27017 is chosen for mapping. After successful deployment, this service can be accessed via HostIP:27017 on the internet.
Config: None. In this setup, configuration files are not used for parameter input.Environment Variables:Enter the necessary environment variables:MONGO_INITDB_ROOT_USERNAMEandMONGO_INITDB_ROOT_PASSWORDto initialize MongoDB’s root user and password. Set these values to user and password.
It is important to note that this service is exposed externally using hostPort.
Deploy the web app according to the target specifications:
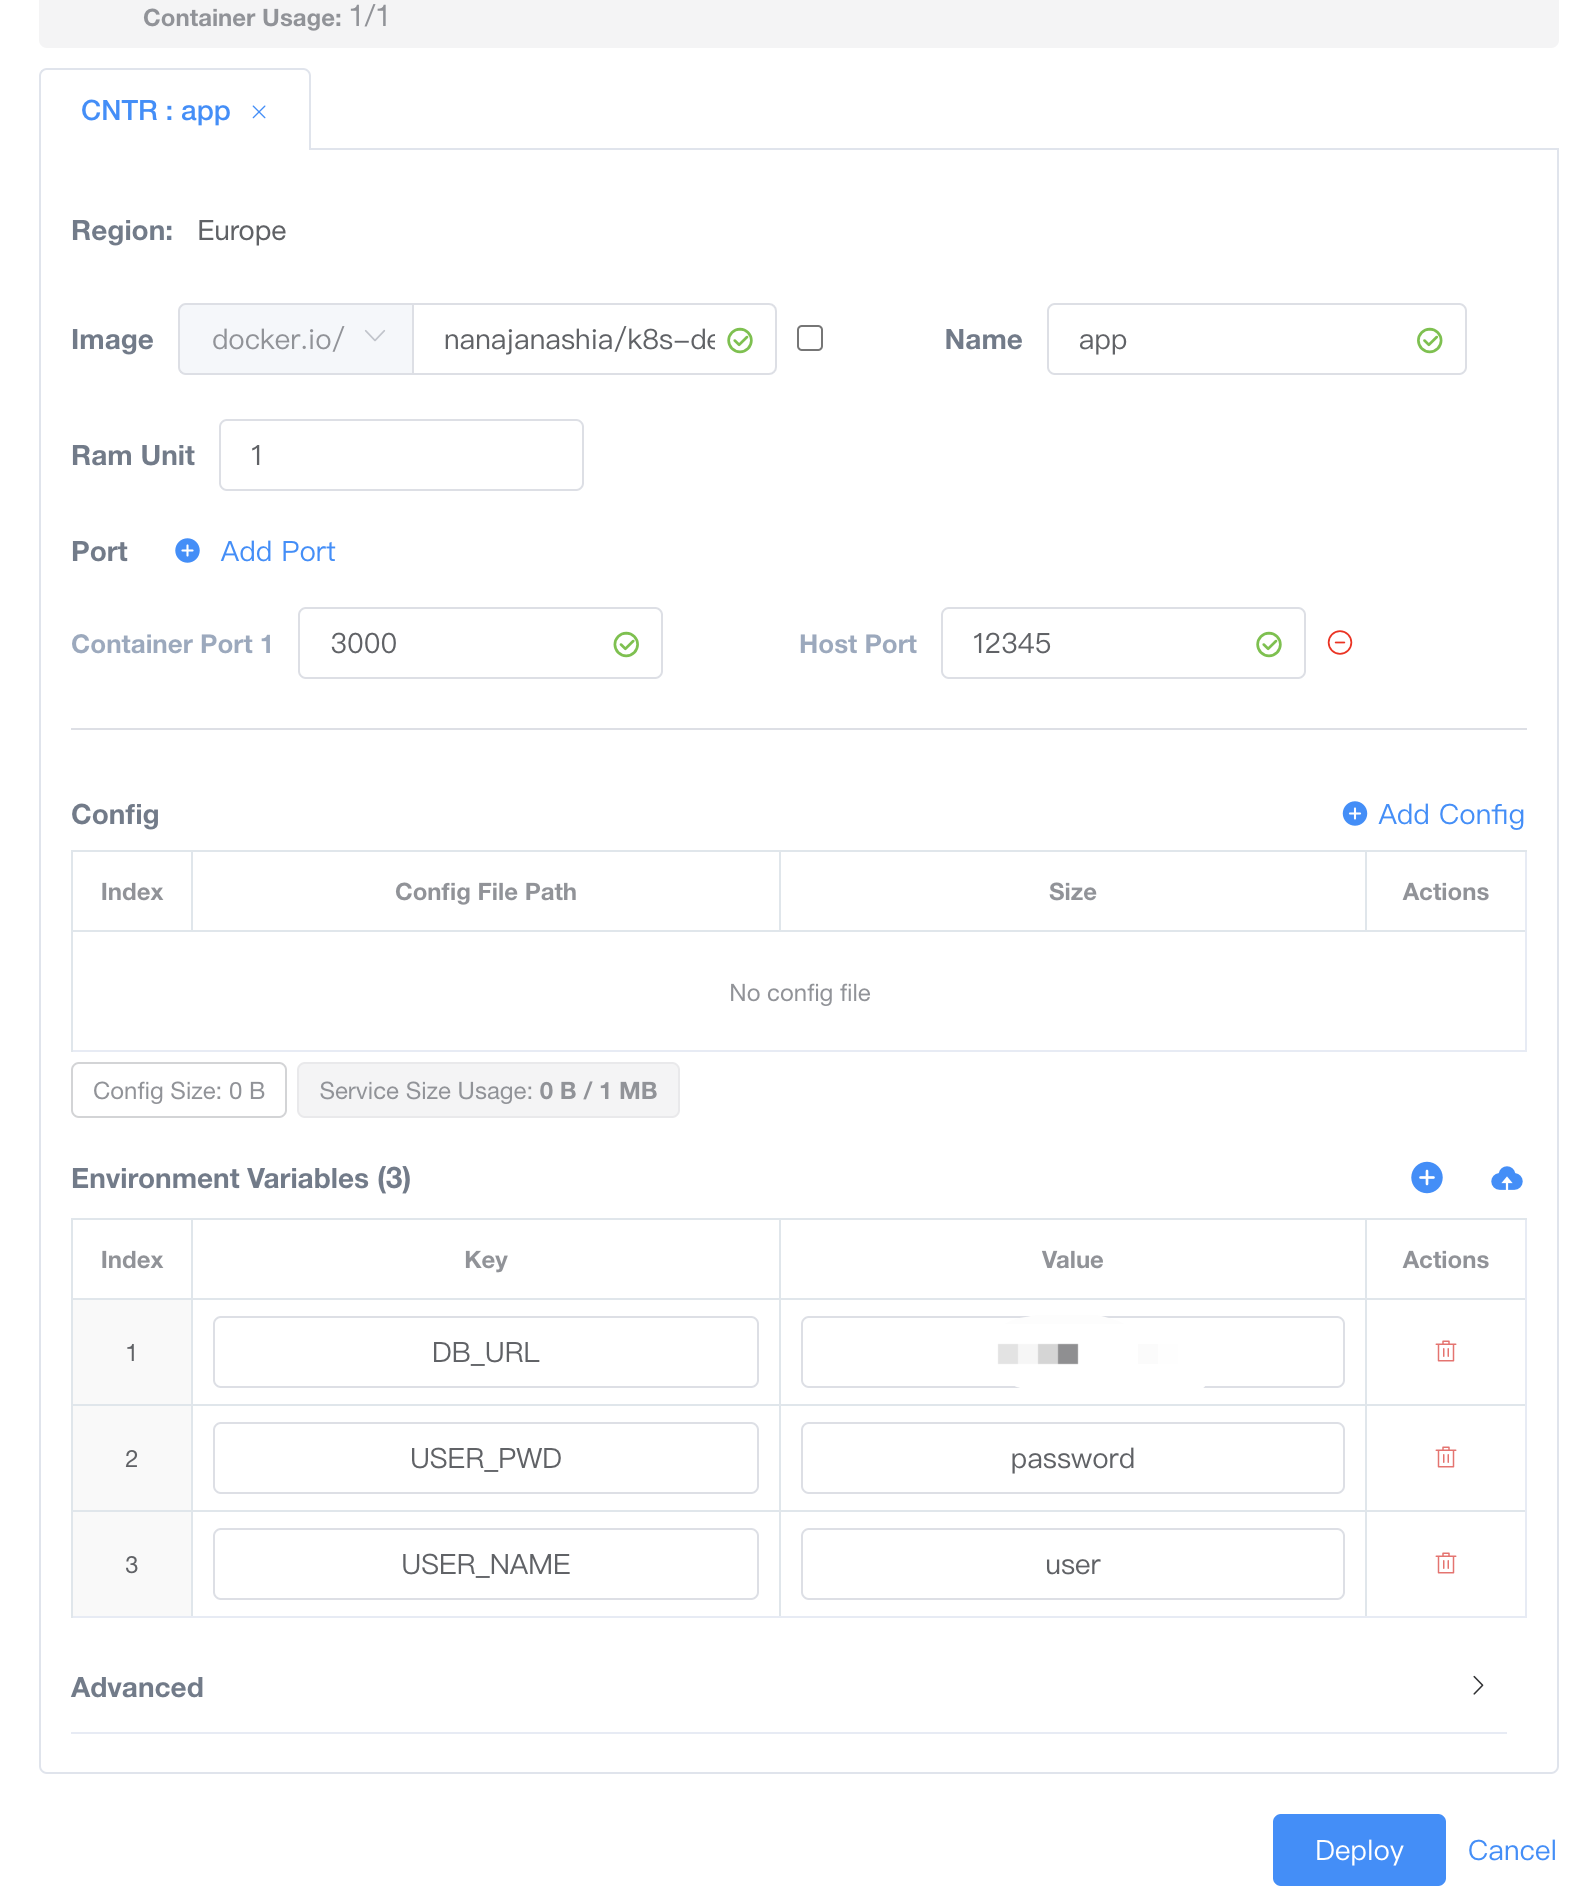
Image: Use the nanajanashia/k8s-demo-app:v1.0 image as the web application service.Name: appRam Unit: Only 1Gi of memory can be allocated (the total available is 1Gi, as 1 resource unit was purchased).Mount Path: None. As a web app service, no data storage path needs to be mounted.Port:Container Port:3000. Expose port 3000, as this application listens on that port.Host Port:12345. Choose 12345 as the mapped port. Once deployment is successful, you can access the service on the public network via HostIP:12345.
Config: None. In this setup, configuration files are not used for parameter input.Environment Variables: Fill in the necessary environment variables according to your application. For this web app, the required parameters are:USER_NAME: user. This is the MongoDB username.USER_PWD: password. This is the MongoDB password.DB_URL: Enter the host IP used by the MongoDB service (only the IP needs to be specified because this web application defaults to port 27017).
At this point, two independent services have been deployed, communicating over the network via host IP and host port. Specifically, the web app communicates with MongoDB using DB-HostIP:HostPort, and users can access the web application through a browser using web-HostIP:HostPort.
Deploy two user services in any region, using the domain feature
In VKUBE, we can deploy two services in separate pods and configure domain names for communication.
Deploy MongoDB according to the target specifications:
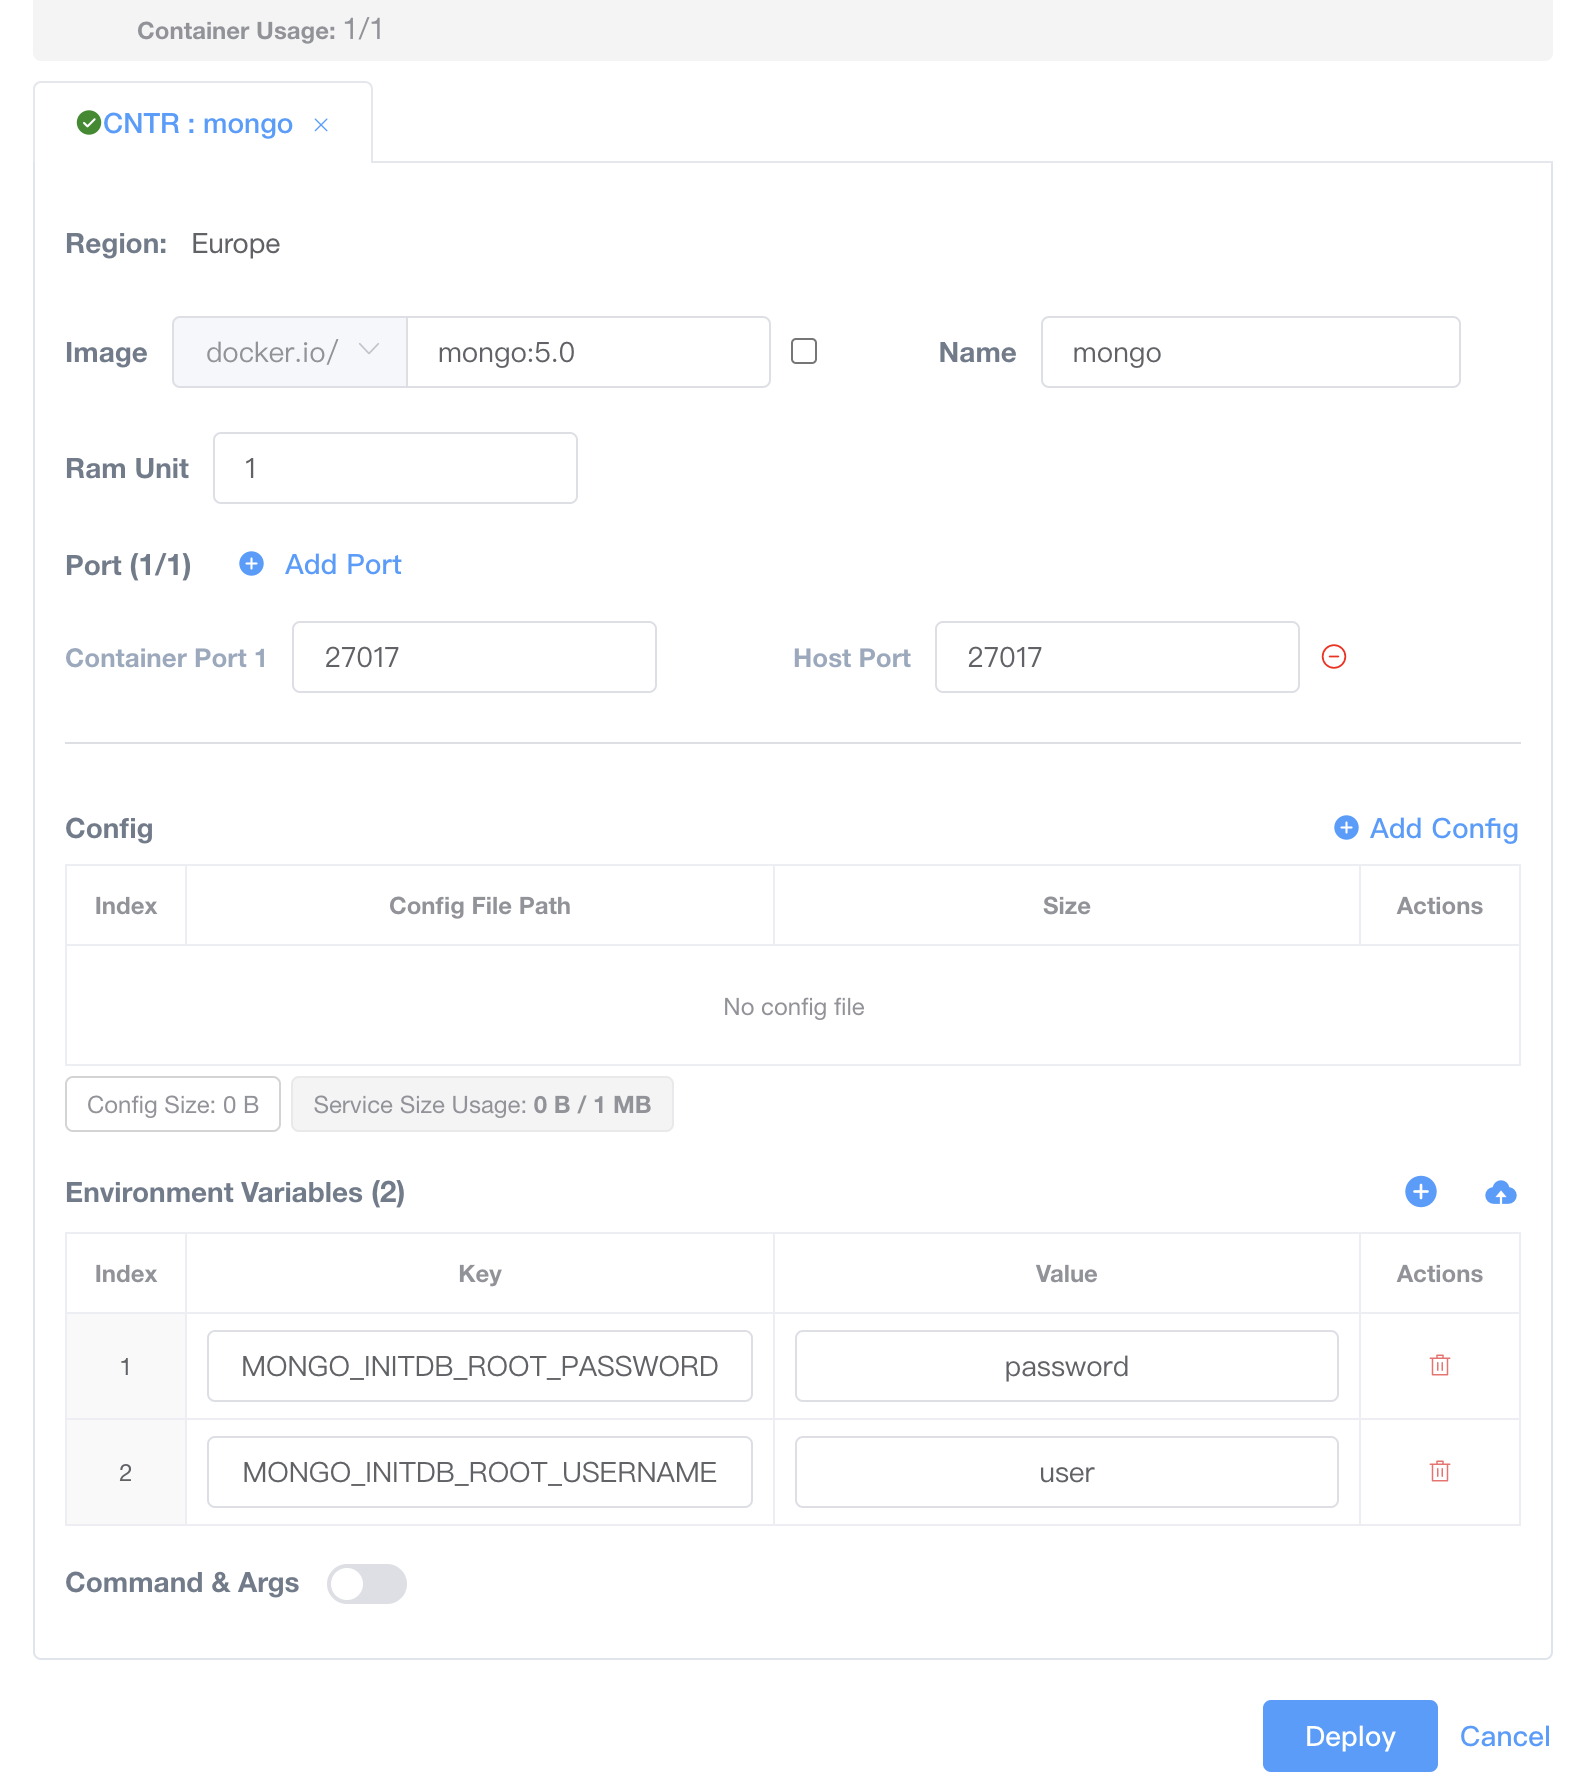
Image: Use themongo:5.0image as the DB service.Name: mongoRam Unit: Only 1Gi of memory can be allocated (the total available is 1Gi, as 1 resource unit was purchased).Mount Path: Enter/data/dbas the data storage path for persistence (since MongoDB’s default data storage path is/data/db).Port:Container Port:27017. This program listens on port 27017.Host Port:27017. Port 27017 is chosen for mapping. After successful deployment, this service can be accessed via HostIP:27017 on the internet. Domain names can be configured to facilitate access.
Config: None. In this setup, configuration files are not used for parameter input.Environment Variables:Enter the necessary environment variables:MONGO_INITDB_ROOT_USERNAMEandMONGO_INITDB_ROOT_PASSWORDto initialize MongoDB’s root user and password. Set these values to user and password.
In the user’s domain service provider, for example, add an A Record for db.mydomain.com pointing to the HostIP of the MongoDB service.
Deploy the web app according to the target specifications:
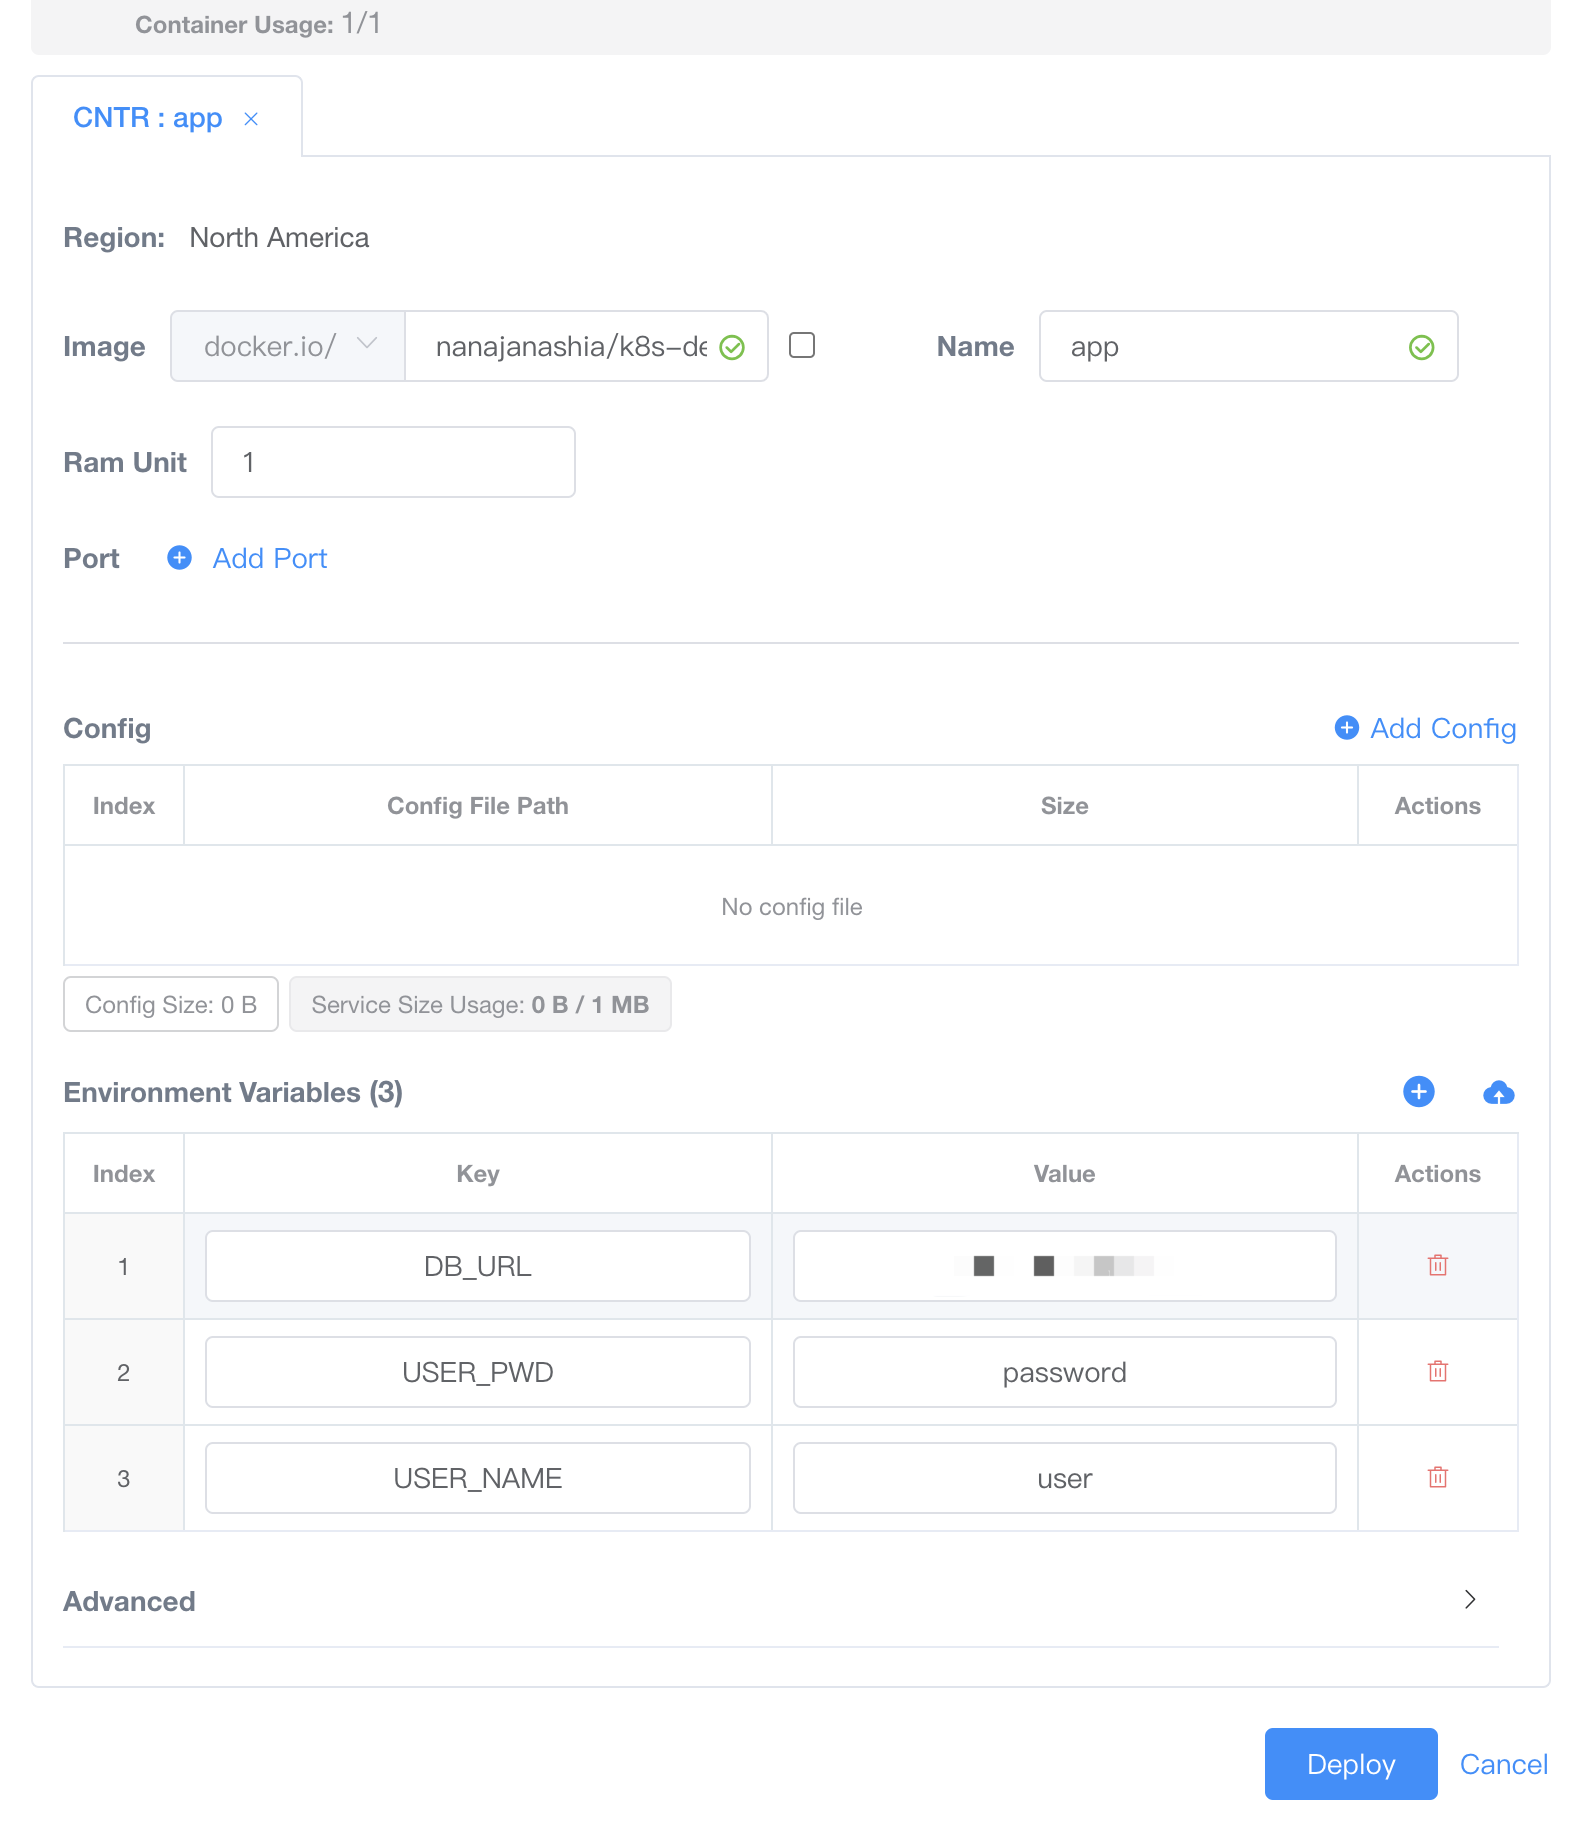
Image: Use the nanajanashia/k8s-demo-app:v1.0 image as the web application service.Name: appRam Unit: Only 1Gi of memory can be allocated (the total available is 1Gi, as 1 resource unit was purchased).Mount Path: None. As a web app service, no data storage path needs to be mounted.Port: No. Instead of using hostPort for communication, choose to useVKUBE’s HTTP domain proxy service as the communication path.Config: None. In this setup, configuration files are not used for parameter input.Environment Variables: Fill in the necessary environment variables according to your application. For this web app, the required parameters are:USER_NAME: user. This is the MongoDB username.USER_PWD: password. This is the MongoDB password.DB_URL:db.mydomain.com. This is the previously set domain, andVKUBEwill proxy this domain to the corresponding MongoDB service.
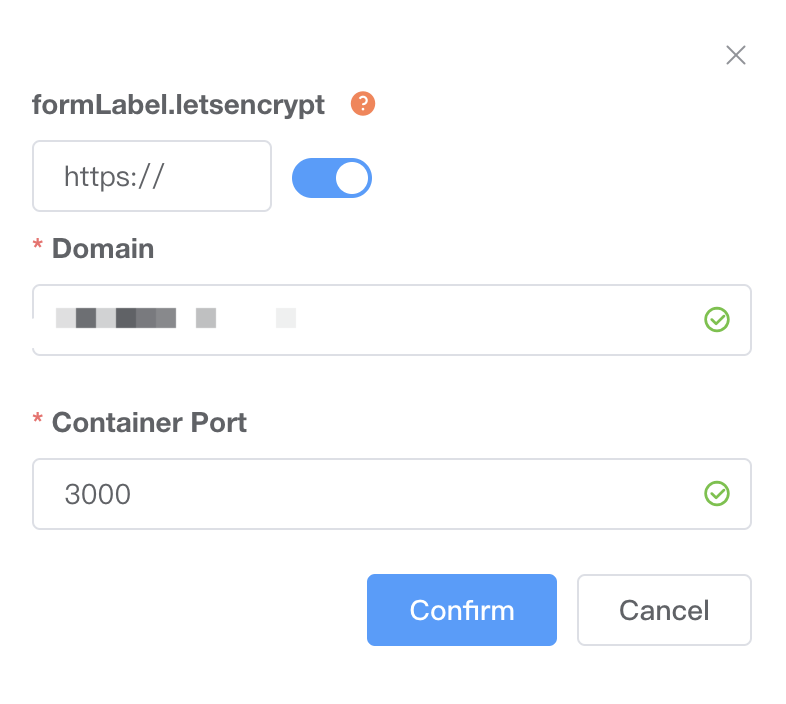
Here, you can also select the Domain button in the Actions menu to add a domain, such as app.mydomain.com.
As of now, two independent services have been deployed, communicating over domain names that are ultimately proxied to the corresponding services. The web app communicates with MongoDB using either db.mydomain.com:27017 (or HostIP:27017), while users access the web application via app.mydomain.com:80 in their browsers.
Note:
VKUBE’s domain service only provides application-layer proxy functionality for domain names and supports proxying solely for HTTP/HTTPS on ports 80 and 443.
Deploy two user services in the same region, using the Alias feature
In VKUBE, we can deploy two services in separate pods and use Alias for communication. Note that these two services must be in the same region. The basic requirements are similar to using hostPort, with the key difference being that hostPort is not needed during deployment.
Deploy MongoDB according to the target specifications:
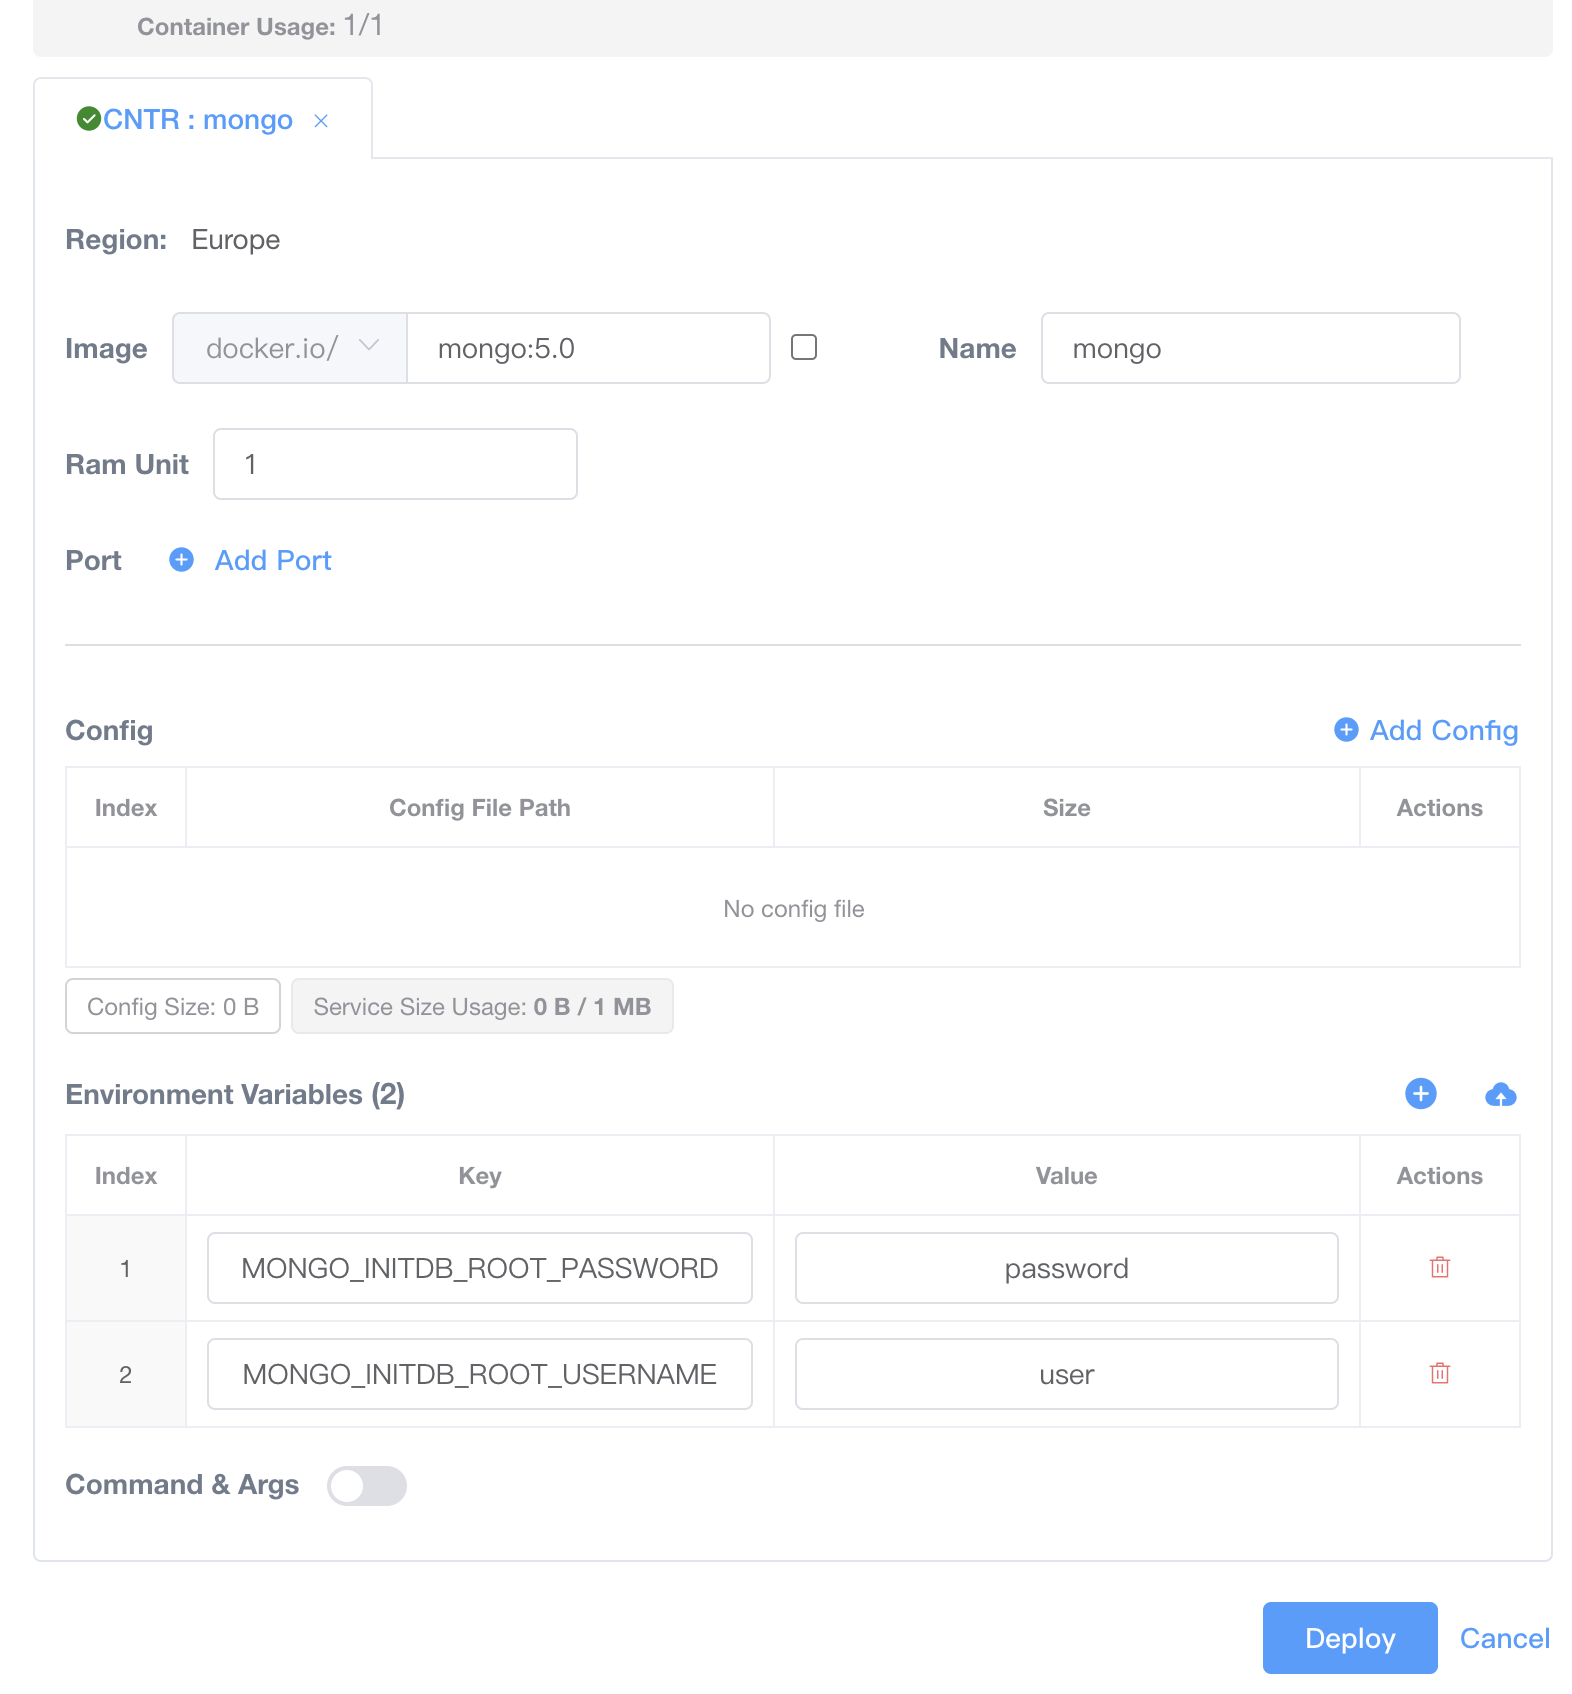
Image: Use themongo:5.0image as the DB service.Name: mongoRam Unit: Only 1Gi of memory can be allocated (the total available is 1Gi, as 1 resource unit was purchased).Mount Path: Enter/data/dbas the data storage path for persistence (since MongoDB’s default data storage path is/data/db).Port: No. This method does not use hostPort for communication.Config: None. In this setup, configuration files are not used for parameter input.Environment Variables:Enter the necessary environment variables:MONGO_INITDB_ROOT_USERNAMEandMONGO_INITDB_ROOT_PASSWORDto initialize MongoDB’s root user and password. Set these values to user and password.
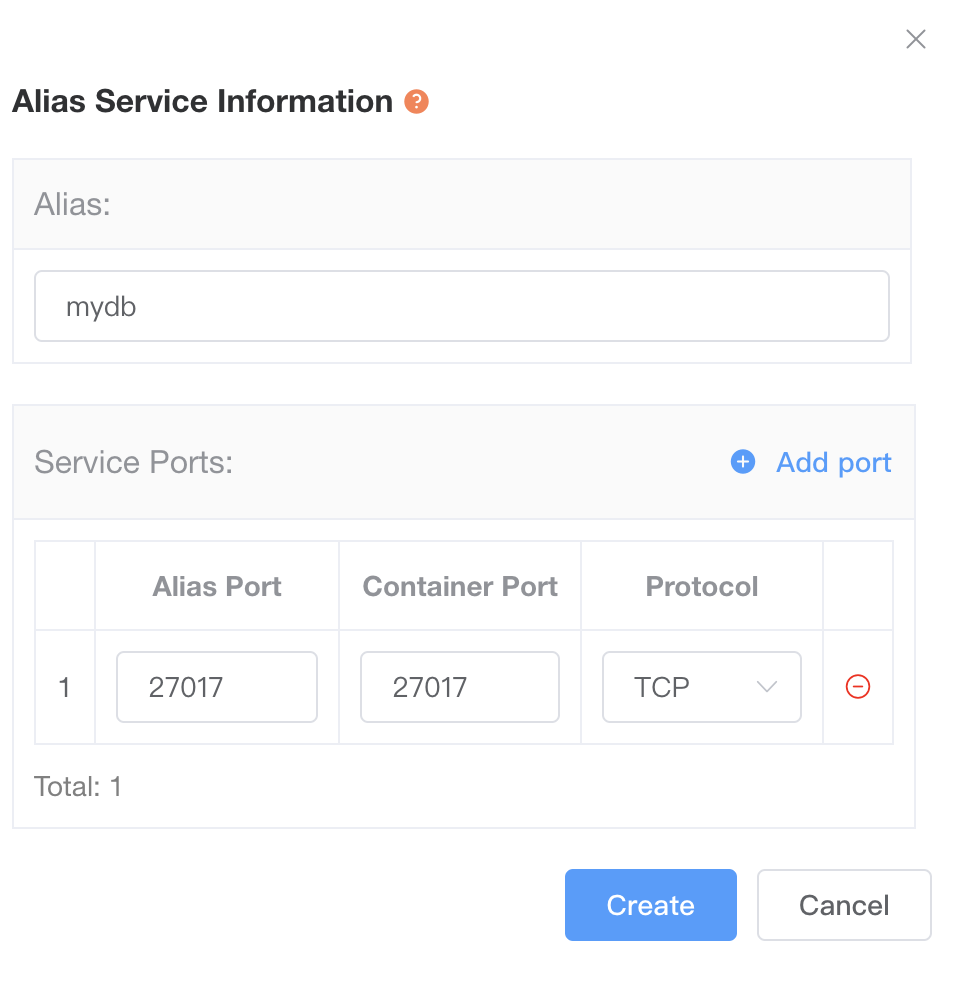
In the Actions menu, select the Alias button to add an alias. For example, the alias mydb has been added.
Deploy the web app according to the target specifications:

Image: Use the nanajanashia/k8s-demo-app:v1.0 image as the web application service.Name: appRam Unit: Only 1Gi of memory can be allocated (the total available is 1Gi, as 1 resource unit was purchased).Mount Path: None. As a web app service, no data storage path needs to be mounted.Port:Container Port:3000. Expose port 3000, as this application listens on that port.Host Port:12345. Choose 12345 as the mapped port. Once deployment is successful, you can access the service on the public network via HostIP:12345.
Config: None. In this setup, configuration files are not used for parameter input.Environment Variables: Fill in the necessary environment variables according to your application. For this web app, the required parameters are:USER_NAME: user. This is the MongoDB username.USER_PWD: password. This is the MongoDB password.DB_URL:mydb. This is the previously set alias, which allows communication only between services within the same region.
The web application service needs to expose its service using either hostPort or domain.
At this point, two independent services have been deployed, communicating over the network through a domain, ultimately proxied to the corresponding services. That is, the web app communicates with MongoDB via mydb:27017.
For additional control over network requests, use the Network Policy feature
Currently, VKUBE’s Network Policy provides a whitelist for network ingress settings, allowing users to specify which services within VKUBE are permitted to access a particular service.
For example, in the above case, a policy can be set for MongoDB to allow only the app service to access it, providing a security measure. This can be done by selecting the Policy button in the Actions menu and adding the policy.
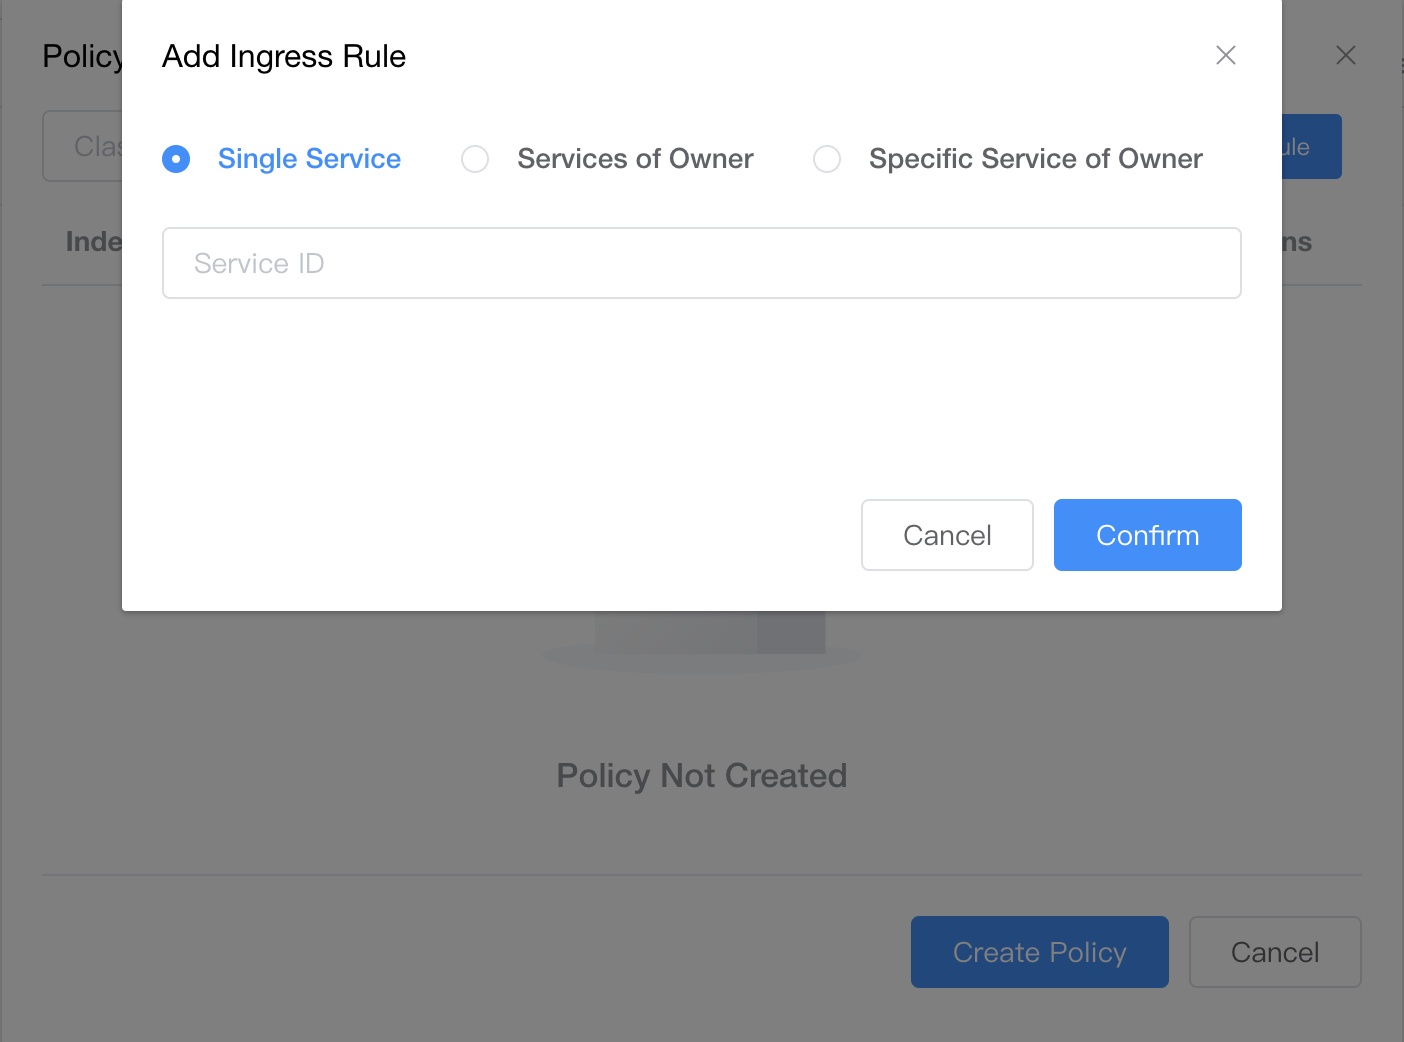
Enter the user service ID of the web app service in the input box.
Using multiple configuration files in VKUBE
In VKUBE, we can pass multiple configuration files as parameters to the container, allowing for dynamic updates of the configuration files. The following two examples will illustrate this.
Deploy a static website using Nginx as the web server and pass the static HTML content as a configuration file into the container. In the Nginx deployment:

The path for the configuration file is /usr/share/nginx/html/index.html, where we can write the static HTML content.
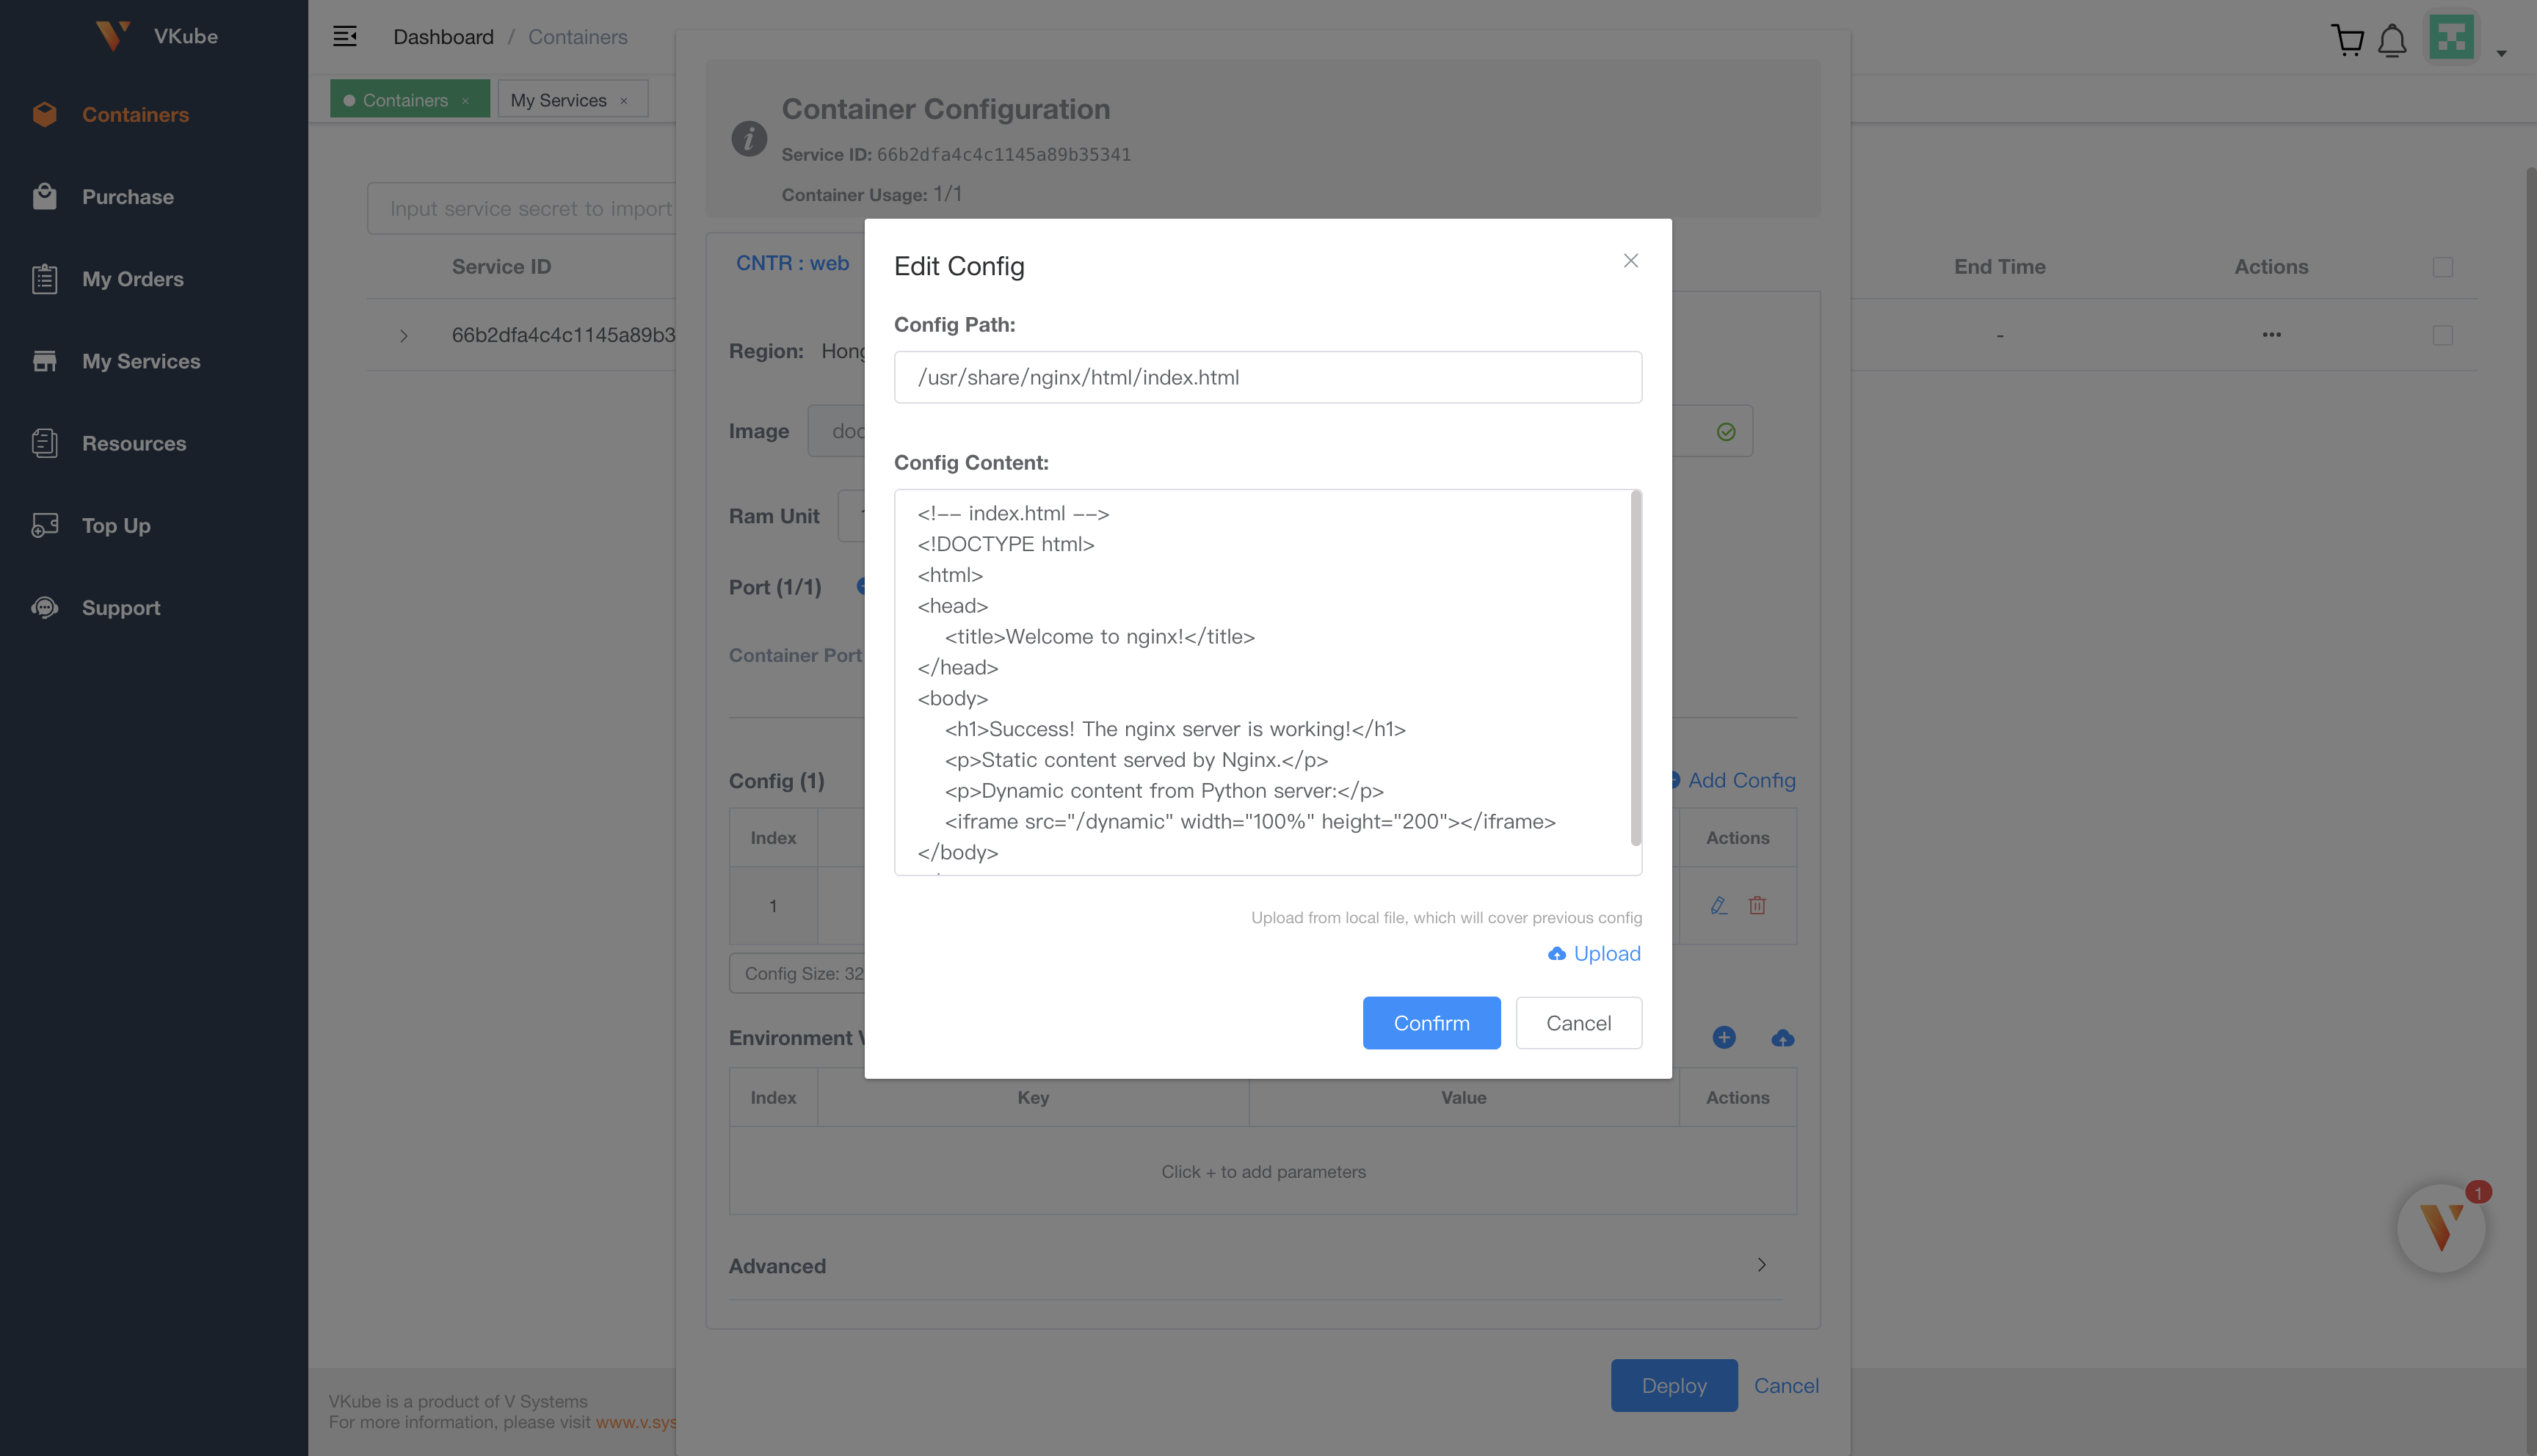
Image: The nginx:latest image is used as the web application service.Name: webRam Unit: Only 1Gi of memory can be allocated (the total available is 1Gi, as 1 resource unit was purchased).Mount Path: None. As a web app service, no data storage path needs to be mounted.Port:Container Port:80Host Port:12345. Port 12345 is selected for mapping. Once deployed successfully, the service can be accessed on the internet via HostIP:12345. A domain can be configured to facilitate access.
Config:Config Path:/usr/share/nginx/html/index.htmlConfig Content: Fill in the configuration file content; in this case, it should contain static HTML content.
Environment Variables: No. In this scenario, environment variables were not chosen to pass parameters.
In the Actions menu, select Config to view the currently configuration files and modify their content. Note that in Config, you can only change the content of the configuration files; you cannot add or delete configuration files, nor can you modify the file paths or names. After making changes, if the program does not support hot reloading, you will need to use the Restart function in Actions to restart the program and read the new configuration file content. To add or delete configuration files or modify their paths and names, you can handle this in Redeploy.
Run two containers in a single Pod: one container runs Nginx to serve a static webpage via a configuration file, while the other container hosts a simple HTTP server (e.g., Python’s http.server) to provide dynamic content.
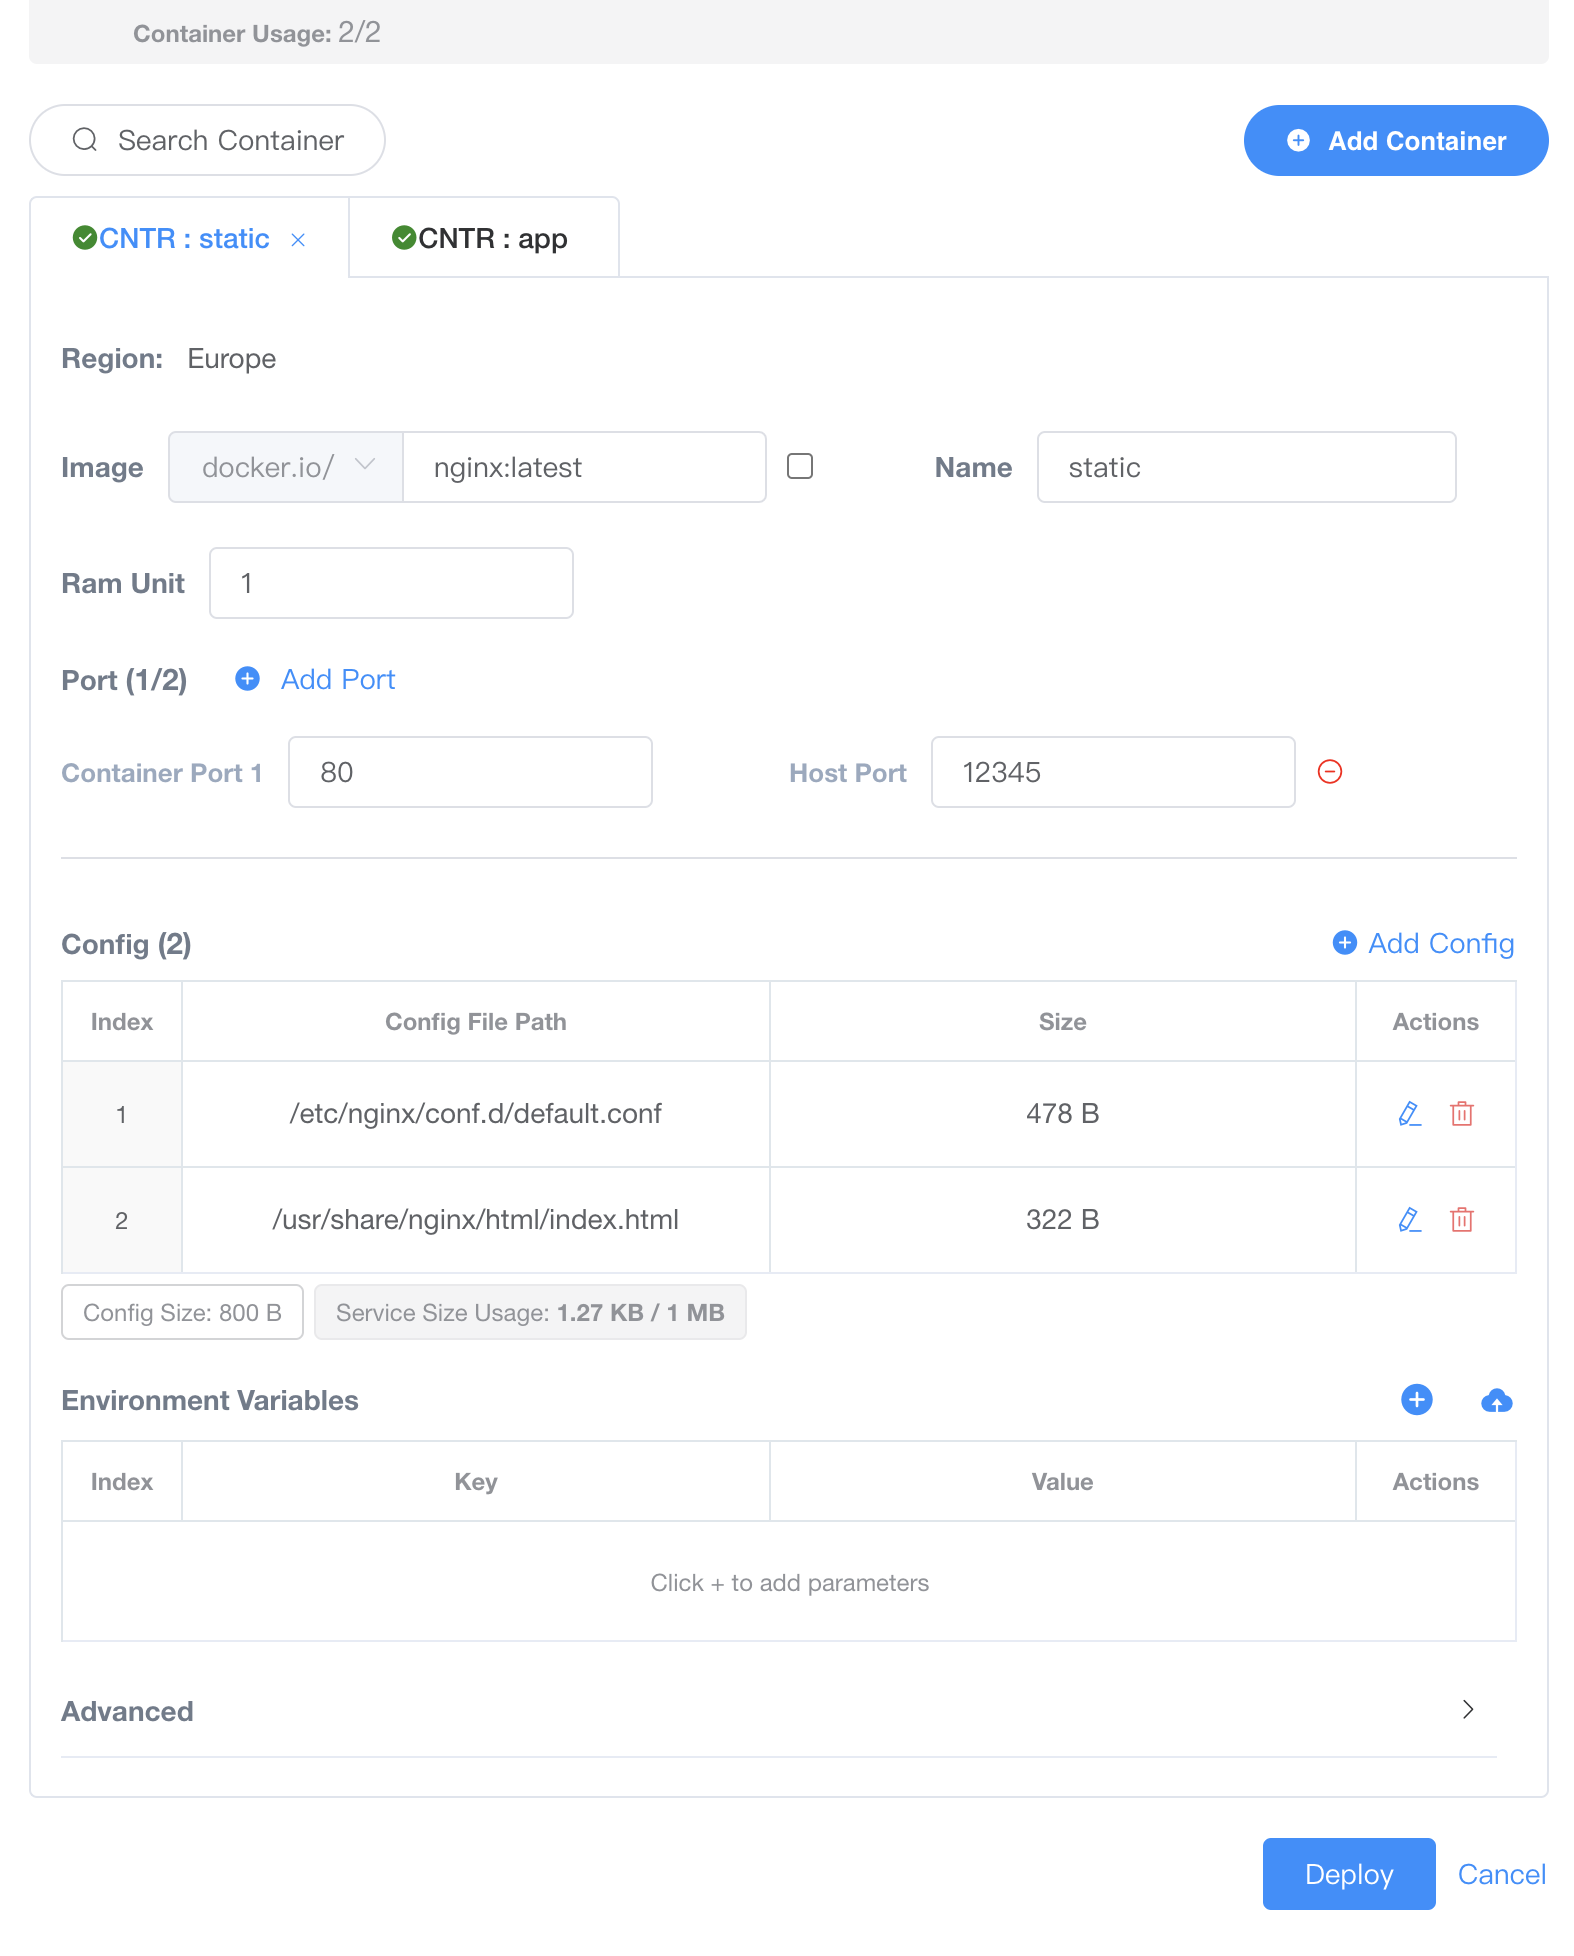
Image: The nginx:latest image is used as the web application service.Name: webRam Unit: Only 1Gi of memory can be allocated (the total available is 1Gi, as 1 resource unit was purchased).Mount Path: None. As a web app service, no data storage path needs to be mounted.Port:Container Port:80Host Port:12345. Port 12345 is selected for mapping. Once deployed successfully, the service can be accessed on the internet via HostIP:12345. A domain can be configured to facilitate access.
Config:Config Path:/usr/share/nginx/html/index.htmlConfig Content: Fill in the configuration file content; in this case, it should contain static HTML content.
Config Path:/etc/nginx/conf.d/default.confConfig Content: Fill in the configuration file with the default Nginx configuration content, adding a route to access the app service.
Environment Variables: No. In this scenario, environment variables were not chosen to pass parameters.
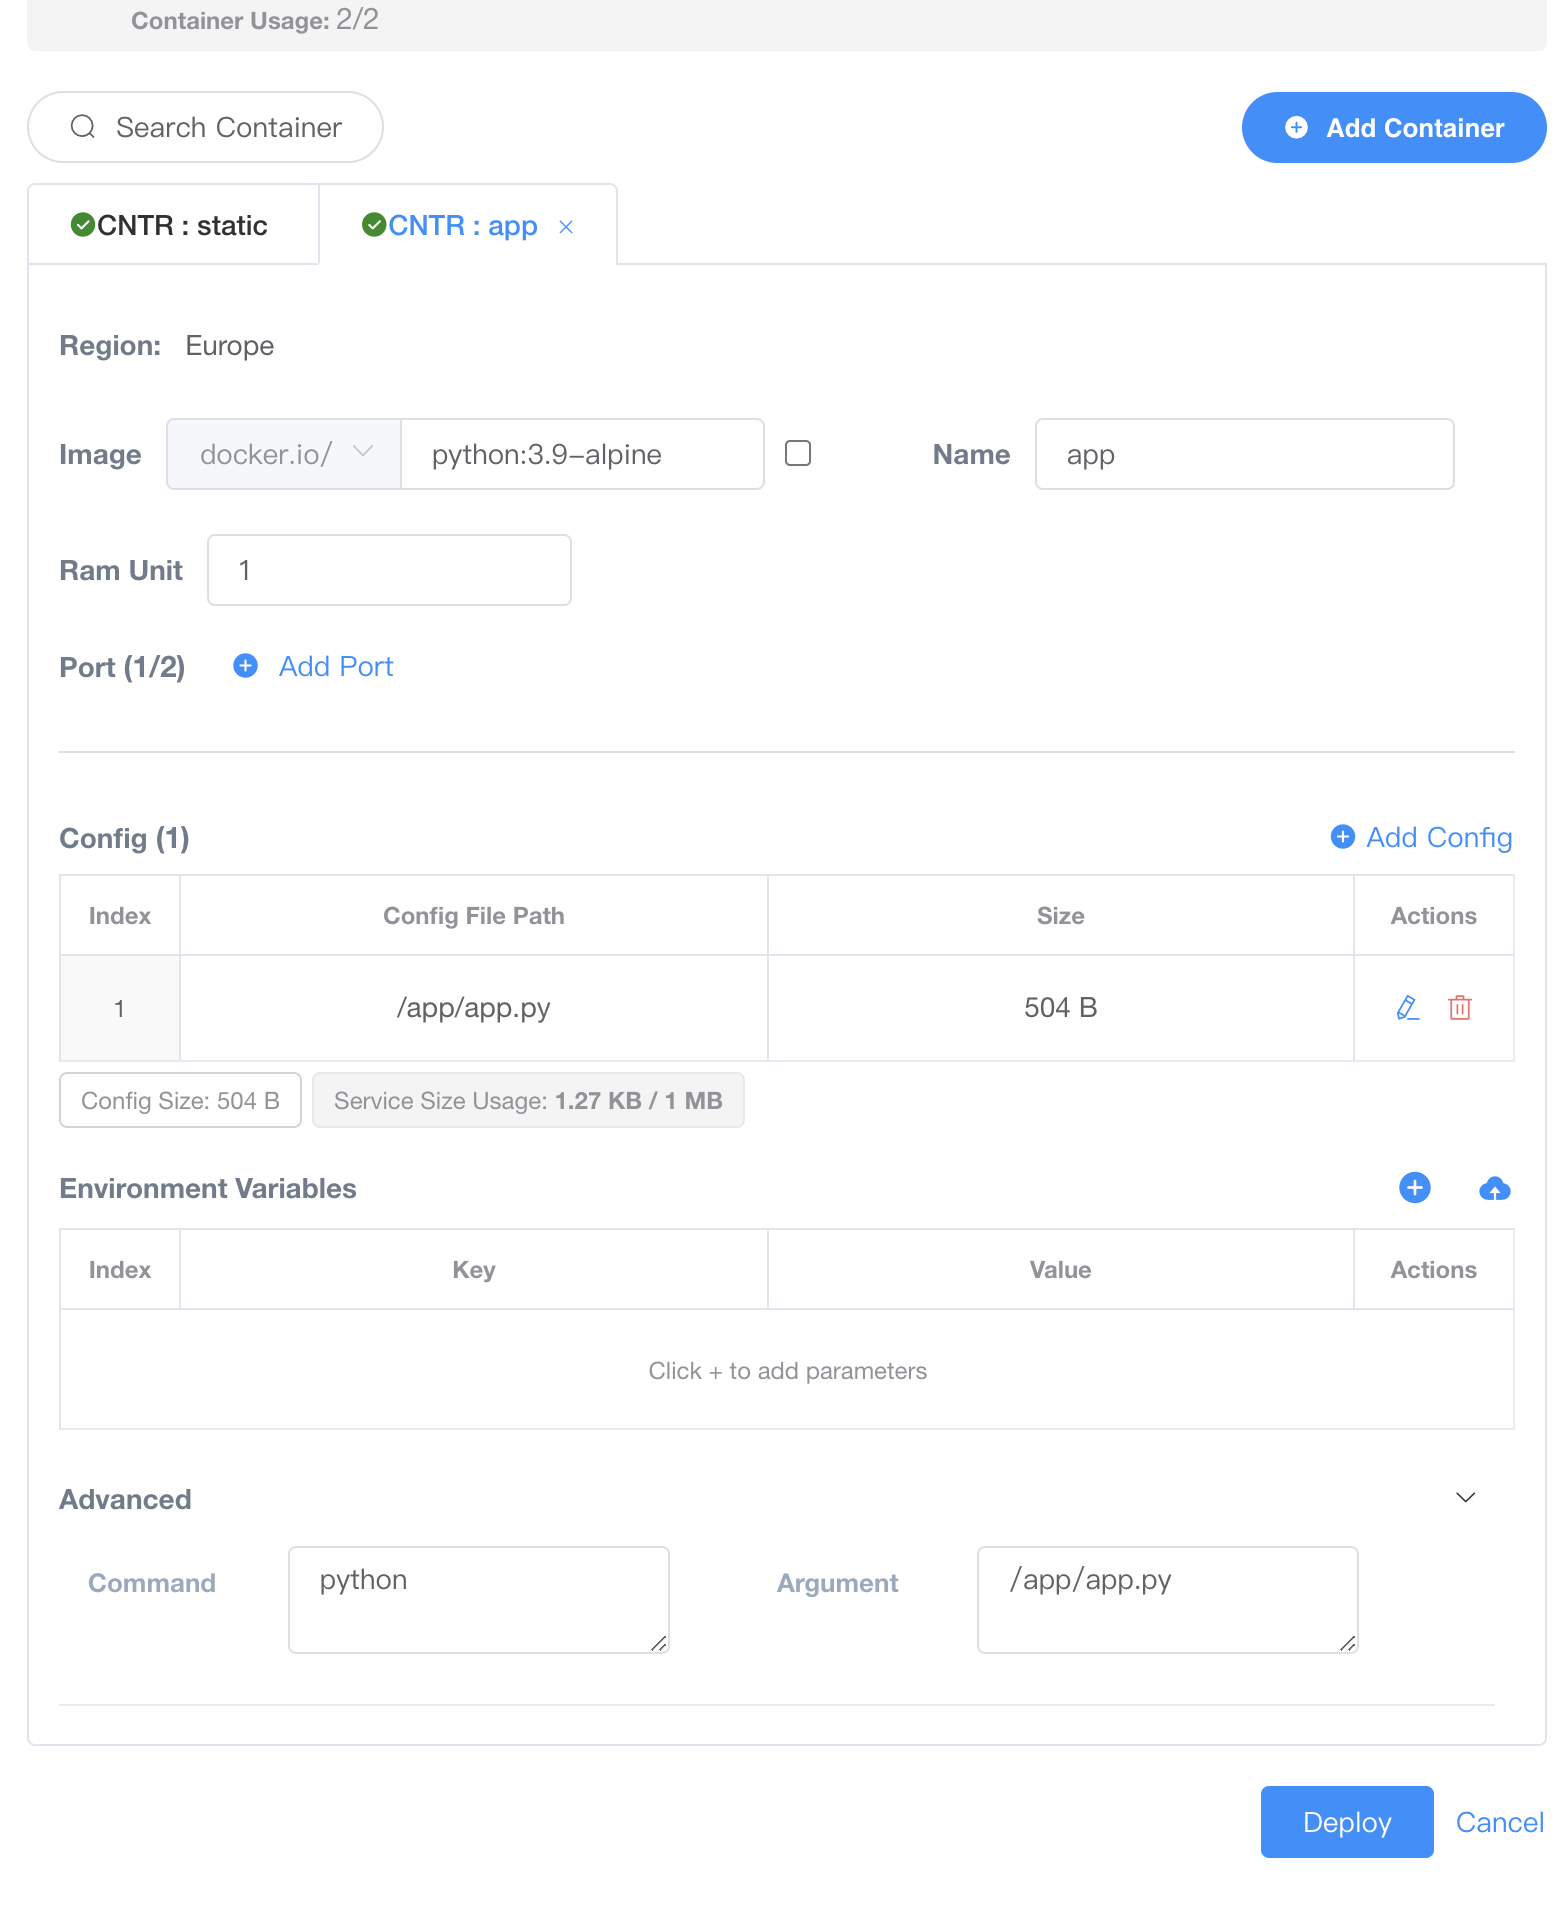
Image: Used the python:3.9-alpine image as the web application service.Name: appRam Unit: Only 1Gi of memory can be allocated (the total available is 1Gi, as 1 resource unit was purchased).Mount Path: None. As a web app service, no data storage path needs to be mounted.Port: Communication is established through localhost.Config:Config Path:/app/app.pyConfig Content: Fill in the configuration file content. In this example, it includes a simple Python HTTP server script.
Environment Variables: No. In this scenario, environment variables were not chosen to pass parameters.
The final deployment result allows access to a static webpage via HostIP:12345, with content served by the /usr/share/nginx/html/index.html configuration file. Requests are routed according to rules set in /etc/nginx/conf.d/default.conf and served by a simple HTTP service powered by the Python script located at /app/app.py.