V Kube Web Console
This web page helps user to view detail information of pod which ordered from v-cloud.
After making an order, user can get secret from provider SDK node through user cli. In this webpage user can view order information through adding secrets which will be stored in local storage and will not be uploaded to server. Once user has opened the page, web will load secrets from local storage for retreiving pod informations from backend.
In the main screen, there will be three buttons, log, deploy and delete, for undeployed secrets, but two for deployed secrets. User can use log button to open a dialog to view log from pod. delete button will remove secret from local storage , and pod will not be affected (secret is able to add back to pod list in web page later). If the pod hasn't be deployed yet, the deploy button will be visible for user. When clicking deploy button, it will open a dialogue for deploying pod.
Addition or deletion of secrets will not modify order information or pod status. But pod cannot be deployed again after first deployment.
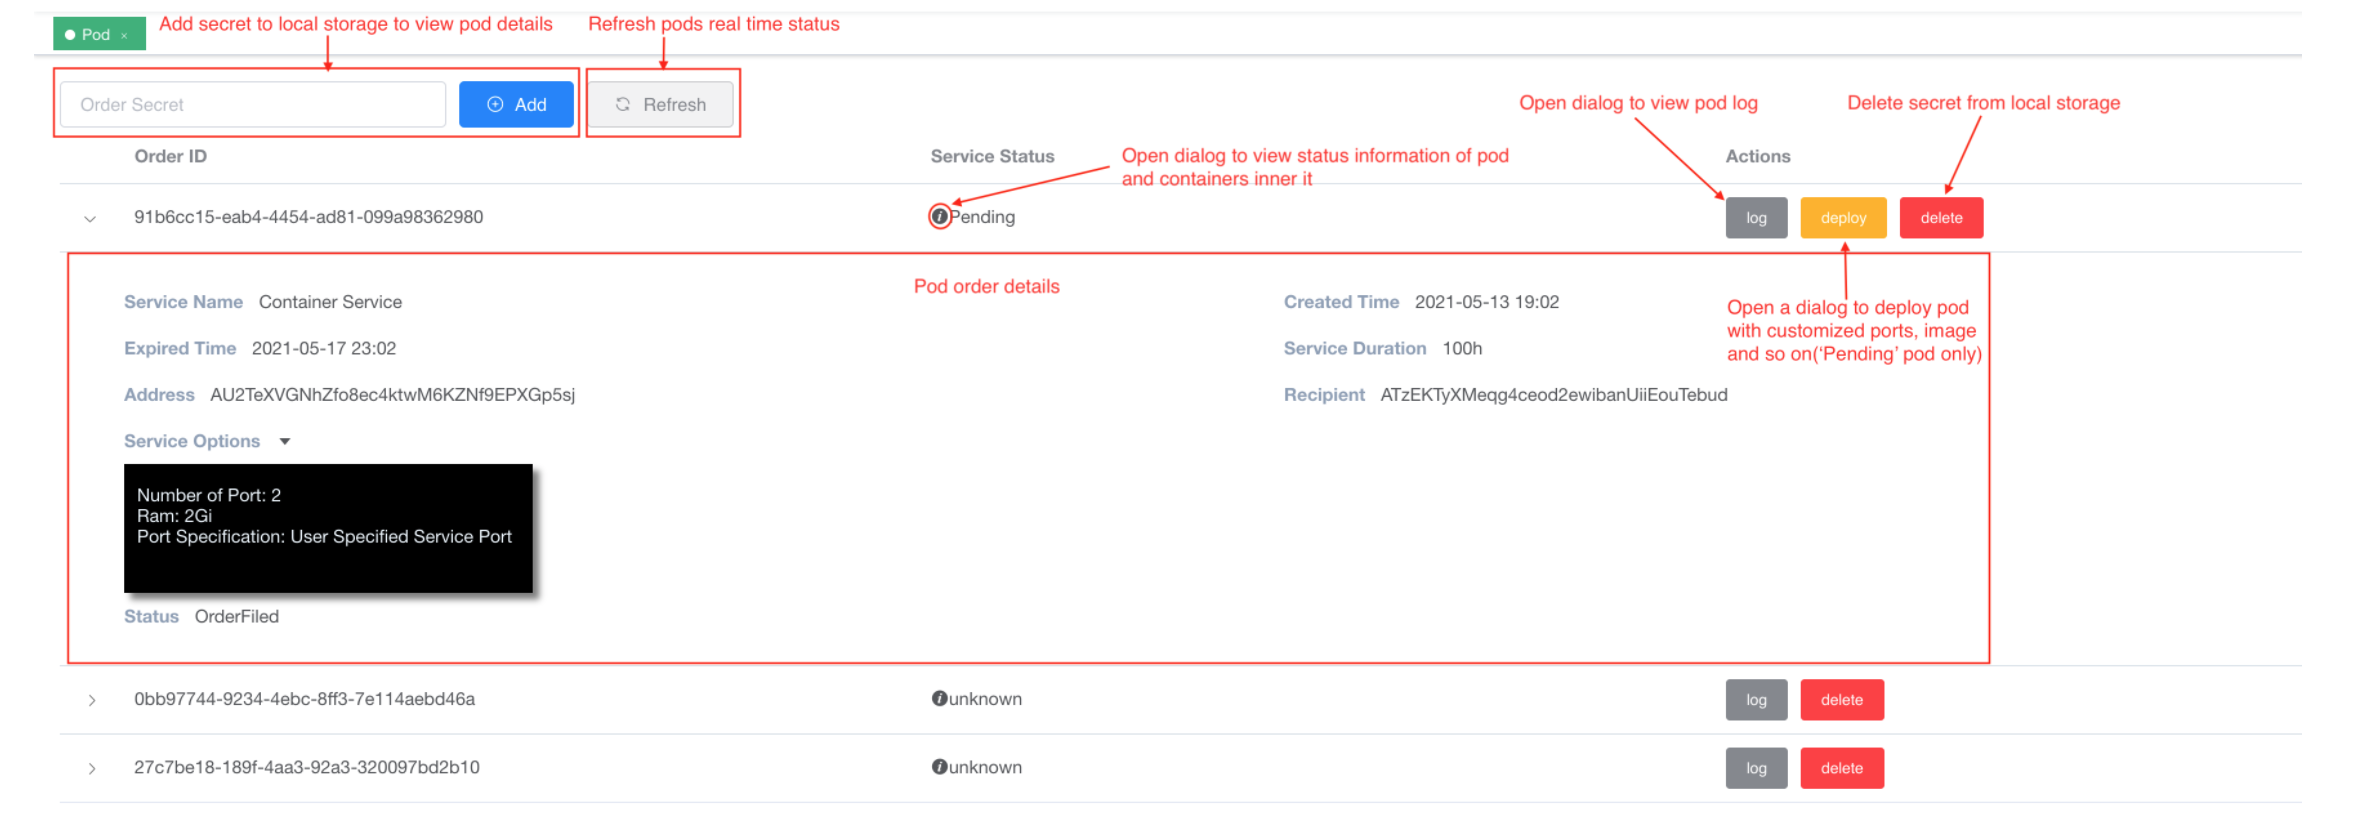
Pod table structure
In the upper left corner of web, there is a text field for inputting secret. Add button (After adding the secret, the new pod will be added to pod list. If an invalid secret is added, a warning notification will be shown.) and Refresh button (refresh pods status)
Each row of data represents an order of pod. Order ID is id of order which buy a pod, Service Status mean current status of pod in this order(info icon in the left of status is a small button to open a dialog to view pod status in json format). Actions provides button group to manipulate the pod or related secret stored in local storage .
Actions area can have three types of button:
logbutton: Open dialog to view real time log from pod. Once pod has generated new log, these log will be pushed to the dialog.deletebutton: Delete secret from local storage. Deleting will not affect pod's operation and modify order data.deploybutton: For a pod has never deployed, this button will be presented inActionarea of that order. It will open a dialog which allow user to deploy pod with custom configuration. Once pod has been deployed, this button will not be presented again.
User can click arrow icons locate in left side of each row to open a collapse which contains details of a order. It contains the following attributes:
Service Name: Service name of the pod defined by creator.
Creared Time: Order create time.
Expired Time: Expired time of service(user cannot use the pod after that time)
Service Duration: Total duration which user can use the service.
Address: VSYS coin wallet address used to make the order
Recipient VSYS coin wallet address of merchant provide the service
Service Option: Pod configure information. These information is embedded inner a black collapse which can be open by clicking arrow icon besides the attribute name.
Status: current order status

Pod deployment dialog
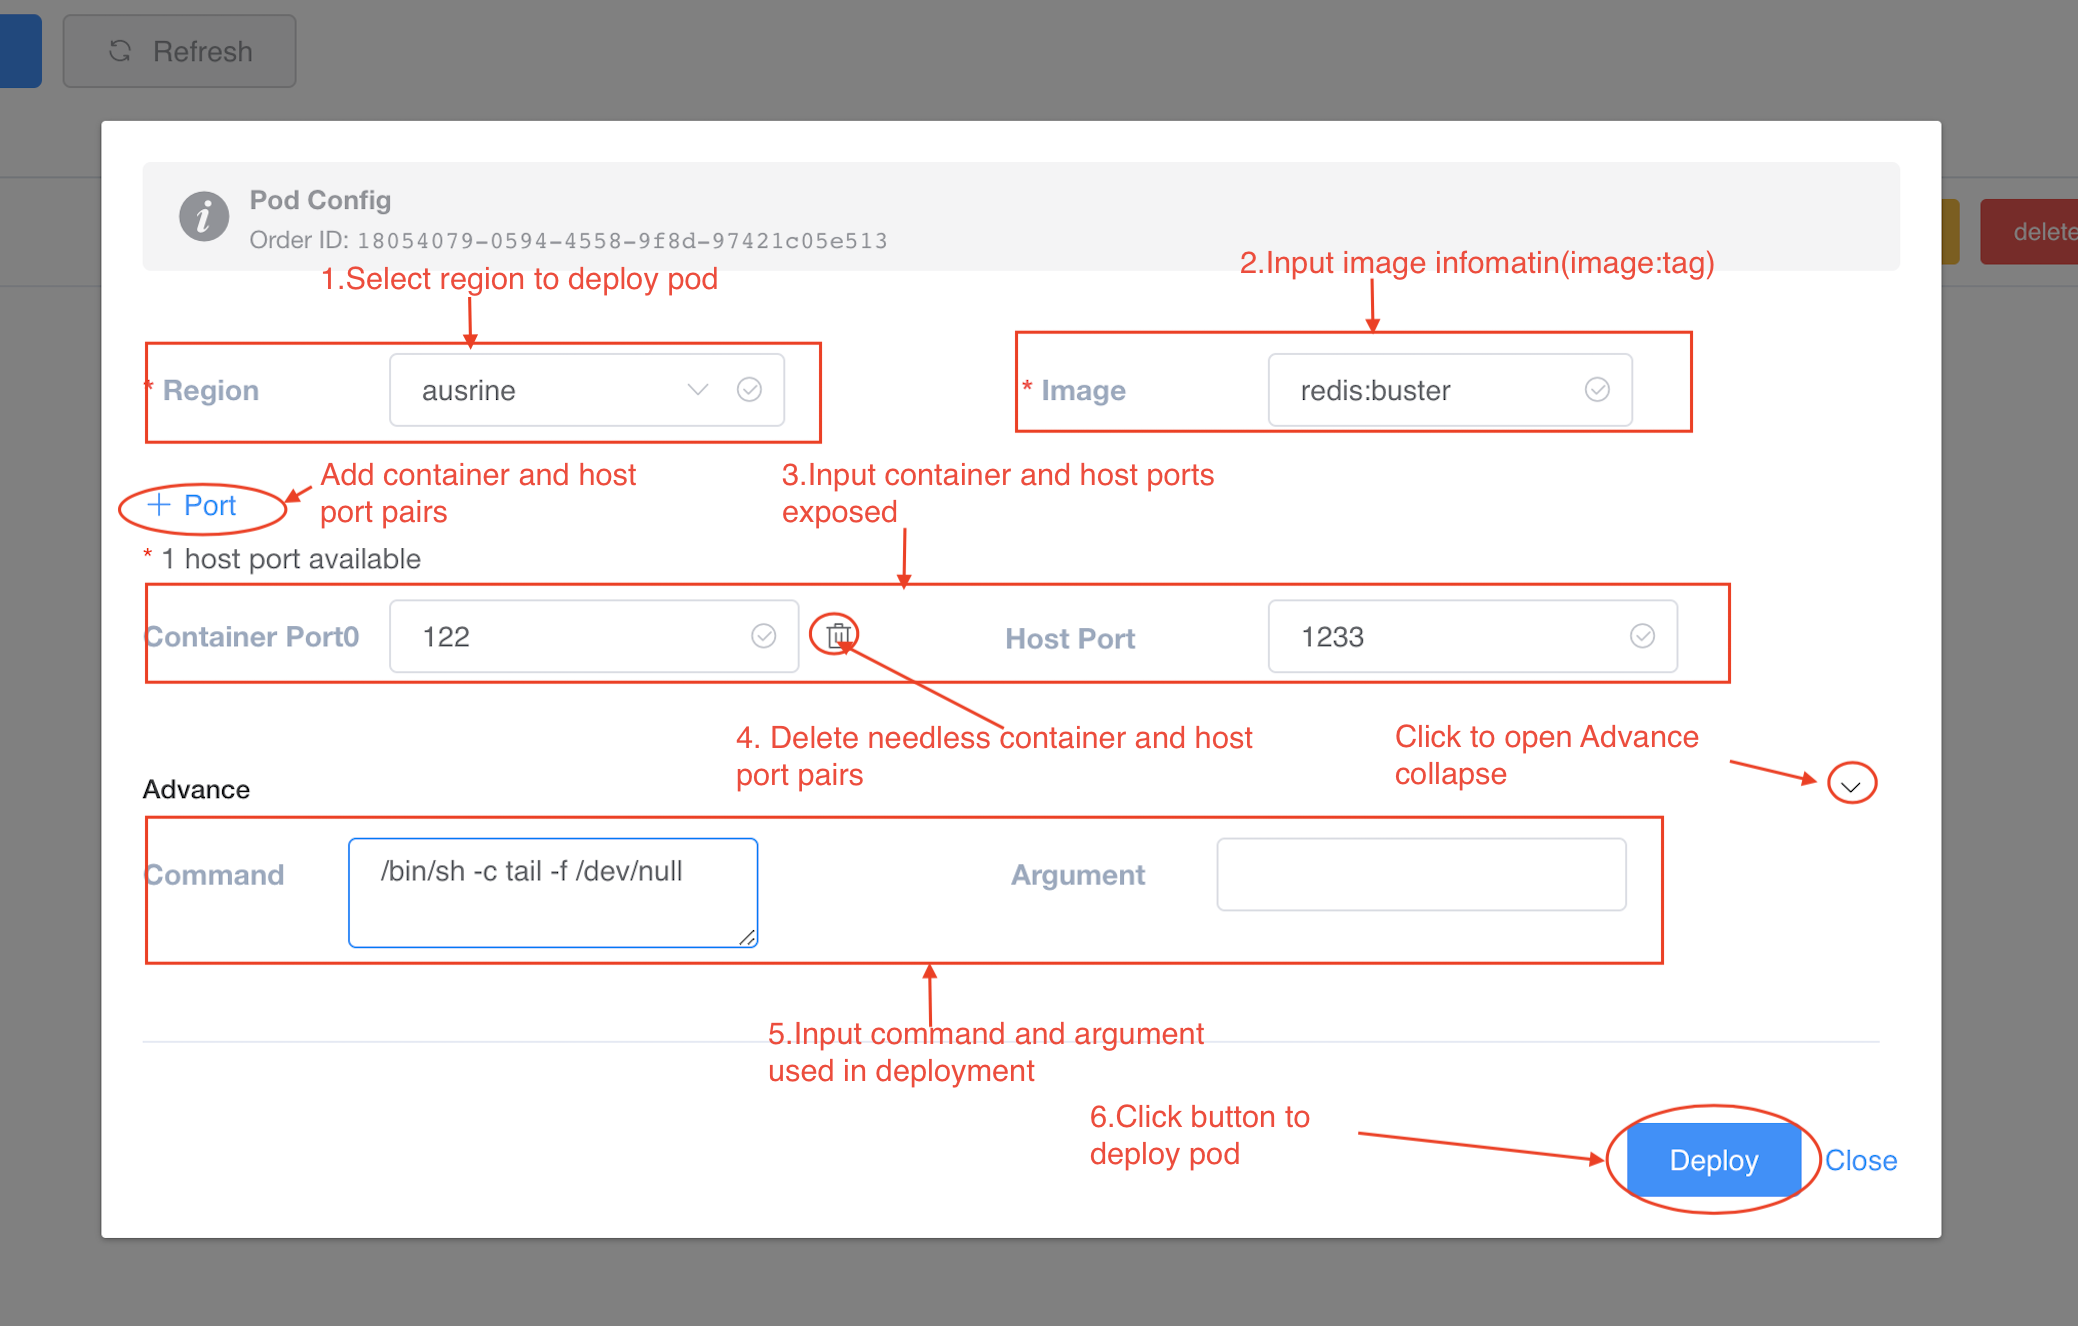
After user makes a order, the Service Status of pod is Pending in the web, action area of the row will present deploy button. At the same time, the webpage currently only support one container deployment inner a pod. Please deploy pod with caution, because of no second chance to deploy pod after first successful deployment. Click deploy button of pod you want to deploy to open dialog, then follow the below steps:
- Select
Regionto deploy pod.(whenRegionis empty, textfields of container and host port are readonly) - Input docker image name with tags in format of
image:tag. User has to ensure image is public readable in Docker Hub. If the image doesn't exist in Docker Hub or is in wrong format, a hint with error message will be shown below the textfield. - Click
+Portbutton to add container and host port pairs( In a pair, both of container and host port cannot be empty). Below the button, message1 host port availabletells user the number of port pairs can be used. Number of port is defined byNumber Of PortfromService Optionin the order. Container port ranges from 1 to 65535, and ports numbers cannot be repeatly used within a container. System will check if a host port is occupied in selectedRegion. - Click delete icon to remove container and host port pair.
- (Optional) Click arrow icon at the row of
Advanceto input command and argument for pod deployment. - After finishing configuring, click
deploybutton to validate. If validation failed, an error message will be shown below corresponding fields. Or it will send configuration data to server for deploying pod.

As a result of successful deployment, deployment dialog will be closed and success alert will pop up. But dialog will keep open if failed to deploy, and user receives a failure alert.
Pod log dialog
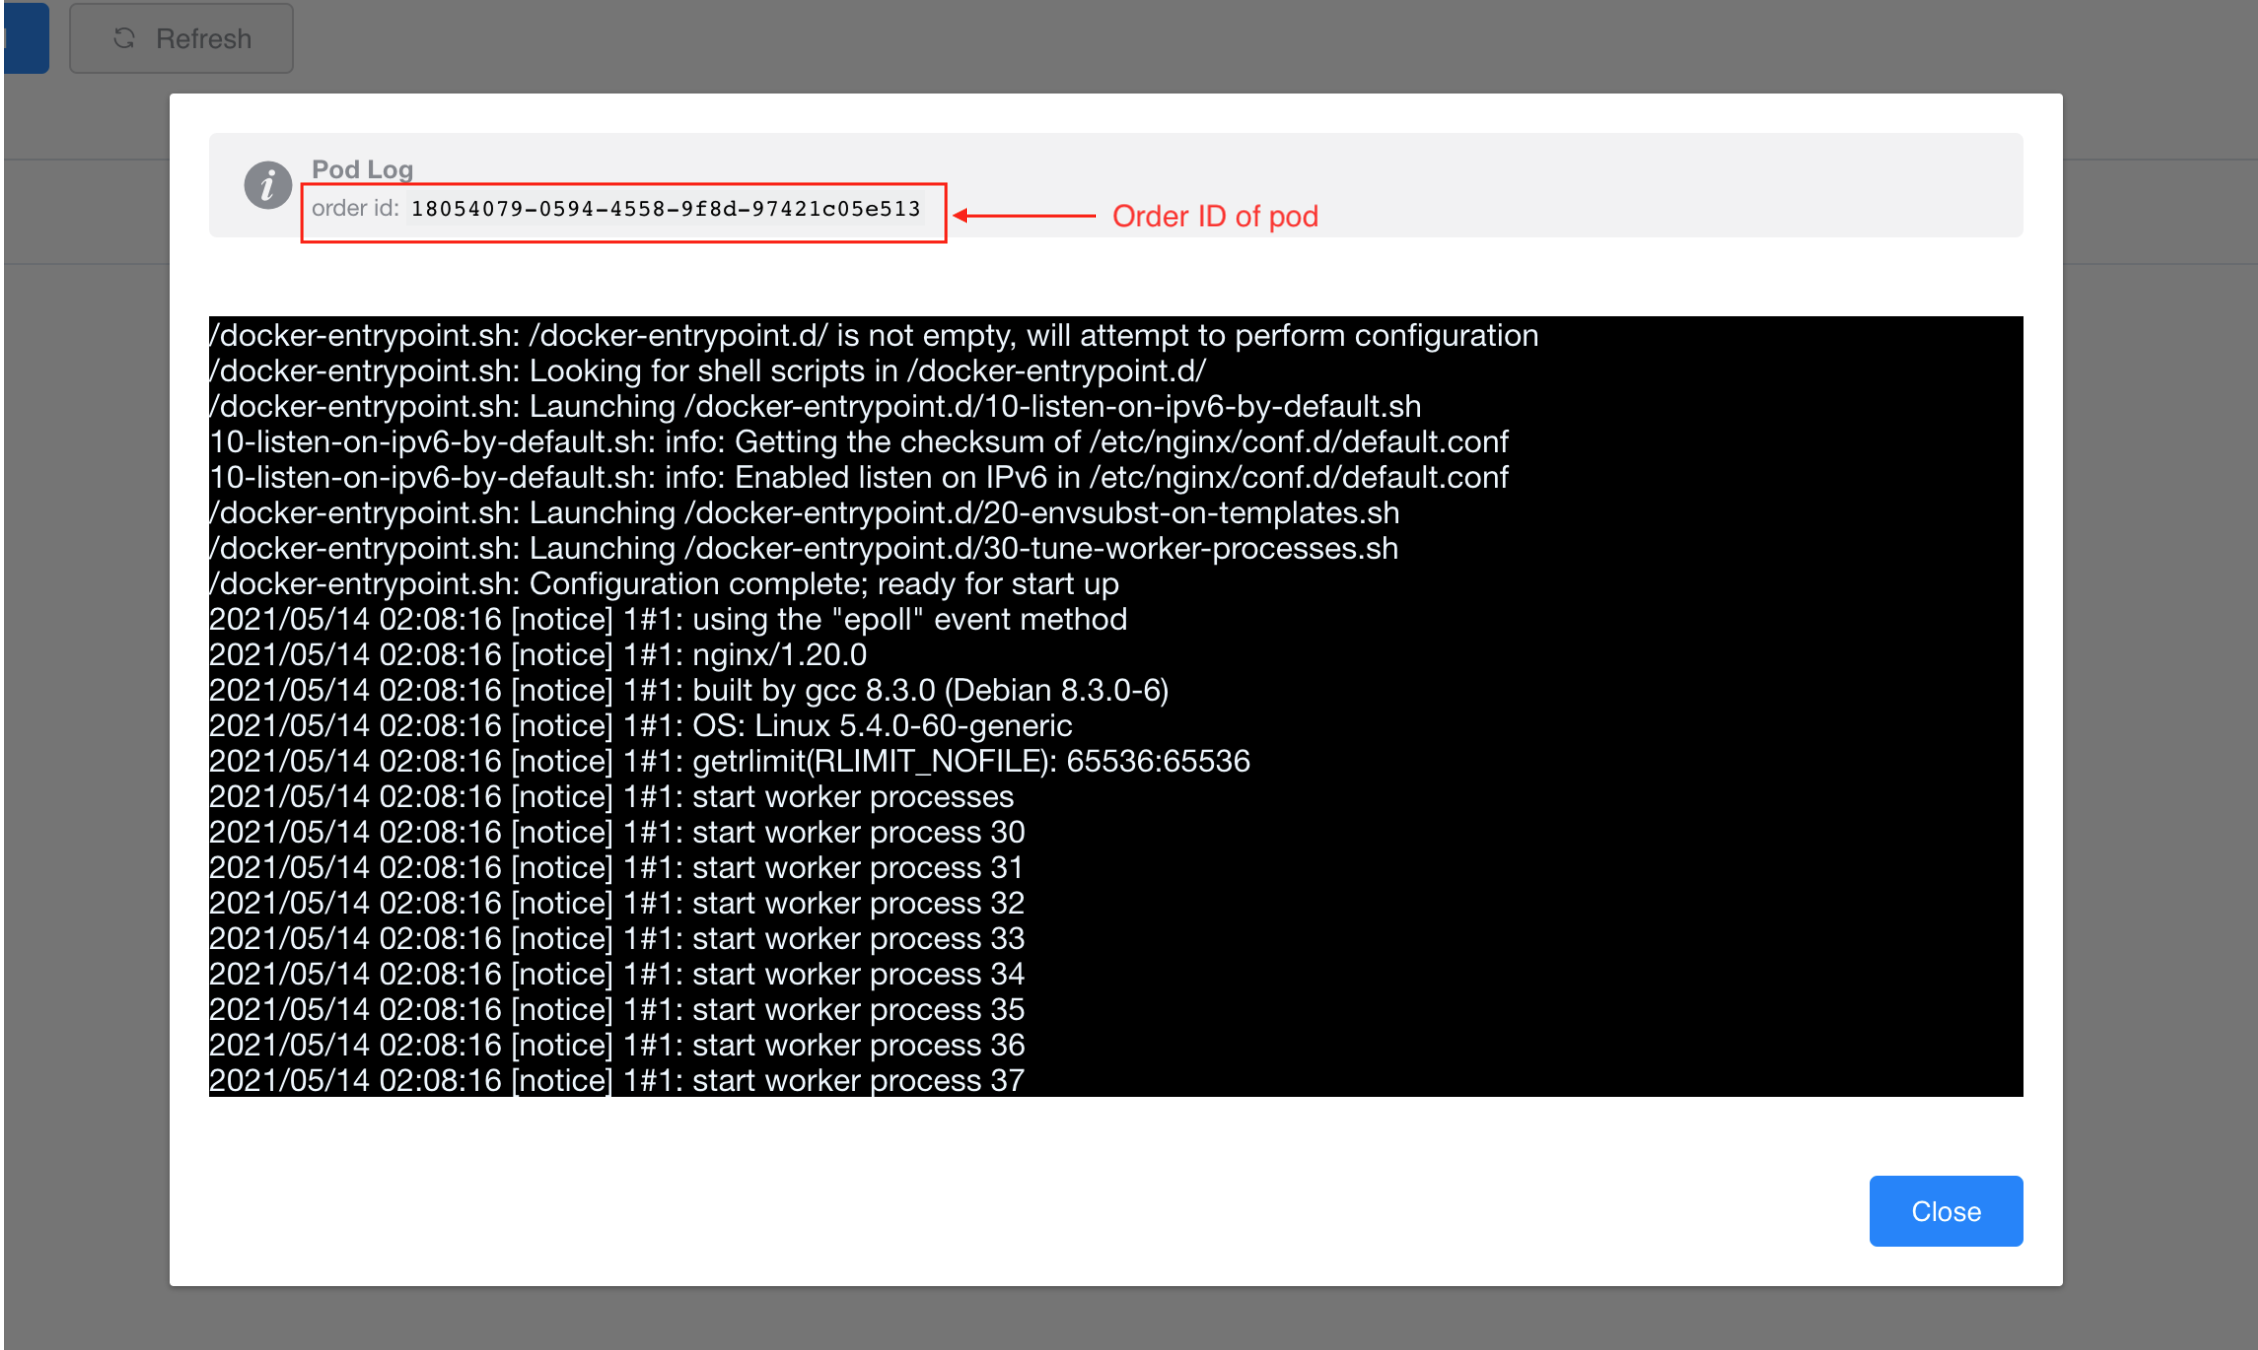
When deployment is finished, user can open log dialogue to check log from pod in real time. But there are some cases that terminal area will output error messages in red color. Such as pod has shut down , web failed to connect to server using source event, or pod has never been deployed.

Pod status details dialog
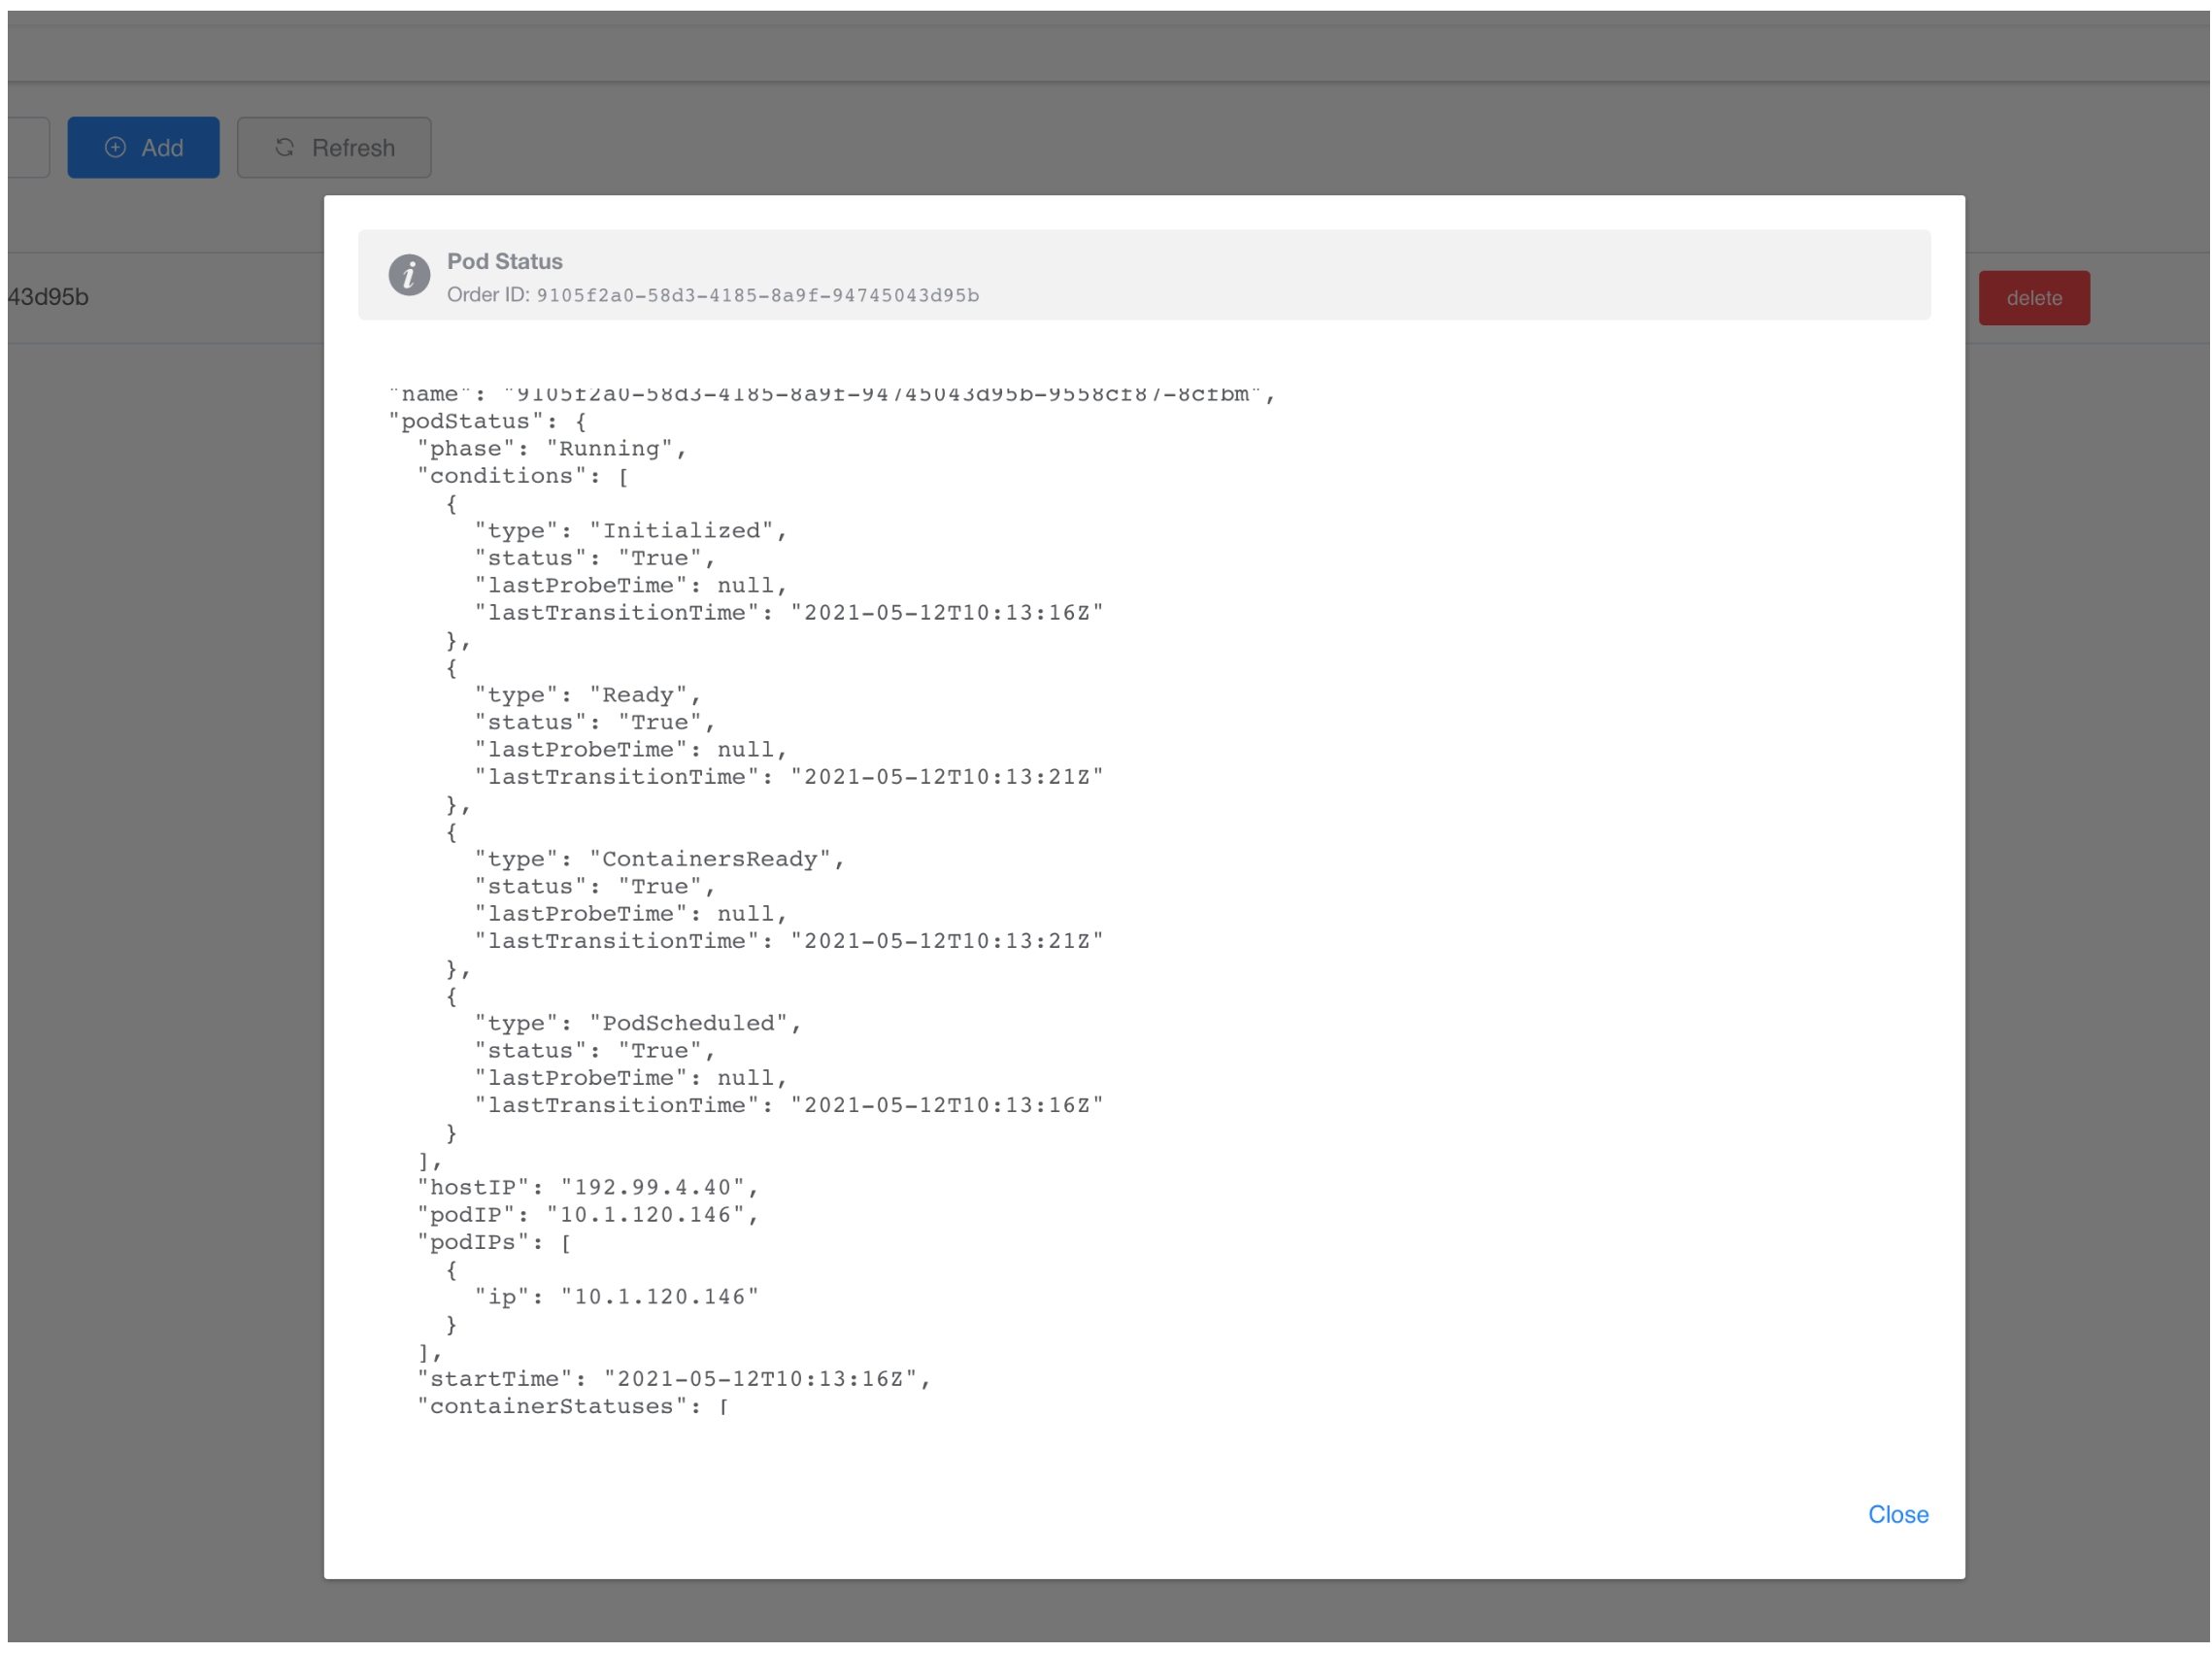
If pod is deployed successfully, user can view pod detail which contains container configuration, current status, pod historical status record and so on. But if web cannot get pod status information or pod is not running, dialog will present an empty json{}
